This tutorial is one of four that put into practice concepts from Microservices March 2022: Kubernetes Networking:
- Reduce Kubernetes Latency with Autoscaling
- Protect Kubernetes APIs with Rate Limiting
- Protect Kubernetes Apps from SQL Injection
- Improve Uptime and Resilience with a Canary Deployment (this post)
Want detailed guidance on using NGINX for even more Kubernetes networking use cases? Download our free eBook, Managing Kubernetes Traffic with NGINX: A Practical Guide.
Your organization is successfully delivering apps in Kubernetes and now the team is ready to roll out version 2 of a backend service. But there are valid concerns about traffic interruptions (a.k.a. downtime) and the possibility that v2 might be unstable. As the Kubernetes engineer, you need to find a way to ensure v2 can be tested and rolled out with little to no impact on customers.
You decide to implement a gradual, controlled migration using the traffic‑splitting technique called canary deployment because it’s a safe and agile way to test the stability of a new feature or version. Your use case involves traffic moving between two Kubernetes services, so you choose to use F5 NGINX Service Mesh because it’s easy to deploy and delivers reliable results. You send 10% of your traffic to v2 with the remaining 90% still routed to v1. Stability looks good, so you gradually transition larger and larger percentages of traffic to v2 until you reach 100%. Problem solved!
Lab and Tutorial Overview
This blog accompanies the lab for Unit 4 of Microservices March 2022 – Advanced Kubernetes Deployment Strategies, demonstrating how to use NGINX Service Mesh for a canary deployment.
To run the tutorial, you need a machine with:
- 2 CPUs or more
- 2 GB of free memory
- 20 GB of free disk space
- Internet connection
- Container or virtual machine manager, such as Docker, HyperKit, Hyper-V, KVM, Parallels, Podman, VirtualBox, or VMware Fusion/Workstation
- minikube installed
- Helm installed
- A configuration that allows you to launch a browser window. If that isn’t possible, you need to figure out how to get to the relevant services via a browser.
To get the most out of the lab and tutorial, we recommend that before beginning you:
- Watch the recording of the livestreamed conceptual overview
- Review the background blogs, webinar, and video
-
Watch the video summary of the lab:
This tutorial uses these technologies:
- NGINX Service Mesh
- Grafana
- Helm
- Jaeger
- minikube
- NATS
- Prometheus
- SPIRE
- Two sample apps, defined in the YAML files discussed below
The instructions for each challenge include the complete text of the YAML files used to configure the apps. You can also copy the text from our GitHub repo. A link to GitHub is provided along with the text of each YAML file.
This tutorial includes three challenges:
- Deploy a Cluster and NGINX Service Mesh
- Deploy the Frontend and Backend Apps
- Use NGINX Service Mesh to Implement a Canary Deployment
Challenge 1: Deploy a Cluster and NGINX Service Mesh
In this challenge, you deploy a minikube cluster and NGINX Service Mesh.
Create a Minikube Cluster
Deploy a minikube cluster. After a few seconds, a message confirms the deployment was successful.
$ minikube start \
--extra-config=apiserver.service-account-signing-key-file=/var/lib/minikube/certs/sa.key \
  --extra-config=apiserver.service-account-key-file=/var/lib/minikube/certs/sa.pub \
  --extra-config=apiserver.service-account-issuer=kubernetes/serviceaccount \
  --extra-config=apiserver.service-account-api-audiences=api
🏄  Done! kubectl is now configured to use "minikube" cluster and "default" namespace by default
Did you notice this minikube command looks different from the ones in other Microservices March tutorials? The additional --extra-config arguments enable the Kubernetes ServiceAccount token volume projection feature as required by NGINX Service Mesh.
With this feature enabled, the kubelet mounts a service account token into each pod, which uniquely identifies the pod in the cluster. The kubelet takes care of rotating the token at a regular interval.
To learn more, see Authentication between microservices using Kubernetes identities on the learnk8s blog.
Deploy NGINX Service Mesh
NGINX Service Mesh is developed and maintained by F5 NGINX. It includes a free version of the commercial NGINX Plus software as the sidecar.
There are two options for installation:
- With the NGINX Service Mesh command‑line utility,
nginx‑meshctl. - With Helm. This is the simpler and quicker method, so we use it in this tutorial.
Perform these steps:
-
Download and install NGINX Service Mesh:
$ helm install nms ./nginx-service-mesh --namespace nginx-mesh --create-namespace -
Confirm that the NGINX Service Mesh pods are deployed, as indicated by the value
Runningin theSTATUScolumn.It might take a couple of minutes for all pods to deploy. In addition to the NGINX Service Mesh pods, there are pods for Grafana, Jaeger, NATS, Prometheus, and SPIRE. Check out the docs for information on how these tools work with NGINX Service Mesh.
$ kubectl get pods --namespace nginx-mesh
NAME                                  READY   STATUS
grafana-7c6c88b959-62r72              1/1     Running
jaeger-86b56bf686-gdjd8               1/1     Running
nats-server-6d7b6779fb-j8qbw          2/2     Running
nginx-mesh-api-7864df964-669s2        1/1     Running
nginx-mesh-metrics-559b6b7869-pr4pz   1/1     Running
prometheus-8d5fb5879-8xlnf            1/1     Running
spire-agent-9m95d                     1/1     Running
spire-server-0                        2/2     Running
Challenge 2: Deploy the Frontend and Backend Apps
In this challenge, you deploy two microservices apps:
- backend-v1 – A business‑logic app that serves data to the frontend microservice via the Kubernetes API
- frontend – A web app that exposes a UI to app users, deconstructs complex requests, and sends calls to numerous backend apps
After verifying that traffic is flowing and inspecting a dependency graph for the apps, you deploy the backend-v2 app.
Deploy the backend-v1 App
-
Using the text editor of your choice, create a YAML file called 1-backend-v1.yaml with the following contents (or copy from GitHub).
apiVersion: v1 kind: ConfigMap metadata: name: backend-v1 data: nginx.conf: |- events {} http { server { listen 80; location / { return 200 '{"name":"backend","version":"1"}'; } } } --- apiVersion: apps/v1 kind: Deployment metadata: name: backend-v1 spec: replicas: 1 selector: matchLabels: app: backend version: "1" template: metadata: labels: app: backend version: "1" annotations: spec: containers: - name: backend-v1 image: "nginx" ports: - containerPort: 80 volumeMounts: - mountPath: /etc/nginx name: nginx-config volumes: - name: nginx-config configMap: name: backend-v1 --- apiVersion: v1 kind: Service metadata: name: backend-svc labels: app: backend spec: ports: - port: 80 targetPort: 80 selector: app: backend - Deploy backend-v1:
$ kubectl apply -f 1-backend-v1.yaml configmap/backend-v1 created deployment.apps/backend-v1 created service/backend-svc created -
Confirm that the backend-v1 pods and services successfully deployed, as indicated by the value
Runningin theSTATUScolumn.$ kubectl get pods,services NAME READY STATUS pod/backend-v1-745597b6f9-hvqht 2/2 Running NAME TYPE CLUSTER-IP PORT(S) service/backend-svc ClusterIP 10.102.173.77 80/TCP service/kubernetes ClusterIP 10.96.0.1 443/TCP
You may be wondering why there are two pods running for backend-v1. It’s because NGINX Service Mesh injects a sidecar proxy container into each pod to intercept all incoming and outgoing traffic. The collected data is used for metrics, but you can also use the sidecar proxy to route traffic.
Deploy the frontend App
-
Create a YAML file called 2-frontend.yaml with the following contents (or copy from GitHub). Notice the pod uses
curlto issue a request to the backend service (backend-svc) once per second.apiVersion: apps/v1 kind: Deployment metadata: name: frontend spec: selector: matchLabels: app: frontend template: metadata: labels: app: frontend spec: containers: - name: frontend image: curlimages/curl:7.72.0 command: [ "/bin/sh", "-c", "--" ] args: [ "sleep 10; while true; do curl -s http://backend-svc/; sleep 1 && echo ' '; done" ] -
Deploy frontend:
$ kubectl apply -f 2-frontend.yaml deployment.apps/frontend created -
Confirm that the frontend app deployed, as indicated by the value
Runningin theSTATUScolumn. Note that like backend-v1, frontend has two pods running because it is also deployed in the NGINX Service Mesh environment.$ kubectl get pods NAME READY STATUS RESTARTS backend-v1-5cdbf9586-s47kx 2/2 Running 0 frontend-6c64d7446-mmgpv 2/2 Running 0
Verify Traffic Is Flowing
Next, inspect the logs to verify that traffic is flowing from frontend to backend-v1. Run the following command. For the final parameter, specify the full pod ID for frontend as reported by the kubectl get pods command in Step 3 just above.
Hint: You’ll run this kubectl logs command repeatedly in this tutorial, so copy the command string to a temporary file from which you can paste it into the terminal.
Note that in each log entry the traffic is routed to version 1 of the backend, which is expected because backend-v1 is the only version of the backend service at this point.
$ kubectl logs -c frontend frontend-6c64d7446-mmgpv

{"name":"backend","version":"1"}
{"name":"backend","version":"1"}
{"name":"backend","version":"1"}
{"name":"backend","version":"1"}
{"name":"backend","version":"1"}
{"name":"backend","version":"1"}
Inspect the Jaeger Dependency Graph
The NGINX Service Mesh sidecars deployed alongside the two apps are collecting metrics as the traffic flows. You can use this data to create a dependency graph of your architecture with Jaeger.
-
Open the Jaeger dashboard in a browser.
$ minikube service jaeger -
Click the System Architecture tab to display a dependency graph of the very simple architecture. For a magnified view, open the DAG subtab as shown (mouse over the graph to see the labels shown in the screenshot). Imagine a deployment where the frontend microservice is sending requests to dozens or even hundreds of backend services – this would be a very interesting graph!

Deploy the backend-v2 App
Now deploy a second backend app, backend-v2, which as the version number suggests is a new version of backend-v1.
-
Create a YAML file called 3-backend-v2.yaml with the following contents (or copy from GitHub).
Notice that because
backend-v2is another version of the backend app, you specify the same value –backend– in thespec.selector.matchLabels.appfield as forbackend-v1in Step 1 of Deploy the backend‑v1 App. As a result, traffic will be distributed evenly between the two versions.apiVersion: v1 kind: ConfigMap metadata: name: backend-v2 data: nginx.conf: |- events {} http { server { listen 80; location / { return 200 '{"name":"backend","version":"2"}'; } } } --- apiVersion: apps/v1 kind: Deployment metadata: name: backend-v2 spec: replicas: 1 selector: matchLabels: app: backend version: "2" template: metadata: labels: app: backend version: "2" annotations: spec: containers: - name: backend-v2 image: "nginx" ports: - containerPort: 80 volumeMounts: - mountPath: /etc/nginx name: nginx-config volumes: - name: nginx-config configMap: name: backend-v2 -
Deploy backend-v2:
$ kubectl apply -f 3-backend-v2.yaml configmap/backend-v2 created deployment.apps/backend-v2 created - Confirm that the
backend-v2pod and services deployed, as indicated by the valueRunningin theSTATUScolumn (not shown, but similar to the output shown in Step 3 of Deploy the backend‑v1 App. -
Examine the traffic distribution by examining the logs as in Verify Traffic Is Flowing. As expected, requests are now routed alternately to the two versions of the backend app.
$ kubectl logs -c frontend frontend-6c64d7446-mmgpv {"name":"backend","version":"1"} {"name":"backend","version":"2"} {"name":"backend","version":"1"} {"name":"backend","version":"2"} {"name":"backend","version":"1"} {"name":"backend","version":"2"} {"name":"backend","version":"1"} -
Return to the DAG tab on the Jaeger dashboard to see if both versions of the backend app appear in the dependency graph, indicating that NGINX Service Mesh has correctly mapped both versions.
It can take a few minutes for Jaeger to recognize that backend-v2 was added. If you don’t want to wait, you can just continue to the next challenge and check back on the dependency graph a little later.

Challenge 3: Use NGINX Service Mesh to Implement a Canary Deployment
So far in this tutorial, you deployed two versions of the backend app: backend-v1 and backend-v2. Now that you know backend-v2 can handle traffic, you could immediately route all traffic to it, but it’s a best practice to test a new version’s stability before entrusting it with production traffic. A perfect technique for this use case is canary deployment.
In this challenge, you configure and implement a canary deployment that routes 10% of traffic to a new app version, then incrementally increase the proportion routed to the new version until it’s handling all traffic.
What Is a Canary Deployment?
As discussed in How to Improve Resilience in Kubernetes with Advanced Traffic Management on our blog, a canary deployment is a type of traffic split that provides a safe and agile way to test the stability of a new app feature or version. A typical canary deployment starts with a high share (say, 99%) of your users on the stable version and moves a tiny group (the other 1%) to the new version. If the new version fails, for example crashing or returning errors to clients, you can immediately move the test group back to the stable version. If it succeeds, you can switch users from the stable version to the new one, either all at once or (as is more common) in a gradual, controlled migration.
In this diagram an Ingress controller implements a canary deployment to split traffic between two Kubernetes services.

Canary Deployments Between Services in a Kubernetes Cluster
While you can use an Ingress controller to split north‑south traffic flowing from external clients to Kubernetes services in a cluster, you can’t use it to split east‑west traffic flowing within the cluster from one service (in this tutorial, frontend) to two versions of another service (backend-v1 and backend-v2). There are two options for implementing a canary deployment within a Kubernetes cluster:
Instruct a proxy on the frontend pod to send 9 out of 10 requests to backend-v1. But imagine if you have dozens of replicas of frontend. Do you really want to manually update all those proxies? No! That’s both error‑prone and time‑consuming.
Option 2: The Better Way
Use a service mesh to implement the traffic split. In addition to providing observability and control, a service mesh is also the ideal tool for implementing a traffic split between services because you can apply a single policy to all of the frontend replicas in the mesh!
Using NGINX Service Mesh for Traffic Splitting
NGINX Service Mesh implements the Service Mesh Interface (SMI), a specification that defines a standard interface for service meshes on Kubernetes, including typed resources such as TrafficSplit, TrafficTarget, and HTTPRouteGroup. NGINX Service Mesh and the NGINX SMI extensions make it simple to deploy traffic‑splitting policies, including canary deployment, with minimal interruption to production traffic.
In this diagram from How Do I Choose? API Gateway vs. Ingress Controller vs. Service Mesh on our blog, NGINX Service Mesh implements a canary deployment between services with conditional routing based on HTTP criteria.
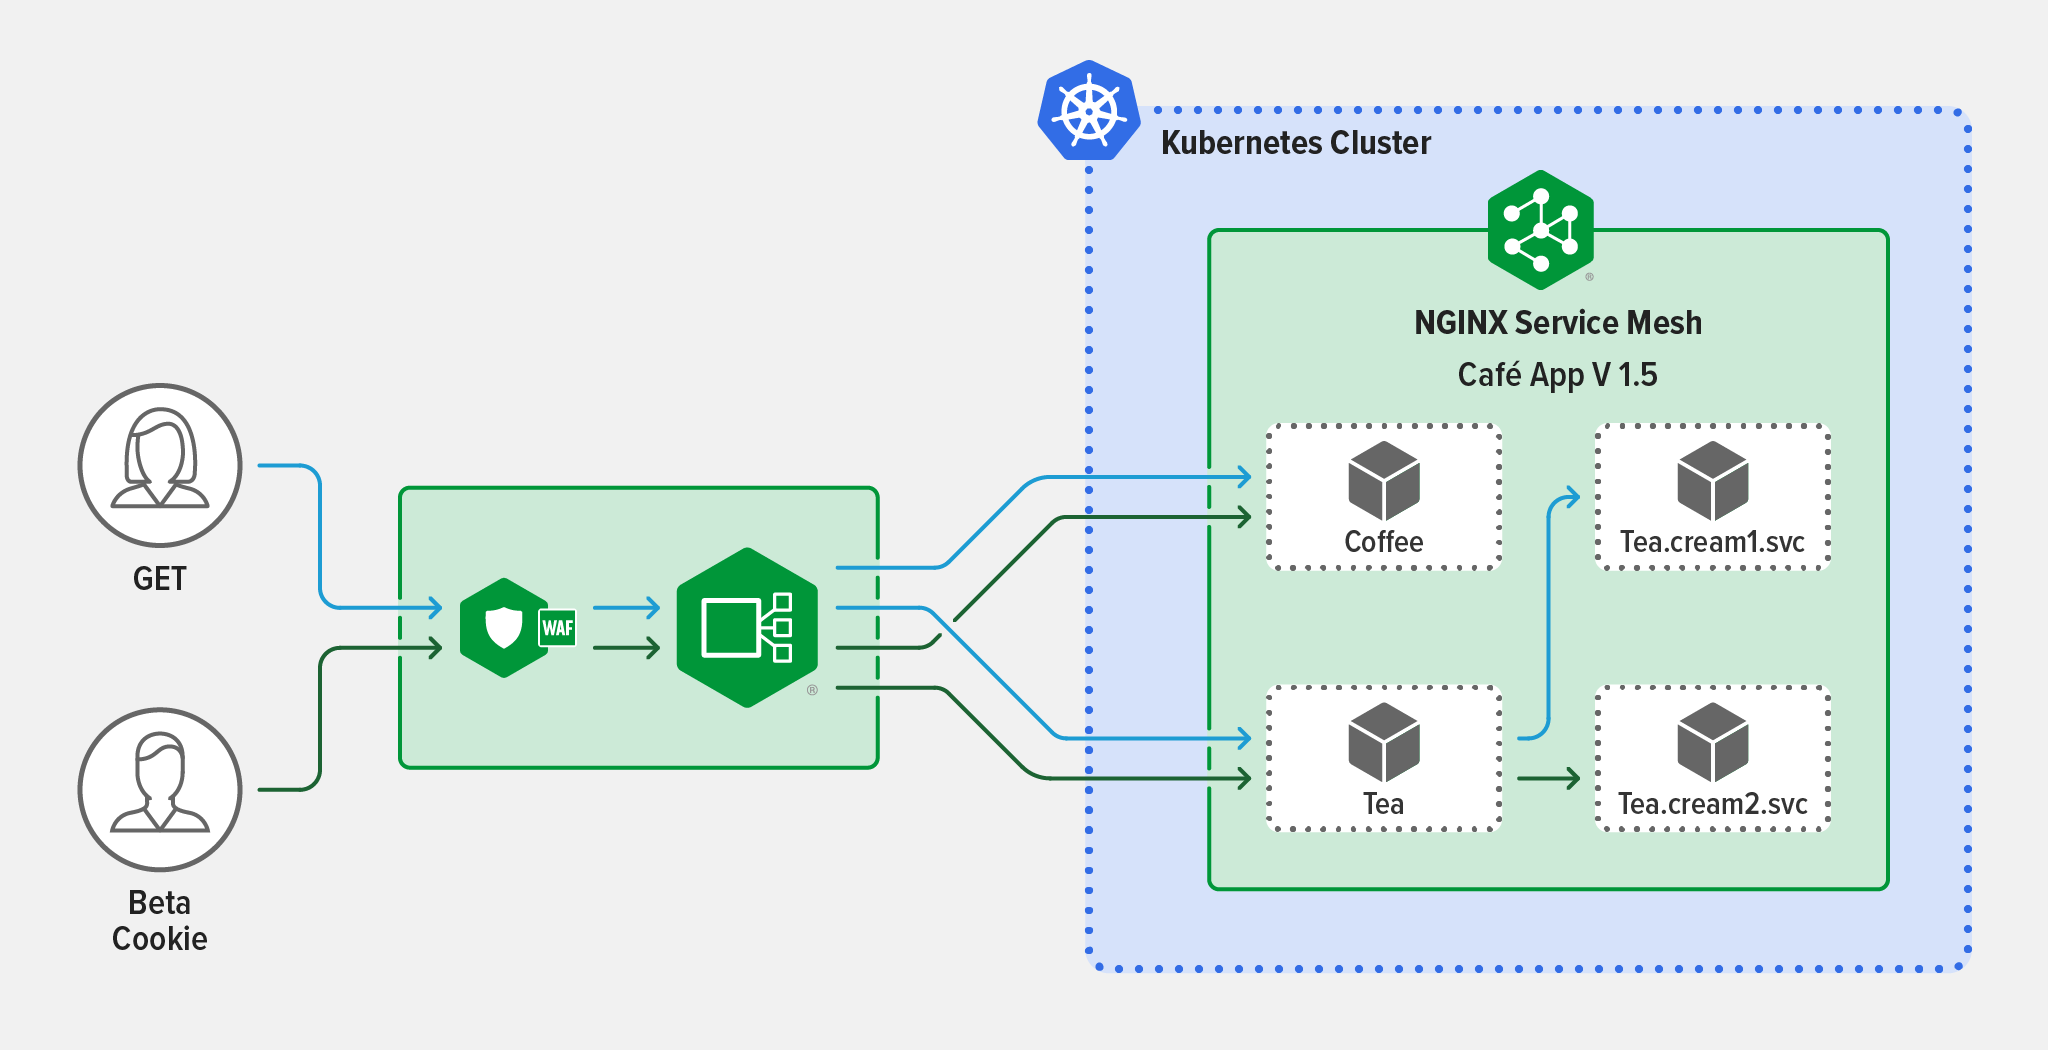
NGINX Service Mesh’s architecture – as for all meshes – has a data plane and a control plane. Because NGINX Service Mesh leverages NGINX Plus as the data plane, it’s able to perform advanced deployment scenarios.
- Data plane – Made of up of a containerized NGINX Plus proxies called sidecars which are responsible for offloading functions required by all apps within the mesh as well as implementing traffic‑routing patterns like canary deployment.
- Control plane – Manages the data plane. While the sidecars route application traffic and provide other data‑plane services, the control plane injects sidecars into pods and performs administrative tasks, such as renewing mTLS certificates and pushing them to the appropriate sidecars.

Configure the Canary Deployment
The NGINX Service Mesh control plane can be controlled with Kubernetes custom resource definitions (CRDs). It uses the Kubernetes services to retrieve a list of pod IP addresses and ports. Then, it combines the instructions from the CRD and informs the sidecars to route traffic directly to the pods.
-
Using the text editor of your choice, create a YAML file called 5-split.yaml that defines the traffic split using the
TrafficSplitCRD (or copy from GitHub).apiVersion: split.smi-spec.io/v1alpha3 kind: TrafficSplit metadata: name: backend-ts spec: service: backend-svc backends: - service: backend-v1 weight: 90 - service: backend-v2 weight: 10Notice there are three services defined in the CRD (and you have created only the first one so far):
backend-svcis the service that targets all pods.backend-v1is the service that selects pods from the backend-v1 deployment.backend-v2is the service that selects pods from the backend-v2 deployment.
-
Before implementing the traffic split, create the missing services. Create a YAML file called 4-services.yaml with the following contents (or copy from GitHub).
apiVersion: v1 kind: Service metadata: name: backend-v1 labels: app: backend version: "1" spec: ports: - port: 80 targetPort: 80 selector: app: backend version: "1" --- apiVersion: v1 kind: Service metadata: name: backend-v2 labels: app: backend version: "2" spec: ports: - port: 80 targetPort: 80 selector: app: backend version: "2" -
Start the services:
$ kubectl apply -f 4-services.yaml
service/backend-v1 created
service/backend-v2 created
Implement the Canary Deployment
-
Before implementing the canary deployment with the
TrafficSplitCRD, verify in the logs that traffic is still being routed as in Challenge 2 – split evenly between backend-v1 and backend-v2.$ kubectl logs -c frontend frontend-6c64d7446-mmgpv {"name":"backend","version":"1"} {"name":"backend","version":"2"} {"name":"backend","version":"1"} {"name":"backend","version":"2"} {"name":"backend","version":"1"} {"name":"backend","version":"2"} -
Apply the
TrafficSplitCRD.$ kubectl apply -f 5-split.yaml trafficsplit.split.smi-spec.io/backend-ts created -
Inspect the logs again. Now, 10% of traffic is being delivered to backend-v2.
$ kubectl logs -c frontend frontend-6c64d7446-mmgpv

{"name":"backend","version":"1"}
{"name":"backend","version":"2"}
{"name":"backend","version":"1"}
{"name":"backend","version":"1"}
{"name":"backend","version":"1"}
{"name":"backend","version":"1"}
{"name":"backend","version":"1"}
{"name":"backend","version":"1"}
{"name":"backend","version":"1"}
{"name":"backend","version":"1"}
Incrementally Increase Traffic to backend-v2
Now that you’ve seen backend-v2 can handle traffic, you might be tempted to route all traffic to it immediately. As mentioned, however, it’s considered best practice to shift traffic to the new app incrementally – say at 25%, 50%, and 100% – to check that it remains stable as the traffic load increases.
To illustrate how easy it is to change the traffic split with NGINX Service Mesh, this tutorial “takes a short cut” and routes first 80% and then 100% of traffic to backend-v2.
-
Edit 5-split.yaml so that backend-v1 gets 20% of traffic and backend-v2 the other 80%.
apiVersion: split.smi-spec.io/v1alpha3 kind: TrafficSplit metadata: name: backend-ts spec: service: backend-svc backends: - service: backend-v1 weight: 20 - service: backend-v2 weight: 80 -
Apply the changes:
$ kubectl apply -f 5-split.yaml trafficsplit.split.smi-spec.io/backend-ts configured -
Verify the 20/80 split in the logs:
$ kubectl logs -c frontend frontend-6c64d7446-mmgpv {"name":"backend","version":"2"} {"name":"backend","version":"1"} {"name":"backend","version":"2"} {"name":"backend","version":"2"} {"name":"backend","version":"2"} {"name":"backend","version":"2"} {"name":"backend","version":"1"} {"name":"backend","version":"2"} {"name":"backend","version":"2"} {"name":"backend","version":"2"} -
To complete the transition, edit 5-split.yaml again such that 100% of traffic is routed to
backend-v2.apiVersion: split.smi-spec.io/v1alpha3 kind: TrafficSplit metadata: name: backend-ts spec: service: backend-svc backends: - service: backend-v1 weight: 0 - service: backend-v2 weight: 100 -
Apply the changes:
$ kubectl apply -f 5-split.yaml trafficsplit.split.smi-spec.io/backend-ts configured -
Inspect the logs to verify backend-v2 is getting all the traffic. The transition to the new version is complete!
$ kubectl logs -c frontend frontend-6c64d7446-mmgpv

{"name":"backend","version":"2"}
{"name":"backend","version":"2"}
{"name":"backend","version":"2"}
{"name":"backend","version":"2"}
{"name":"backend","version":"2"}
{"name":"backend","version":"2"}
{"name":"backend","version":"2"}
{"name":"backend","version":"2"}
{"name":"backend","version":"2"}
{"name":"backend","version":"2"}
Next Steps
We hope you’re inspired to keep exploring the capabilities of NGINX Service Mesh. The tutorials in the NGINX Service Mesh docs are a good place to start.
NGINX Service Mesh is completely free. For download and installation instructions, see the Getting Started documentation.