
Editor – For more on maximizing Drupal 8 performance with NGINX, watch our webinar on demand, Maximizing Drupal 8 Performance with NGINX. You can read a transcript of the webinar in two parts: Architecture and Configuration and Caching and Load Balancing.
Drupal is a leading open source content management system and a major presence in the application development landscape. Drupal is used for everything from personal blogs to gigantic enterprise and governmental projects, and is in a class of its own for truly intensive app development, API development, and other complex work.
.
Drupal is based on PHP, a scripting language which is easy to learn and easy to use for rapid prototyping, followed by a quick move to production. However, the basic operation of PHP can contribute to performance problems when a site needs to be able to scale rapidly due to short‑term spikes in usage or long‑term growth.
Also, most Drupal sites use the Apache HTTP Server web server, which has its own performance limitations. This blog post explains some ways to work around the limitations of Drupal and Apache, making your Drupal‑based site as high‑performance as you need it to be.
New features in Drupal 8, the latest release, make Drupal even stronger for big projects – including smaller projects that suddenly become big ones. New additions include:
- Mobile improvements. Full support for mobile site templates and easy backend administration from a mobile device.
- Data and presentation layer uncoupling. The Drupal API is now fully RESTful, making it easier to use with Angular.js, Ember.js, and other client‑side content extraction and display tools.
- Support for Symfony 2. Symfony 2 is an up‑to‑date, object‑oriented PHP framework, well known for customer relationship management (CRM) integration.
- Twig support. Twig is a frontend library and template engine that eliminates some disadvantages of pure PHP while embracing the latest PHP standards.
- Security improvements. New features offer additional ways to make systems more secure.
Many of these improvements support big, complex sites, which are vulnerable to performance problems. While the driving force in traffic growth is “north‑south” traffic – from clients to servers – modern sites typically see the amount of “east‑west” traffic – between backend servers – increasing as well.
The tips in this blog post show how to solve common performance problems that face Drupal‑based sites. With some imagination and hard work, sites can be quickly re‑architected to remove performance bottlenecks and lay the groundwork for growth up to many times current traffic volumes.
Tip 1 – Plan Your Site Architecture
Most Drupal sites initially use Apache HTTP Server as their web server. Apache is used among a wide range of websites, and instructions for configuring it are widely available. However, as websites grow in performance, many sites move to NGINX. NGINX is the leader at the world’s busiest sites (the top 100,000 sites, top 10,000 sites, and top 1,000 sites).
Apache and Drupal share similar problems when a site gets busier:
- Apache faces what is called the C10K problem – strictly speaking, difficulty supporting more than 10,000 connections at a time. (Apache falls well short of this goal.) Apache allocates memory to every additional connection, so it tends to start swapping to disk as concurrent connections increase. This sends site performance into a downward spiral and can lead the entire server to crash or freeze.
- Drupal does a fair amount of work to serve each request that it receives, with each request consuming memory and CPU time. Similarly to Apache, but at a much lower number of connections, Drupal site performance can fall into a downward spiral.
Also, when an application server also handles Internet traffic and other functions, it becomes a potential problem in multiple ways. It’s vulnerable to all of the different kinds of problems that a website can have, represents a single point of failure, and needs to be optimized for incompatible tasks, such as fast responsiveness to Internet requests, fast application processing, and fast disk access, as well as high security.
So to address performance bottlenecks as a site grows, you can take several separate but related steps, as described in this blog post:
- Replace Apache with NGINX as the web server for your Drupal site. This improves performance and sharply reduces memory utilization when many thousands of connections run concurrently.
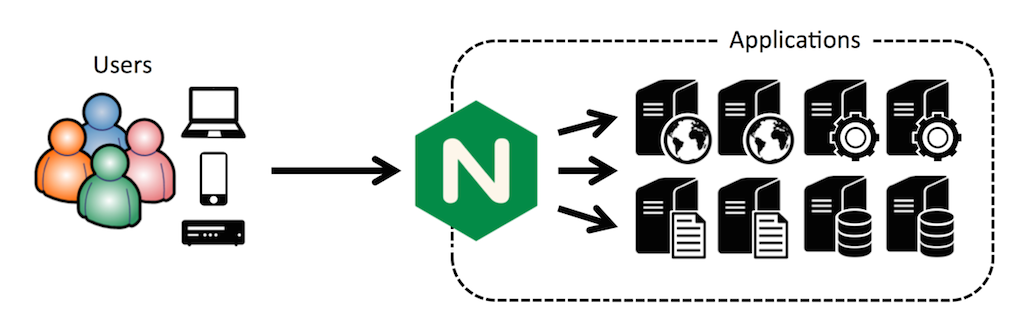
- Implement a reverse proxy server. NGINX is a very popular reverse proxy server for Drupal sites and for sites of all kinds. Implementing a reverse proxy server removes the burden of handling Internet traffic from your application server and allows other performance‑enhancing steps: caching of static files and the use of multiple load‑balanced application servers.
- Once you’ve implemented a reverse proxy server, consider growth strategies. You can add physical servers, add servers in the cloud, or use a mix of resources to support overall growth as well as spikes in demand.
- Monitor traffic among servers. Once you’re running multiple servers, you need the ability to monitor performance across them. This allows you to maintain optimum performance for users.
You can plan these steps in advance, based on projected or possible future growth and your technical resources.
Note: You can implement NGINX as a reverse proxy server with either Apache or NGINX as your web server. Decoupling these two functions can simplify implementation.
Tip 2 – Replace Your Web Server
If you need a “quick fix” for performance for your website, which will also serve as a valuable step in architecting your site for security, flexibility, and performance, consider moving from Apache to NGINX as your web server.
NGINX was designed to solve the C10K problem – the difficulty that most web servers have in supporting a large number of simultaneous connections (that is, more than 10,000 connections at once).
The easy way to support multiple connections is to fork a new process for each new connection. This gives you access to all the capabilities of Apache for each new connection. However, the resulting connections are “heavy” – each connection has nontrivial start‑up time, debugging complexity and, most importantly, memory requirements.
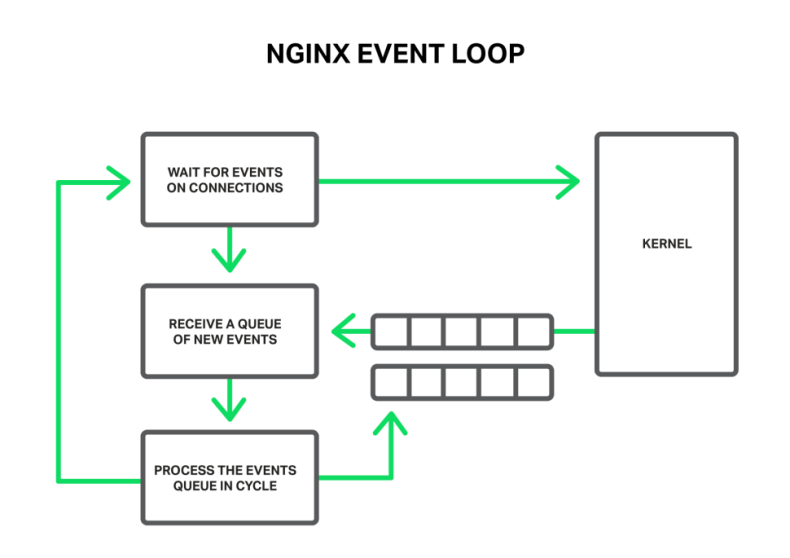
NGINX was developed to eliminate the overhead that this simplistic approach incurs. NGINX runs an ongoing event loop that handles requests as they occur, without allocating resources to the requestors.
So simply replacing Apache with NGINX is a “quick fix” for performance issues. You can make this change without changing your actual application code. However, it’s worth noting that you don’t even have to change the “local” web server to use NGINX – you can use NGINX as a remote proxy server, load balancer, etc., as described in the rest of this blog post, whether you stay with Apache or switch to NGINX as the web server that works directly with your Drupal code.
Tip 3 – Rewrite URLs
There is a configuration issue that arises when replacing Apache with NGINX. If site layout is complex, it’s desirable to display a simplified, user‑friendly URL. Short URLs are a vital component for security, flexibility, and web usability. However, they’re a bit complicated, so we’ll go into a little depth about them here. (For more detail, start with the Wikipedia article on URL redirection, which includes specifics on NGINX URL rewriting.)
The point of a short URL, in the web server context, is not really for the URL to be as short as possible. (Confusingly, if you use a URL shortener, such as Bitly, the shortest possible URL is the goal, but that’s not what we’re doing here.) The term “short URL” is actually shorthand for “a shorter, predictable, stable, user‑understandable URL, with no PHP code”. Let’s look at each part of that:
- Shorter. Obscure directory names, multiple levels of directories, and what might appear to the user to be gobbledygook are simply removed so the user doesn’t have to see, copy and paste, remember, or otherwise deal with it.
- Predictable. The URL is within the user’s expectations – a key usability requirement. (You want the user focused on content and on completing tasks, not on confusing URLs.) The URL includes the domain name (such as www.nginx.com) and sensible subdirectory names, such as /news or /blog. The second page of an article might be denoted by a sensible path element such as /page2.
- Stable. The URL of a page doesn’t change over time – even if you move the page itself, and the assets on it, to different locations for your own convenience. This is important for users, for sites that link to you, and (not unrelatedly) for SEO.
- User‑understandable. The name of the piece of content needs to be user‑understandable, including components such as drupal-8-performance and the publishing date. In a pinch, the user can remember the URL and retype it into another browser window if needed. This attribute is also valuable for usability and SEO.
- No PHP code. It’s common for actual URLs to include PHP file extensions and parameters, as in …/index.php?title=page_title. Removing this and replacing it with a user‑understandable name for the piece of content is highly desirable best practice, even though many sites don’t make the effort.
In most web servers, URL rewriting is accomplished via the mod_rewrite module in the .htaccess (hypertext access) file, which is a directory‑level configuration file. In NGINX, you use the integrated HTTP rewrite module instead. It’s simpler, more powerful, and easier to maintain than mod_rewrite, but if you’re used to the latter, you’ll need to learn the NGINX way. See this recent blog post for creating new rewrite rules in NGINX and this one for converting Apache rewrite rules to NGINX.
Here’s a sample NGINX rewrite rule that uses the rewrite directive. It matches URLs that begin with the string /download and then include the /media/ or /audio/ directory somewhere later in the path. It replaces those elements with /mp3/ and adds the appropriate file extension, .mp3 or .ra. The $1 and $2 variables capture the path elements that aren't changing. As an example, /download/cdn-west/media/file1 becomes /download/cdn-west/mp3/file1.mp3. If there is an extension on the filename (such as .flv), the expression strips it off and replaces it with .mp3.
server {
    # ...
    rewrite ^(/download/.*)/media/(\w+)\.?.*$ $1/mp3/$2.mp3 last;
    rewrite ^(/download/.*)/audio/(\w+)\.?.*$ $1/mp3/$2.ra  last;
    return  403;
    # ...
}
Tip 4 – Deploy a Reverse Proxy Server
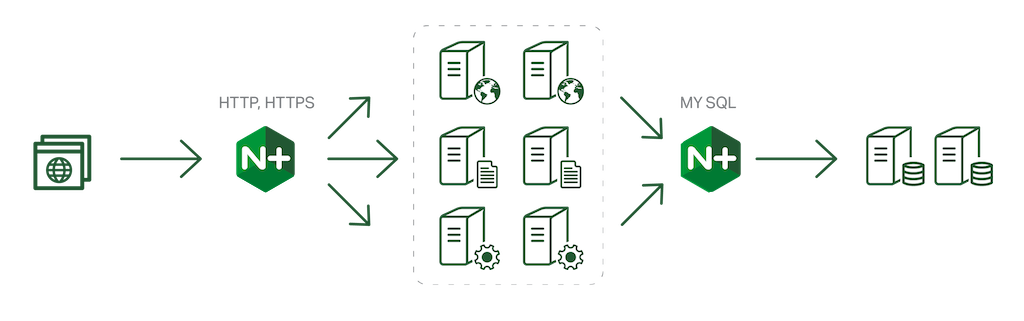
Deploying a reverse proxy server is the first step in creating a site architecture that is flexible and adaptable, and in particular that can “scale out” – that is, that can support multiple application servers running in parallel.
A reverse proxy server receives requests from browsers and then does not just immediately process them. Instead, the reverse proxy server examines each request and decides, Solomon‑like, what to do with it: either carry out the request itself or send it to another server for fulfillment.
The reverse proxy server communicates with the application server quickly, over a local area network. When the application server finishes a request and hands the result back to the reverse proxy server, it doesn’t have to wait to communicate with the actual client over the Internet; instead, the application server can go right back to handling the next application‑related request. The reverse proxy server then sends the response back to the client.
This approach allows for flexibility, redundancy, improved security, and many other good things. It’s an example of the quote at the beginning of this article from David Wheeler in action: “All problems in computer science can be solved by another level of indirection.”
The ironic thing is that adding indirection usually hurts performance, because it adds another call or lookup to a given process. However, adding a reverse proxy server is likely to help performance. There are two reasons for this:
- Communication between web servers is much faster than communication over the Internet. The “communicate with another web server” part of reverse proxy serving is essentially free.
- Letting servers specialize allows each to run much faster than a single server doing too many different things, especially when one of those things is application serving – assembling the core elements of a page from component parts and sending it back to the requester. Application servers really benefit from not having to do anything else, especially when handling thousands or tens of thousands of requests per second.
So adding a reverse proxy server allows you to free your Drupal server from handling Internet traffic directly. Your Drupal server can be running on Apache or NGINX. (If you’re building from scratch, you may well want to go all‑NGINX, but many sites that are already using Apache web servers begin by putting an NGINX web server in front of an unchanged Apache‑Drupal setup. NGINX can then be inserted as the web server for Drupal when convenient.)
Inserting a reverse proxy server can immediately “rescue” a site that’s tipping over due to excessive traffic, security problems (which can now be addressed away from the application processing), or other issues. The reverse proxy server also introduces new flexibility into the site architecture. The new capabilities include:
- Caching of static files. Application processing is usually the bottleneck in site operations, so serving static files – images, CSS files, JavaScript files and so on – separately from dynamic pages increases site performance.
- Dynamic file caching / microcaching. The purpose of an application server is to send a custom response to each new request. However, for a busy site, caching application server responses for a very short time, say one to ten seconds, allows most responses to come from the cache, with little penalty to freshness.
- Scalability. Adding one or more additional application servers allows flexible response to traffic spikes and traffic that rises over time. You can even use cloud processing to handle spikes beyond what your on‑premises servers can manage.
- Load balancing. To prevent any one application server from becoming a bottleneck, loads must be shared sensibly across servers. Various load balancing techniques – some specific to NGINX Plus – and, where needed, session persistence, support smooth user interactions.
- Security management. The reverse proxy server – the only server exposed to the Internet – can be locked down tightly and monitored closely for security problems, without affecting application processing and other site functionality.
- Security protocol termination. Protocols used to help secure or speed up a site, such as TLS/SSL and HTTP/2, can be processed and terminated at the reverse proxy server. The application server sees and serves non-encrypted traffic.
- Monitoring and management. Monitoring a one‑server site is simple – it’s working, or it’s failing. With multiple servers, monitoring and management capabilities, largely specific to NGINX Plus, allow continuous service delivery with high performance.
- Flexibility and redundancy per capability. Every server in a multiserver setup can be backstopped by another, under load or not, enabling high levels of uptime. Even the reverse proxy capability can be supported by multiple servers.
All of these functions run without any impact at all on the application server, which allows it to run much more efficiently. Caching is a very common application used with NGINX as a reverse proxy server, as described in the following tip.
Tip 5 – Cache Static Files
The term “caching” is often used with Drupal to refer to dynamic caching, also called microcaching – that is, caching application server pages for brief periods. We discuss that in the next tip.
The more common – nearly ubiquitous – use for NGINX as a reverse proxy server is to use it for caching of static files: graphics and code files – JPEGs, PNGs, CSS files, JavaScript files, and the like. This is very easy to do. It gets the cached files to the user faster and offloads the Drupal server from a significant number of transactions per pageview.
The following configuration block sets up NGINX caching. The proxy_cache_path specifies where cached content is stored in the local file system and allocates a named zone in shared memory. The proxy_cache directive is placed in the context that you want to cache for and references the shared memory zone. For more details, see the NGINX Plus Admin Guide.
http {
    # ...
    proxy_cache_path /data/nginx/cache keys_zone=one:10m;

    server {
        proxy_cache one;
        location / {
            proxy_pass http://localhost:8000;
        }
    }
}
For further caching efficiency for static files, consider a content delivery network (CDN). CloudFlare, a widely used CDN, uses NGINX as its operating system.
Tip 6 – Cache Dynamic Files
Drupal handles caching of PHP‑generated web pages for you, and this can significantly improve site performance. As with microcaching for any platform, users don’t all get a newly created version of the web page; instead, they get a copy that’s perhaps a second or ten seconds old. This is usually not a problem, and is preferable to having your overall site performance begin to slow as traffic increases. (In which case, users are not getting fresh content for a different, and worse, reason.)
There are two problems with Drupal’s caching. First, Drupal is not efficient at caching. Second, when Drupal is getting overloaded, even the work needed to retrieve cached pages is significant. Whereas, with NGINX, you have a powerful and useful option: bypassing Drupal caching completely.
That’s right – NGINX handles both static file caching and PHP page caching. This has a bunch of advantages:
- Greater simplicity. Your Drupal applications become significantly simpler to develop (less code to write), maintain (less code to update during changes), and debug (fewer places to look when problems occur).
- Higher performance. With NGINX‑level caching, your Drupal app does no work on a cache hit; your app never even sees the request. When your Drupal app is getting near to maxing out, no work is much, much better than some work.
- Easier development. With NGINX caching, there’s no need to turn Drupal caching off during development and back on for runtime, with separate testing for each state. Once caching is working at the NGINX level, you can ignore it when working on your Drupal app.
With all caching happening at the NGINX level, your Drupal app generates fresh content every time it’s called. The Drupal app may only have to generate a fresh page every second, for instance, instead of either accessing the cache or generating a fresh page for hundreds or thousands of concurrent requests. The performance benefits are tremendous.
The following configuration code caches valid pages for just one second. For a server receiving ten to thousands of requests per second, anywhere from 90% to 99% or more of requests will be served from the cache.
proxy_cache_path /tmp/cache keys_zone=cache:10m levels=1:2 inactive=600s max_size=100m;
server {
    proxy_cache cache;
    proxy_cache_valid 200 1s;
    # ...
}
See our recent microcaching blog post for details on this code and the benefits of microcaching using NGINX.
Tip 7 – Use Multiple Application Servers and Load Balancing
With a single application server, you only have what’s called vertical scalability: to get more performance, you need a bigger, faster server. This approach is potentially expensive, because the biggest, fastest servers are disproportionately expensive. It’s also inherently limited, because a single device always has an inherent performance limit. When you need more performance, you have to upgrade or replace your current device, a disruptive operation.
Implementing a reverse proxy server, as described in Tip 2 above, allows you to use multiple application servers, giving you horizontal scalability: to get more performance, just add more servers. With the right software tools, such as those found in NGINX Plus, adding and removing servers can be done with no downtime at all.
However, when there are multiple application servers, there has to be some technique for deciding which server gets the next request. This is called load balancing, and techniques range from the simple – a round‑robin approach where the next request goes to the next server in line – to sophisticated techniques in which the system checks servers to see which one is least busy (and therefore most available) before forwarding a request.
Load balancing can be performed by hardware appliances or by software load balancers running on standard hardware. Software‑based approaches are more flexible – easily used in customer‑owned servers, private clouds, and public clouds.
NGINX and NGINX Plus support five load‑balancing methods, plus server weights. Four methods are supported in both open source NGINX and NGINX Plus; the Least Time method is supported only in NGINX Plus:
- Round Robin – Each new request goes to the next server in the list, regardless of how busy each server is.
- Least Connection – The next request goes to the server with the fewest active connections.
- Hash – The next request is assigned based on a user‑defined key (generic hash) or the IP address (the IP Hash method).
- IP Hash – The next request is assigned based on the client IP address.
- Least Time (NGINX Plus only) – NGINX Plus tracks response time for forwarded client requests, then combines that with “least connections” information to determine where to send new requests.
Server weights is a feature that works with several different load‑balancing methods. You can increase the weight of a server (the default weight is 1) to increase the number of requests that go to that server.
The following code shows the weight parameter on the server directive for backend1.example.com:
upstream backend {
    server backend1.example.com weight=5;
    server backend2.example.com;
    server 192.0.0.1 backup;
}
Tip 8 – Support Session Persistence
Adding multiple application servers introduces a problem: what if your app supports interactive functionality, such as a purchasing session, which assumes that the same server handles all requests for a given user throughout a browser session?
Many apps keep state for a user on the server where the app is running; think of an ecommerce app or a journey on a ride‑sharing service. When state is kept server‑side, the same server has to be used throughout a user session. As with load balancing, there are several techniques for ensuring this.
Note: When session persistence is in use, loads are still being balanced, but it’s user sessions that are being allocated across application servers, not individual user requests. For a busy system, the difference in granularity doesn’t have much impact.
Session persistence keeps a specific client assigned to the same server throughout its session. Only NGINX Plus offers session persistence, using three methods:
- Cookie insertion. When a client makes its first request, NGINX Plus creates a session cookie and returns it to the client. The client includes it in future requests and NGINX Plus uses it to route those requests to the server that responded to the first request.
- Learn. NGINX Plus monitors requests and responses to find session identifiers, which are also usually set in a cookie, and uses them to route traffic to the same server; information to support routing is kept in a shared memory zone.
- Sticky routes. With sticky routes, you can set application servers to mark their responses, so subsequent requests use the same marker and go back to the same server.
Bonus Tip – Configure NGINX for Drupal 8
The NGINX documentation contains a Drupal configuration recipe, and this has been updated to Drupal 8. Comments in the recipe will show you the Drupal 8-specific changes and also guide you if you want to use an earlier version of Drupal for now. So if you are newly configuring NGINX for use with Drupal 8, the Drupal configuration recipe is the place to start.
If you are already using Drupal 7, you may have adjusted your Drupal 7-friendly configuration for specifics of your own environment. If so, you have a choice when upgrading to Drupal 8:
- Start with the Drupal 8-friendly Drupal configuration recipe and adjust it for your environment.
- Start with your current, Drupal 7-friendly NGINX configuration and adjust it for Drupal 8.
If you take the first option, the changes you need to make will be specific to your environment, and we can’t give you guidance here. However, if you take the second option, there are some specific things we can point out to you. (With some help from this excellent, Drupal 8-specific NGINX configuration blog post by Greg Anderson on the Pantheon website; recommended.)
There are three problems that may arise when you upgrade to Drupal 8; here are the issues and a brief description of how to fix them:
-
update.php won’t run. To fix this, update your location directives. Instead of requiring .php at the end of URLs, write them in a way that doesn’t. One way to do this is to replace
location ~ .php$ {with
location ~ .php$|^/update.php { -
Modules can’t be installed from the Admin interface. There’s a bug in Drupal which looks for a needed script, authorize.php, in the wrong subdirectory. NGINX needs to be updated to find it where it is. Change the regular expression which looks for the file from
fastcgi_split_path_info ^(.+.php)(.*)$;to
fastcgi_split_path_info ^(.+?.php)(|/.*)$; -
Navigation elements are missing CSS styling. The administration interface for Drupal 8 uses CSS to control the appearance of interface elements. To help NGINX, find the
locationblock for the top‑level directory / (in other words,location/{...}). Change thetry_filesdirective fromtry_files $uri @rewrite;to
try_files $uri /index.php?$query_string;
For more details on the problems and solutions, see the Pantheon blog post.
Conclusion
Drupal 8’s power and capability support you in creating a wide range of web applications and web sites. When those sites attract widespread usage, performance can become a critical issue. Open source NGINX and NGINX Plus can help you solve those problems through use as a replacement web server, as a reverse proxy server, caching and microcaching engine, and by enabling the use of multiple application servers with load balancing and session persistence.
For more on maximizing Drupal 8 performance with NGINX, watch our webinar on demand, Maximizing Drupal 8 Performance with NGINX. You can read a transcript of the webinar in two parts: Architecture and Configuration and Caching and Load Balancing.
To try NGINX Plus, start your free 30-day trial today or contact us to discuss your use cases.
Image appearing for this post on the NGINX, Inc. blog home page is courtesy of Greg Anderson and Pantheon (see Bonus Tip – Configure NGINX for Drupal 8 above).