
Using JWT support to provide SSO for existing applications
[Editor – This post describes how to use NGINX Plus with OpenID Connect providers that support the Implicit Flow for authentication. The information is technically correct, but some actions (such as using cron to fetch public keys) are no longer necessary because of updates to our reference implementation. For the current implementation, see our GitHub repo.
In NGINX Plus R15 and later, you can also use NGINX Plus as the Relying Party in the OpenID Connect Authorization Code Flow.]
OAuth 2.0 has done much to transform the flexibility and user experience of authenticating to websites and applications. But despite the name, the OAuth 2.0 specification says very little about verifying end‑user identity and nothing about single sign‑on (SSO). That’s where OpenID Connect comes in – it is essentially the missing piece that carries identity information in OAuth 2.0 access tokens.
OpenID Connect identity tokens comply with the JSON Web Token (JWT) specification. JWT (pronounced “jot”) tokens are compact, easy to pass around, and provide a common core schema for describing identity information. The great thing about JWTs is that they can be applied to almost any identity use case, from authenticating API clients to providing SSO for enterprise applications. In fact, many organizations that use Google Apps can utilize Google as the identity provider to provide SSO to their enterprise applications. That said, the use of OpenID Connect and JWTs does not prevent them being used to authenticate to, or provide SSO for, existing web applications.
NGINX Plus R10 and later includes native JWT support, enabling NGINX Plus to validate tokens and decorate upstream requests with the identity of the authenticated user in a way that the application can easily consume. In this blog post we demonstrate how to use the native JWT support in NGINX Plus to enable SSO for existing applications without any changes required to the applications themselves. We’re using Google as the identity provider and a simple website to represent the application. The end‑to‑end flow looks like this:

Enabling OpenID Connect for Your Web Application
Our example has two components: the NGINX Plus configuration and the HTML login page.
NGINX Plus Configuration
The NGINX Plus configuration for validating JWTs is very simple.
server {
    listen 80;
    root /var/www/public_html;

    location /private/ {
        auth_jwt "Google account" token=$cookie_auth_token;
        auth_jwt_key_file /etc/nginx/google_certs.jwk;
    }
}
The location block specifies that any requests to URLs beginning with /private/ must be authenticated. The auth_jwt directive defines the authentication realm that will be returned (along with a 401) if authentication is unsuccessful, and where in the request NGINX Plus can find the JWT. In this case it expects to find the token in a cookie named auth_token. By default, NGINX Plus expects clients to present the JWT as a Bearer Token, using the Authorization header as is common with AJAX applications and API clients, but it can also obtain the JWT from other HTTP headers, query string arguments, or a cookie as in this example.
The auth_jwt_key_file directive tells NGINX how to validate the signature element of the JWT. Signature validation ensures that the JWT was issued by Google and has not been modified since. Google publishes its public keys and refreshes them regularly. To maintain an up‑to‑date set of keys, use cron(8) to fetch them hourly, as in this sample crontab entry.
0 * * * * wget https://www.googleapis.com/oauth2/v3/certs -O /etc/nginx/google_certs.jwkHTML-Based Login Page
To keep this example simple and straightforward, we aren’t building an entire application. Instead we’re using the following basic HTML to create a login page. The HTML file is called /var/www/public_html/index.html (this matches the root path we defined in the NGINX Plus configuration).
<html>
<head>
    <meta http-equiv="cache-control" content="no-cache" />
    <meta http-equiv="expires" content="0" />
    <title>NGINX OpenID Connect demo</title>
    <script src="https://apis.google.com/js/platform.js" async defer></script>
    <meta name="google-signin-scope" content="profile email">
    <meta name="google-signin-client_id"
          content="client-ID.apps.googleusercontent.com">
    <script src="/js.cookie.js"></script>
</head>
<body>
    <h2>NGINX OpenID Connect demo</h2>
    <hr/>
    <h3>Login with a Google account then visit the <a href="/private/">private area</a>.</h3>
    <table><tr><td>
    <div class="g-signin2" data-onsuccess="onSignIn" data-theme="dark"></div></td>
    <script>
      function onSignIn(googleUser) {
        var profile = googleUser.getBasicProfile();
        Cookies.set('auth_token', googleUser.getAuthResponse().id_token);
        document.getElementById('google_signout').innerHTML = '<a href="#" onclick="signOut();"><img src="' + profile.getImageUrl() + '" width=32 height=32>Sign out</a>';
      };
      function signOut() {
        var auth2 = gapi.auth2.getAuthInstance();
        auth2.signOut().then(function () {
          Cookies.remove('auth_token');
          document.getElementById('google_signout').innerHTML = '';
        });
      }
    </script>
    <td><div id="google_signout"></div></td>
    </tr></table>
    <hr/>
</body>
</html>
We’ve highlighted two key dependencies in the <head> block.
<meta name="google‑signin‑client_id">tag – We are using Google’s OAuth 2.0 JavaScript API to perform the OAuth 2.0 end‑user consent and authentication process. This is what gives us the login button and can detect whether we are logged in or not. In order for our website to be authenticated by Google, we need to create an OAuth 2.0 client ID and provide that as thecontentattribute to this tag, replacing theclient-IDplaceholder. For instructions on creating a new OAuth 2.0 client ID, see the Appendix at the bottom of this article.<script src="/js.cookie.js">tag – We need a cookie parser that can extract the identity token from the OAuth 2.0 access token and create a cookie to be sent to the website. The lineCookies.setaccomplishes this, using the JavaScript Cookie library, which is included with this tag.
With these pieces in place we now have a public homepage with Google’s login mechanism and a private area protected by NGINX Plus. Note that we didn’t create any content for our private area so a 404 error is to be expected when we try to access it.
Further Reading
For details about advanced JWT functionality, see Authenticating API Clients with JWT and NGINX Plus. It explains how to proxy authenticated requests with user identity information obtained from the JWT, log JWT claims, and support multiple identity providers.
To explore the native JWT support in NGINX Plus, start your free 30‑day trial today or contact us.
Appendix – Creating a Google OAuth 2.0 Client ID
[Editor – We have made every effort to accurately represent the Google APIs GUI at the time of publication, but the GUI is highly dynamic, with menu options and locations subject to change. Use these instructions as a reference and adapt them to the current GUI as necessary.]
-
Access the Google APIs Dashboard at https://console.developers.google.com/apis/dashboard.
The page that opens depends on your history with Google APIs. You might have to create an account, accept terms of use, and perform other steps not shown in these instructions.
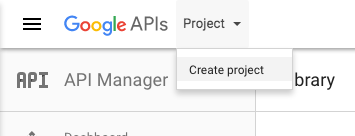
The following screenshot shows the upper left corner of the dashboard. Click the word to the right of the Google APIs logo (if you have previously created a project, its name might appear instead of the word Project). Select Create project.
-
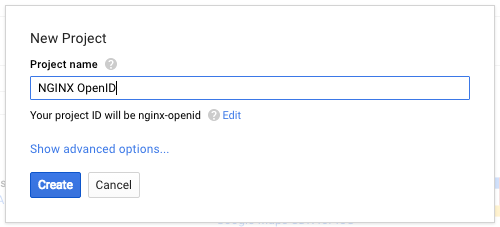
Create a new project. Here our new project is called NGINX OpenID. After you click the Create button, it can take several seconds before a notification appears indicating your project has been created.
-
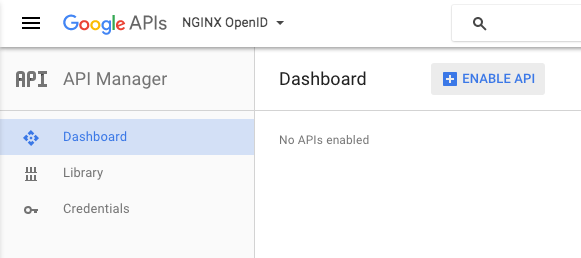
Enable the Google+ API for your project. It provides OAuth 2.0 authentication and identity services.
(If the API Manager dashboard doesn’t already appear in the main part of the window, click Dashboard in the navigation area on the left of the screen.)
The first step in enabling the Google+ API is to click the ENABLE API button.
-
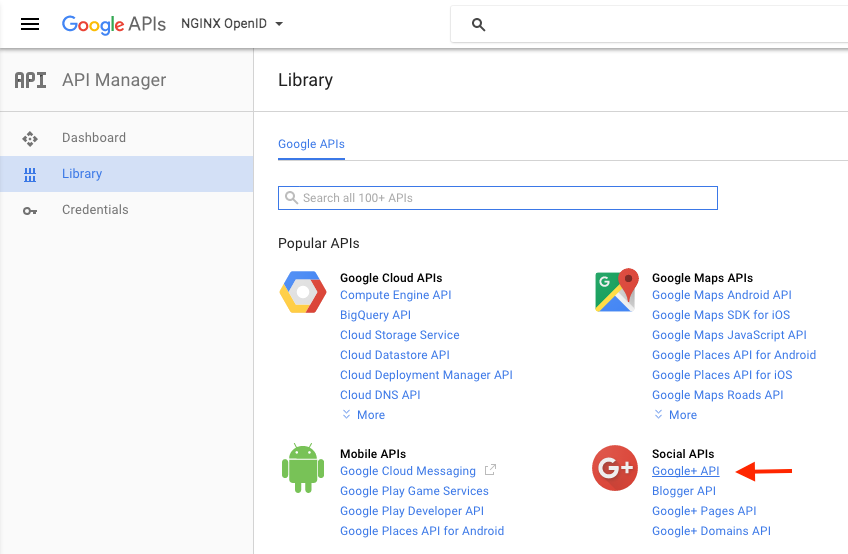
Click Google+ API (in the Social APIs section).
-
Click the ENABLE button.

-
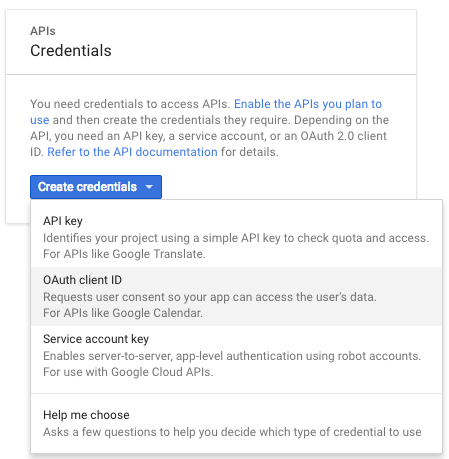
To create credentials for your project, click Credentials in the navigation area on the left of the screen, then click the Create credentials button.
Select OAuth client ID on the drop‑down menu.
-
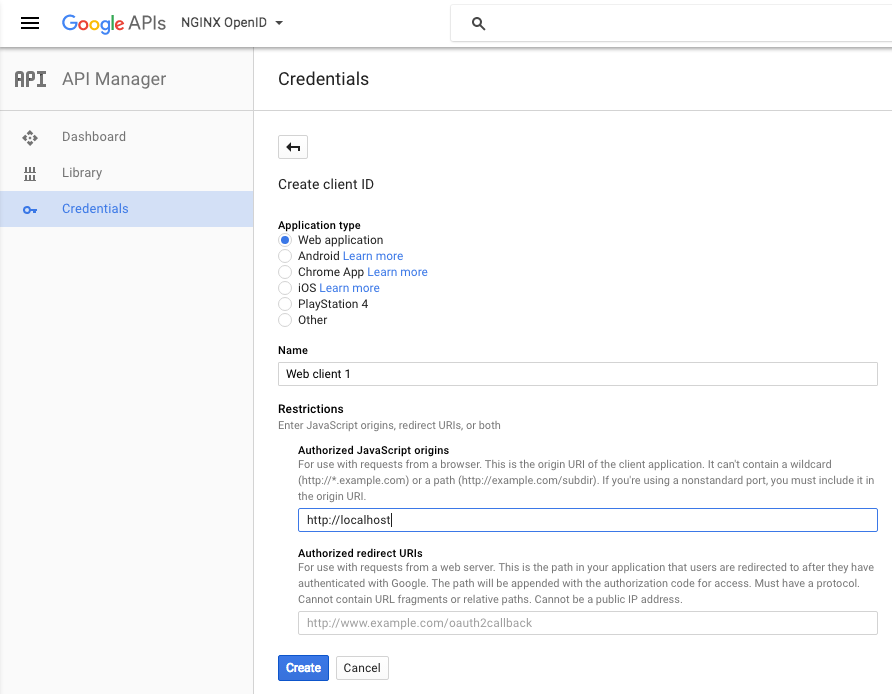
Select the Web application radio button. In the Authorized JavaScript origins field, specify the URL for the host where NGINX Plus is installed and the port number you specified as the parameter to the
listendirective in Enabling OpenID Connect for Your Web Application (for example, mydomain.example.com:80). This example uses localhost but your entry needs to be the hostname and port of the actual NGINX Plus instance.Click the Create button (you might need to click it more than once to make the creation process start).
-
The OAuth client window pops up to report your client ID and client secret. Copy the client ID to the
contentattribute of the<meta name="google-signin-client_id">tag in your app (replacing the highlightedclient-IDplaceholder shown above). You do not need the client secret.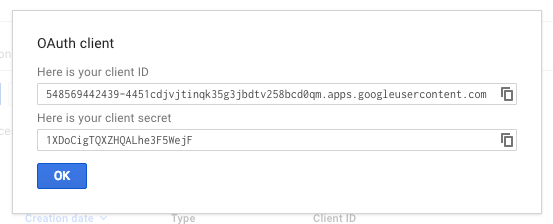
-
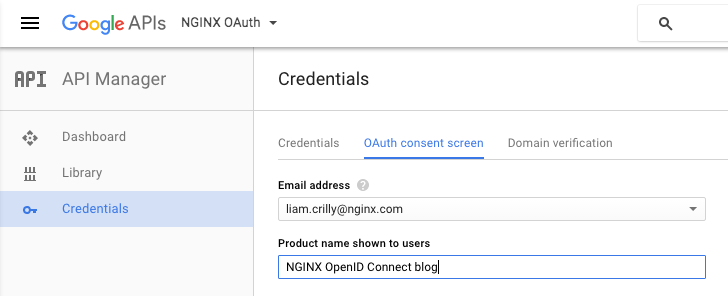
On the main Credentials screen, click OAuth consent screen. Provide your email address and a product name (all other fields are optional).
Return to the section about creating a sample application that uses the credentials
To explore the native JWT support in NGINX Plus, start your free 30‑day trial today or contact us.