Applications can’t serve their purpose if users can’t find them. The Domain Name System (DNS) is the Internet technology that “finds” apps and websites by translating domain names to IP addresses. DNS is so ubiquitous and reliable that most days you don’t even think about it. But when there are DNS problems, everything stops. Making sure DNS works is crucial for modern applications, especially in microservices architectures where services are constantly spinning up and down.
In a previous post, we talked about defining DNS records for two subdomains that correspond to applications running in the same cluster (unit-demo.marketing.net for the Marketing app and unit-demo.engineering.net for the Engineering app) and resolve to the same cluster entry point – namely, the external IP address of the cluster’s NGINX Ingress Controller. Server Name Indication (SNI) routing is configured on NGINX Ingress Controller to authenticate and route connections to the appropriate application based on the domain name requested by users.
But many organizations need to extend that use case and deploy applications in multiple Kubernetes clusters, which might be spread across cloud‑provider regions. For external traffic to reach new cluster regions, you need to create DNS zones that resolve to those regions.
In the past, this process required using a third‑party provider (such as GoDaddy or DNSExit) to manually create a domain registry and update host records appropriately. Now, the ExternalDNS Kubernetes project automates the process by making Kubernetes resources discoverable via public DNS servers. That means you use the Kubernetes API to configure a list of DNS providers.
With an integration between ExternalDNS and NGINX Ingress Controller, you can manage DNS A records such that DNS names are derived from hostnames declared in a standard Kubernetes Ingress resource or an NGINX VirtualServer custom resource. Developers and DevOps teams can leverage this integration in their CI/CD pipelines to automatically discover applications across different clusters, without involving the NetOps team (which typically owns DNS).
In this post, we show how to use sample configuration files from our GitHub repo to integrate ExternalDNS with NGINX Ingress Controller.
The Base Architecture
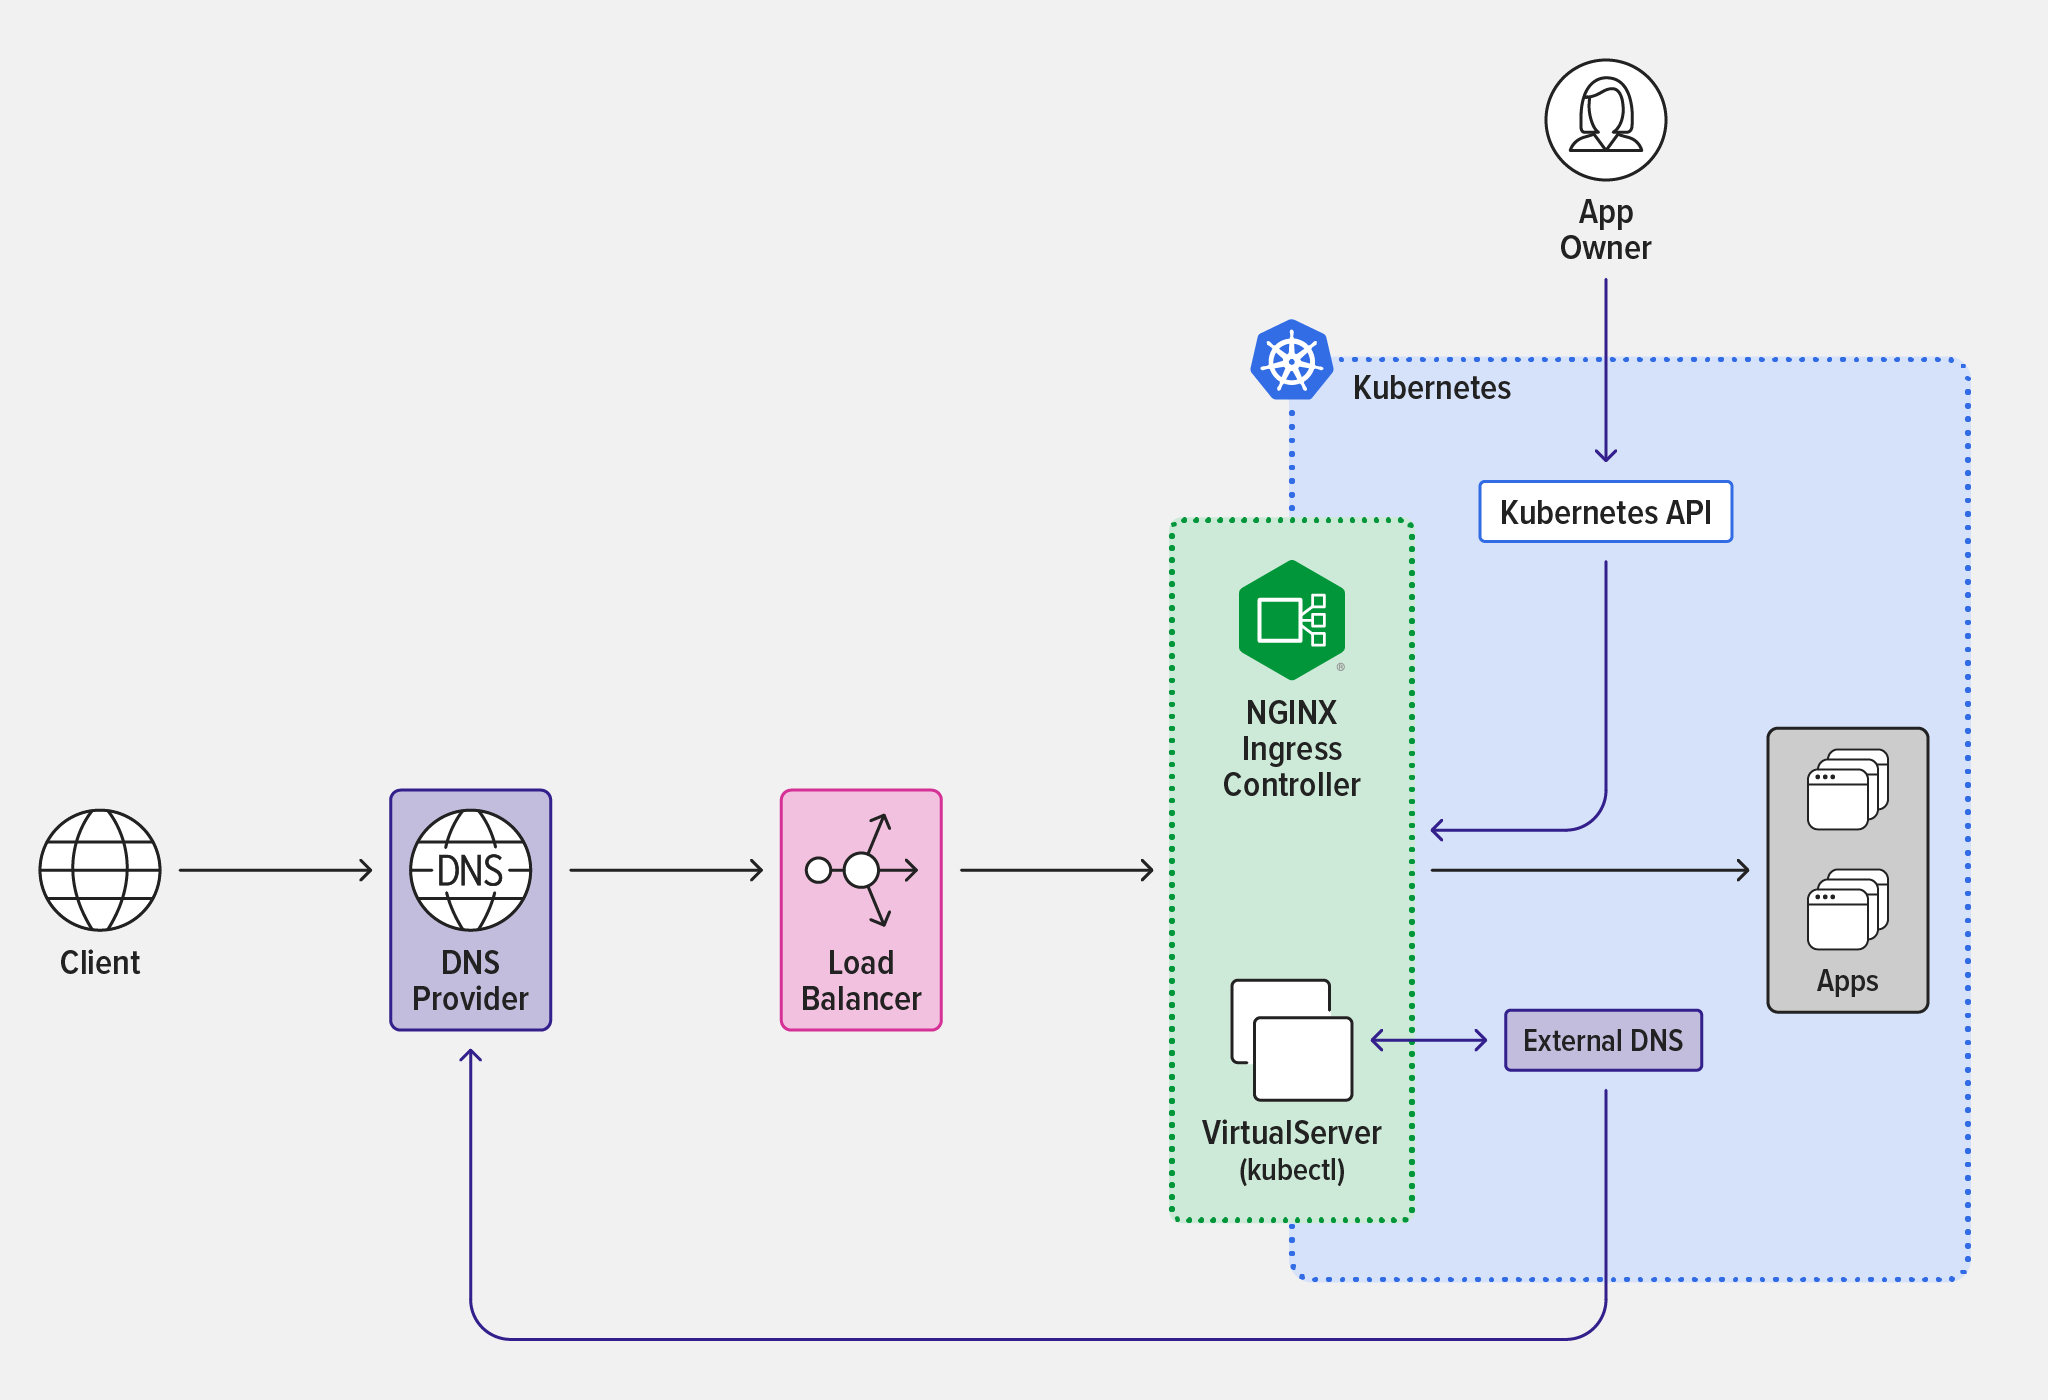
To implement ExternalDNS with NGINX Ingress Controller, we start with the base case where developers configure an Ingress controller to externally expose Kubernetes apps. Clients cannot connect to the apps until the configured domain name resolves to the public entry point of the Kubernetes cluster.
NGINX Ingress Controller interacts with the DNS provider through the intermediary ExternalDNS Kubernetes deployment, enabling automatic discovery of Kubernetes applications using external DNS records. In the diagram, the black lines represent the data path over which external users access applications in the Kubernetes cluster. The purple lines represent the control path over which app owners manage external DNS records with VirtualServer resources in the NGINX Ingress Controller configuration and External DNS accesses the DNS provider.
Integrating ExternalDNS and NGINX Ingress Controller
Perform the steps in the following sections to integrate ExternalDNS and NGINX Ingress Controller.
Prerequisites
- Create at least one registered domain. Substitute its name for
<my‑domain>in the steps below. (There are many articles available on how to register a domain, including this guide from PCMag.) -
Deploy NGINX Ingress Controller using manifests or Helm charts. Add the equivalent of these command‑line arguments in the deployment specification:
-enable-external-dns– Enables integration with ExternalDNS.-external-service=nginx-ingress– Tells NGINX Ingress Controller to advertise its public entry point for recording inArecords managed by the DNS provider. The hostname of the public entry point resolves to the external servicenginx-ingress.
- If you are deploying the Kubernetes cluster on premises, provision an external load balancer. We provide instructions for deploying NGINX as the external load balancer with BGP in our free eBook Get Me to the Cluster. Alternatively, you can use F5 BIG‑IP or MetalLB.
-
If necessary, create a DNS zone in a provider supported by ExternalDNS. This command is for the provider used in the sample deployment, Google Cloud DNS.
$ gcloud dns managed-zones create "external-dns-<my-domain>" --dns-name "external-dns.<my-domain>." --description "Zone automatically managed by ExternalDNS"
Deploy NGINX Ingress Controller and ExternalDNS
-
Clone the GitHub repository for the sample deployment and deploy NGINX Ingress Controller.
$ git clone https://github.com/nginxinc/NGINX-Demos.git && cd NGINX-Demos/external-dns-nginx-ingress/ $ kubectl apply -f nginx-ingress.yaml && kubectl apply -f loadbalancer.yaml -
Update the following arguments in the ExternalDNS deployment specification (on lines 59–62 in external-dns-gcloud.yaml for the sample deployment):
--domain-filter– The name of the domain created in Step 4 of the previous section (in the sample deployment,external-dns.<my-domain>). Remove any existing values so that only this domain is used.--provider– The DNS provider (in the sample deployment,googlefor Google DNS).--google-project– The name of the Google project you’re using for the sample deployment (required only if you have more than one Google project).--txt-owner-id– The ID you choose (unique to the sample deployment).
Note: The arguments you need to include in the ExternalDNS deployment spec may vary depending on which DNS provider you choose. For a list of tutorials on deploying ExternalDNS to the cluster with different DNS providers, see the ExternalDNS documentation.
-
Deploy ExternalDNS in the cluster and verify that the deployment runs successfully (the output is spread across two lines for legibility).
$ kubectl apply -f external-dns-gcloud.yaml
$ kubectl get pods -o wide
NAME                                READY  STATUS    ...
external-dns-4hrytf7f98f-ffuffjbf7  1/1    Running   ...
    ... RESTARTS   AGE
    ... 0          1m
Configure NGINX Ingress Controller
Next, we configure a VirtualServer resource with an Ingress load balancing rule that routes external connections into our Kubernetes applications.
-
In app-virtual-server.yaml, set the
hostfield (line 6):6 host: ingress.external-dns.<my-domain>The mapping between this value and the value of
domain-filteron line 59 of external-dns-gcloud.yaml (set in Step 2 in the previous section) is what enables the automatic update of DNS records. -
Apply app-virtual-server.yaml and verify that the VirtualServer is correctly configured.
$ kubectl apply -f app-secret.yaml && kubectl apply -f app-virtual-server.yaml $ kubectl get vs NAME STATE HOST IP cafe Valid ingress.external-dns.<my-domain> 34.168.X.Y -
Verify that a DNS type
Arecord has been added to the DNS zone. In particular, the IP address in theDATAfield must match theIPfield in the output from thekubectlgetvscommand in the previous step (the external IP address of the service of typeLoadBalancerwhich exposes NGINX Ingress Controller, or the equivalent in an on‑premises deployment).$ gcloud dns record-sets list --zone external-dns-<my-domain> -name ingress.external-dns.<my-domain> --type A NAME TYPE TTL DATA ingress.external-dns.<my-domain>. A 300 34.168.X.Y -
To validate that the VirtualServer hostname can be resolved on the local machine, obtain the name servers assigned to the DNS zone (in this case
my-ns-domains).$ gcloud dns record-sets list --zone external-dns.<my-domain> --name external-dns.<my-domain>. --type NS NAME TYPE TTL DATA external-dns.<my-domain>. NS 21600 my-ns-domains $ dig +short @my-ns-domains ingress.external-dns.<my-domain> 34.168.X.Y - Use the DNS records retrieved in the previous step as dedicated name servers for your registered domain. This sets your registered domain as the parent zone of the DNS zone created in Step 4 of Prerequisites.
-
Verify that you can access the VirtualServer hostname now that it’s exposed to the global Internet.
$ curl -i --insecure https://ingress.external-dns.<my-domain>/tea
HTTP/1.1 200 OK
Server: nginx/1.23.0
Date: Day, DD MM YYYY hh:mm:ss TZ
Content-Type: text/plain
Content-Length: 160
Connection: keep-alive
Expires: Day, DD MM YYYY hh:mm:ss TZ
Cache-Control: no-cache
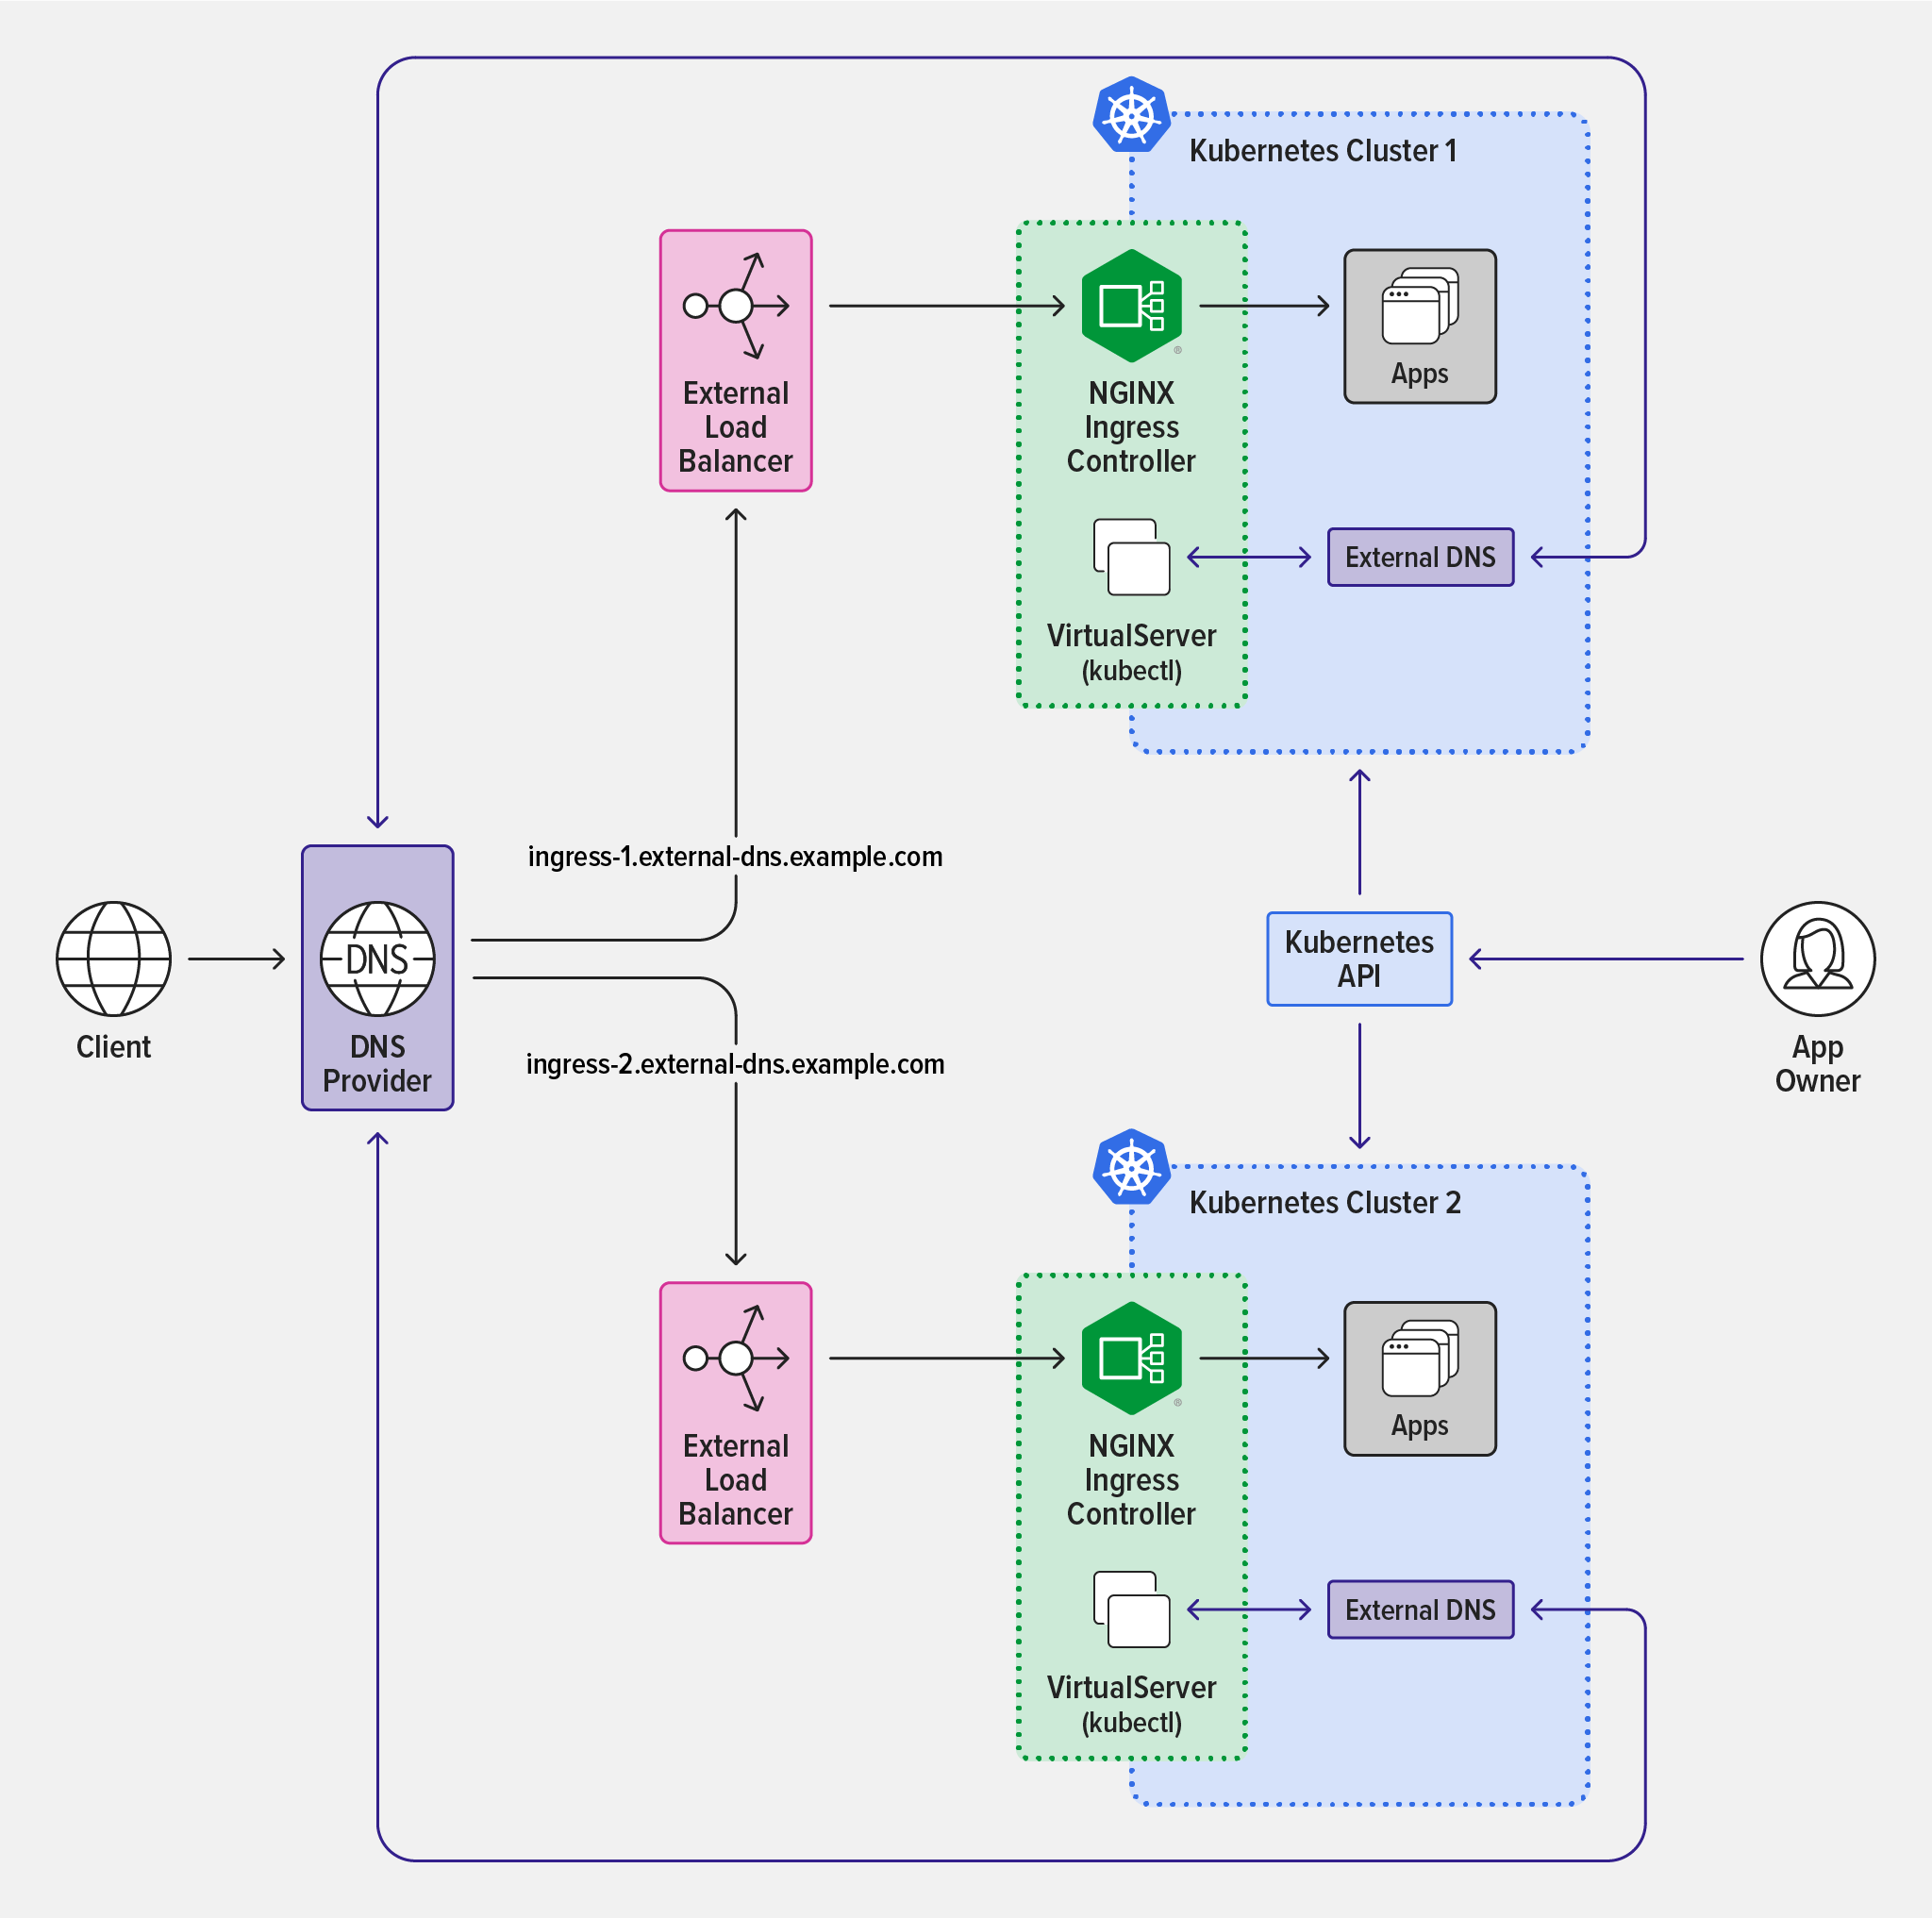
Scaling Out Multiple Kubernetes Clusters
You can quickly scale the architecture and automatically discover multiple clusters by automating the creation of external DNS records and resolving them to new cluster entry points (Kubernetes Cluster 1 and Kubernetes Cluster 2) in the diagram. Repeat the instructions in Deploy NGINX Ingress Controller and ExternalDNS and Configure NGINX Ingress Controller.
You can also use Infrastructure-as-Code tools in your CI/CD pipeline to generate and expose new clusters to external traffic using ExternalDNS and NGINX Ingress Controller. Additionally, you can manage multiple DNS zones, or even multiple DNS providers depending on how discovery is enabled.
Conclusion
Balancing productivity with security measures that mitigate breaches can be difficult. Imposing restrictions on DevOps teams often causes friction between them and NetOps/SecOps teams. The ideal balance differs in each organization, and NGINX provides the flexibility to establish a balance that adheres to your priorities and requirements.
In the past, app owners relied on NetOps teams to connect their applications to external systems. By using the ExternalDNS integration with NGINX, developers and DevOps teams are empowered to deploy discoverable applications on their own, helping accelerate time to market for innovation.
For a full comprehensive guide on getting started with NGINX in Kubernetes, download our free eBook Managing Kubernetes Traffic with F5 NGINX: A Practical Guide.
You can also get started today by requesting 30-day free trial of NGINX Ingress Controller with NGINX App Protect WAF and DoS or contact us to discuss your use cases.