F5 NGINX Management Suite is a family of modules for managing the NGINX data plane from a single pane of glass. By simplifying management of NGINX Open Source and NGINX Plus instances, NGINX Management Suite simplifies your processes for scaling, securing, and monitoring applications and APIs.
You need to install the NGINX Agent on each NGINX instance you want to manage from NGINX Management Suite, to enable communication with the control plane and remote configuration management.
For NGINX instances running on bare metal or a virtual machine (VM), we provide installation instructions in our documentation. In this post we show how to build a Docker image for NGINX Plus and NGINX Agent, to broaden the reach of NGINX Management Suite to NGINX Plus instances deployed in Kubernetes or other microservices infrastructures.
There are three build options, depending on what you want to include in the resulting Docker image:
- NGINX Plus and NGINX Agent only
- NGINX Plus, NGINX Agent, and NGINX App Protect WAF
- NGINX Plus, NGINX Agent, and support for the NGINX Management Suite API Connectivity Manager developer portal (for NGINX Plus instances running as an API gateway)
[Editor – This post was updated in April 2023 to clarify the instructions, and add the ACM_DEVPORTAL field, in Step 1 of Running the Docker Image in Kubernetes.]
Prerequisites
We provide a GitHub repository of the resources you need to create a Docker image of NGINX Plus and NGINX Agent, with support for version 2.8.0 and later of the Instance Manager module from NGINX Management Suite.
To build the Docker image, you need:
- A Linux host (bare metal or VM)
- Docker 20.10+
- A private registry to which you can push the target Docker image
- A running NGINX Management Suite instance with Instance Manager, and API Connectivity Manager if you want to leverage support for the developer portal
- A subscription (or 30-day free trial) for NGINX Plus and optionally NGINX App Protect
To run the Docker image, you need:
- A running Kubernetes cluster
kubectlwith access to the Kubernetes cluster
Building the Docker Image
Follow these instructions to build the Docker image.
-
Clone the GitHub repository:
$ git clone https://github.com/nginxinc/NGINX-Demos Cloning into 'NGINX-Demos'... remote: Enumerating objects: 126, done. remote: Counting objects: 100% (126/126), done. remote: Compressing objects: 100% (85/85), done. remote: Total 126 (delta 61), reused 102 (delta 37), pack-reused 0 Receiving objects: 100% (126/126), 20.44 KiB | 1.02 MiB/s, done. Resolving deltas: 100% (61/61), done. -
Change to the build directory:
$ cd NGINX-Demos/nginx-agent-docker/ -
Run
dockerpsto verify that Docker is running and then run the build.sh script to include the desired software in the Docker image. The base options are:‑C– Name of the NGINX Plus license certificate file (nginx-repo.crtin the sample commands below)‑K– Name of the NGINX Plus license key file (nginx-repo.keyin the sample commands below)-
‑t– The registry and target image in the form<registry_name>/<image_name>:<tag>(
registry.ff.lan:31005/nginx-plus-with-agent:2.7.0in the sample commands below) ‑n– Base URL of your NGINX Management Suite instance (https://nim.f5.ff.lanin the sample commands below)
The additional options are:
‑d– Add data‑plane support for the developer portal when using NGINX API Connectivity Manager‑w– Add NGINX App Protect WAF
Here are the commands for the different combinations of software:
-
NGINX Plus and NGINX Agent:
$ ./scripts/build.sh -C nginx-repo.crt -K nginx-repo.key \ -t registry.ff.lan:31005/nginx-plus-with-agent:2.7.0 \ -n https://nim.f5.ff.lan -
NGINX Plus, NGINX Agent, and NGINX App Protect WAF (add the
‑woption):$ ./scripts/build.sh -C nginx-repo.crt -K nginx-repo.key \ -t registry.ff.lan:31005/nginx-plus-with-agent:2.7.0 -w \ -n https://nim.f5.ff.lan -
NGINX Plus, NGINX Agent, and developer portal support (add the
‑doption):$ ./scripts/build.sh -C nginx-repo.crt -K nginx-repo.key \ -t registry.ff.lan:31005/nginx-plus-with-agent:2.7.0 -d \ -n https://nim.f5.ff.lan
-
Using your preferred text editor, open manifests/1.nginx-with-agent.yaml and make the following changes (the code snippets show the default values that you can or must change, highlighted in orange):
-
In the
spec.template.spec.containerssection, replace the default image name (your.registry.tld/nginx-with-nim2-agent:tag) with the Docker image name you specified with the‑toption in Step 3 of Building the Docker Image (in our case, registry.ff.lan:31005/nginx-plus-with-agent:2.7.0):spec: ... template: ... spec: containers: - name: nginx-nim image: your.registry.tld/nginx-with-nim2-agent:tag -
In the
spec.template.spec.containers.envsection, make these substitutions in thevaluefield for each indicatedname:NIM_HOST– (Required) Replace the default (nginx-nim2.nginx-nim2) with the FQDN or IP address of your NGINX Management Suite instance (in our case nim2.f5.ff.lan).NIM_GRPC_PORT– (Optional) Replace the default (443) with a different port number for gRPC traffic.NIM_INSTANCEGROUP– (Optional) Replace the default (lab) with the instance group to which the NGINX Plus instance belongs.NIM_TAGS– (Optional) Replace the default (preprod,devops) with a comma‑delimited list of tags for the NGINX Plus instance.
spec: ... template: ... spec: containers: ... env: - name: NIM_HOST ... value: "nginx-nim2.nginx-nim2" - name: NIM_GRPC_PORT value: "443" - name: NIM_INSTANCEGROUP value: "lab" - name: NIM_TAGS value: "preprod,devops" -
Also in the
spec.template.spec.containers.envsection, uncomment thesename‑valuefield pairs if the indicated condition applies:NIM_WAFandNIM_WAF_PRECOMPILED_POLICIES– NGINX App Protect WAF is included in the image (you included the-woption in Step 3 of Building the Docker Image), so the value is"true".ACM_DEVPORTAL– Support for the App Connectivity Manager developer portal is included in the image (you included the-doption in Step 3 of Building the Docker Image), so the value is"true".
spec: ... template: ... spec: containers: ... env: - name: NIM_HOST ... #- name: NAP_WAF # value: "true" #- name: NAP_WAF_PRECOMPILED_POLICIES # value: "true" ... #- name: ACM_DEVPORTAL # value: "true"
-
-
Run the nginxwithAgentStart.sh script as indicated to apply the manifest and start two pods (as specified by the
replicas:2instruction in thespecsection of the manifest), each with NGINX Plus and NGINX Agent:$ ./scripts/nginxWithAgentStart.sh start $ ./scripts/nginxWithAgentStart.sh stop -
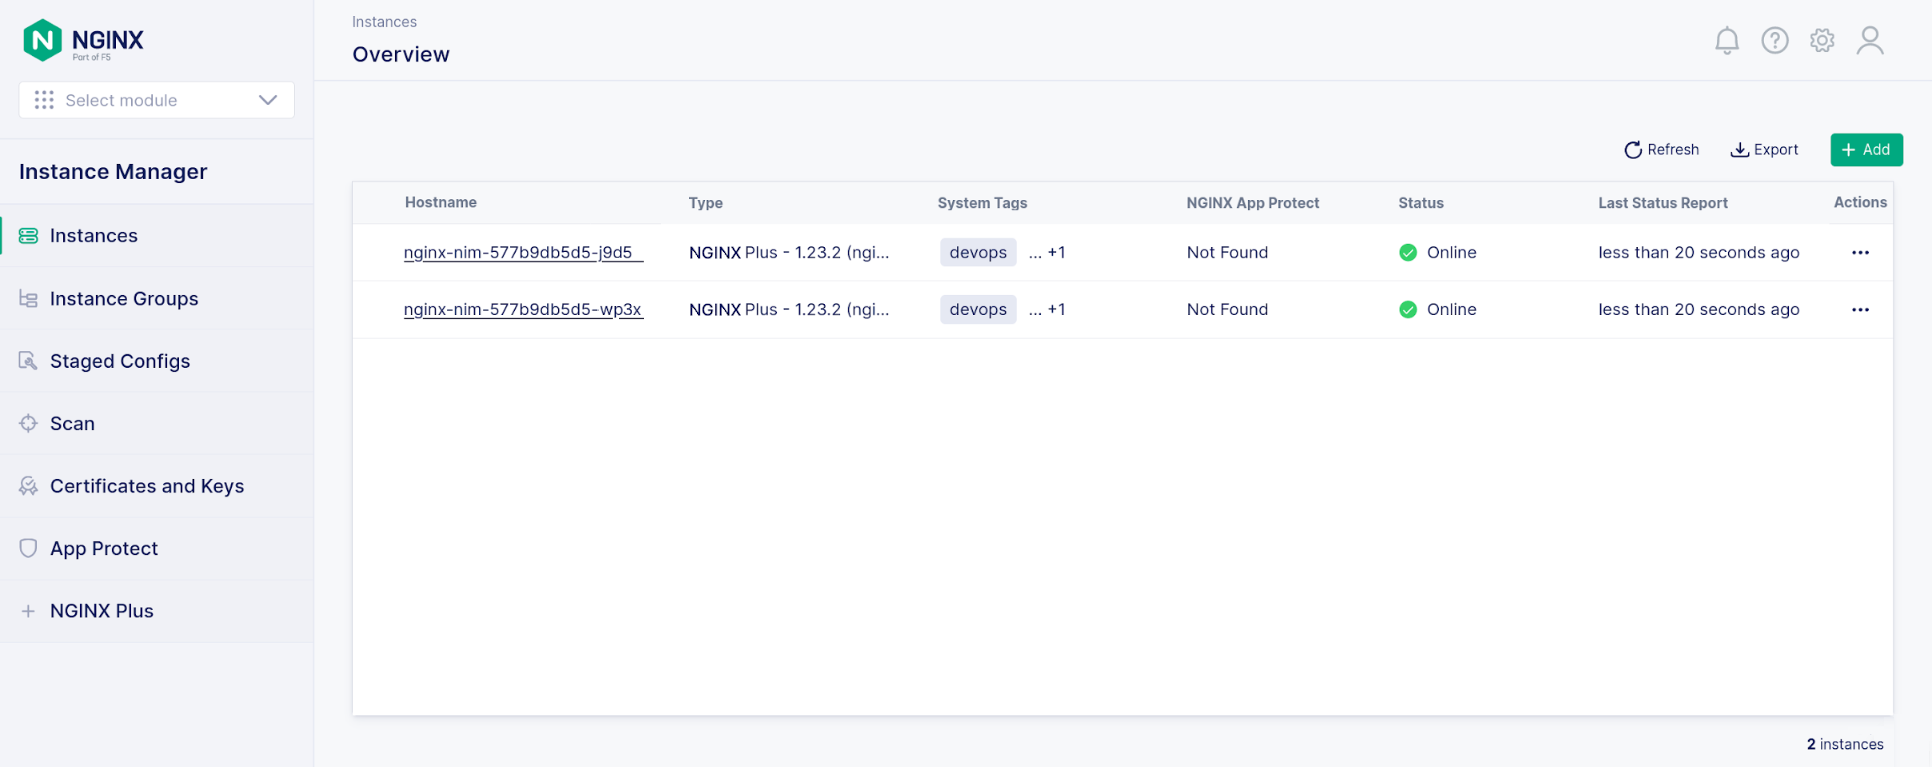
Verify that two pods are now running: each pod runs an NGINX Plus instance and an NGINX Agent to communicate with the NGINX Management Suite control plane.
$ kubectl get pods -n nim-test NAME READY STATUS RESTARTS AGE nginx-nim-7f77c8bdc9-hkkck 1/1 Running 0 1m nginx-nim-7f77c8bdc9-p2s94 1/1 Running 0 1m -
Access the NGINX Instance Manager GUI in NGINX Management Suite and verify that two NGINX Plus instances are running with status Online. In this example, NGINX App Protect WAF is not enabled.
- NGINX Management Suite
- NGINX Plus (includes NGINX App Protect WAF)
Here’s a sample trace of the build for a basic image. The Build complete message at the end indicates a successful build.
$ ./scripts/build.sh -C nginx-repo.crt -K nginx-repo.key -t registry.ff.lan:31005/nginx-plus-with-agent:2.7.0 -n https://nim.f5.ff.lan
=> Target docker image is nginx-plus-with-agent:2.7.0
[+] Building 415.1s (10/10) FINISHED
=> [internal] load build definition from Dockerfile
=> transferring dockerfile: 38B
=> [internal] load .dockerignore
=> transferring context: 2B
=> [internal] load metadata for docker.io/library/centos:7
=> [auth] library/centos:pull token for registry-1.docker.io
=> CACHED [1/4] FROM docker.io/library /centos:7@sha256:be65f488b7764ad3638f236b7b515b3678369a5124c47b8d32916d6487418ea4
=> [internal] load build context
=> transferring context: 69B
=> [2/4] RUN yum -y update  && yum install -y wget ca-certificates epel-release curl  && mkdir -p /deployment /etc/ssl/nginx  && bash -c 'curl -k $NMS_URL/install/nginx-agent | sh' && echo "A  299.1s
=> [3/4] COPY ./container/start.sh /deployment/
=> [4/4] RUN --mount=type=secret,id=nginx-crt,dst=/etc/ssl/nginx/nginx-repo.crt  --mount=type=secret,id=nginx-key,dst=/etc/ssl/nginx/nginx-repo.key  set -x  && chmod +x /deployment/start.sh &  102.4s
=> exporting to image
=> exporting layers
=> writing image sha256:9246de4af659596a290b078e6443a19b8988ca77f36ab90af3b67c03d27068ff
=> naming to registry.ff.lan:31005/nginx-plus-with-agent:2.7.0
=> Build complete for registry.ff.lan:31005/nginx-plus-with-agent:2.7.0
Running the Docker Image in Kubernetes
Follow these instructions to prepare the Deployment manifest and start NGINX Plus with NGINX Agent on Kubernetes.
Get Started
To try out the NGINX solutions discussed in this post, start a 30-day free trial today or contact us to discuss your use cases:
Download NGINX Agent – it’s free and open source.