At NGINX we’re constantly looking for ways to help you get the most out of our software. Our solution briefs and sizing guides are one important resource we provide – by empirically testing the performance you can expect at different levels of computing power, we help you maximize application delivery performance with the infrastructure you already have, and determine accurate operating expenses for the performance and scale you are preparing for.
We recently updated the NGINX Ingress Controller solution brief with sizing guidelines for Amazon Elastic Kubernetes Service (EKS). The brief outlines the performance you can expect to achieve with the NGINX Ingress Controller running on various instance types in Amazon EKS, along with the estimated monthly total cost of ownership (TCO). In this blog, we explain how we came up with those numbers, including all the information you need to do similar testing of your own.
Topology
The following diagram shows the topology used for the testing.
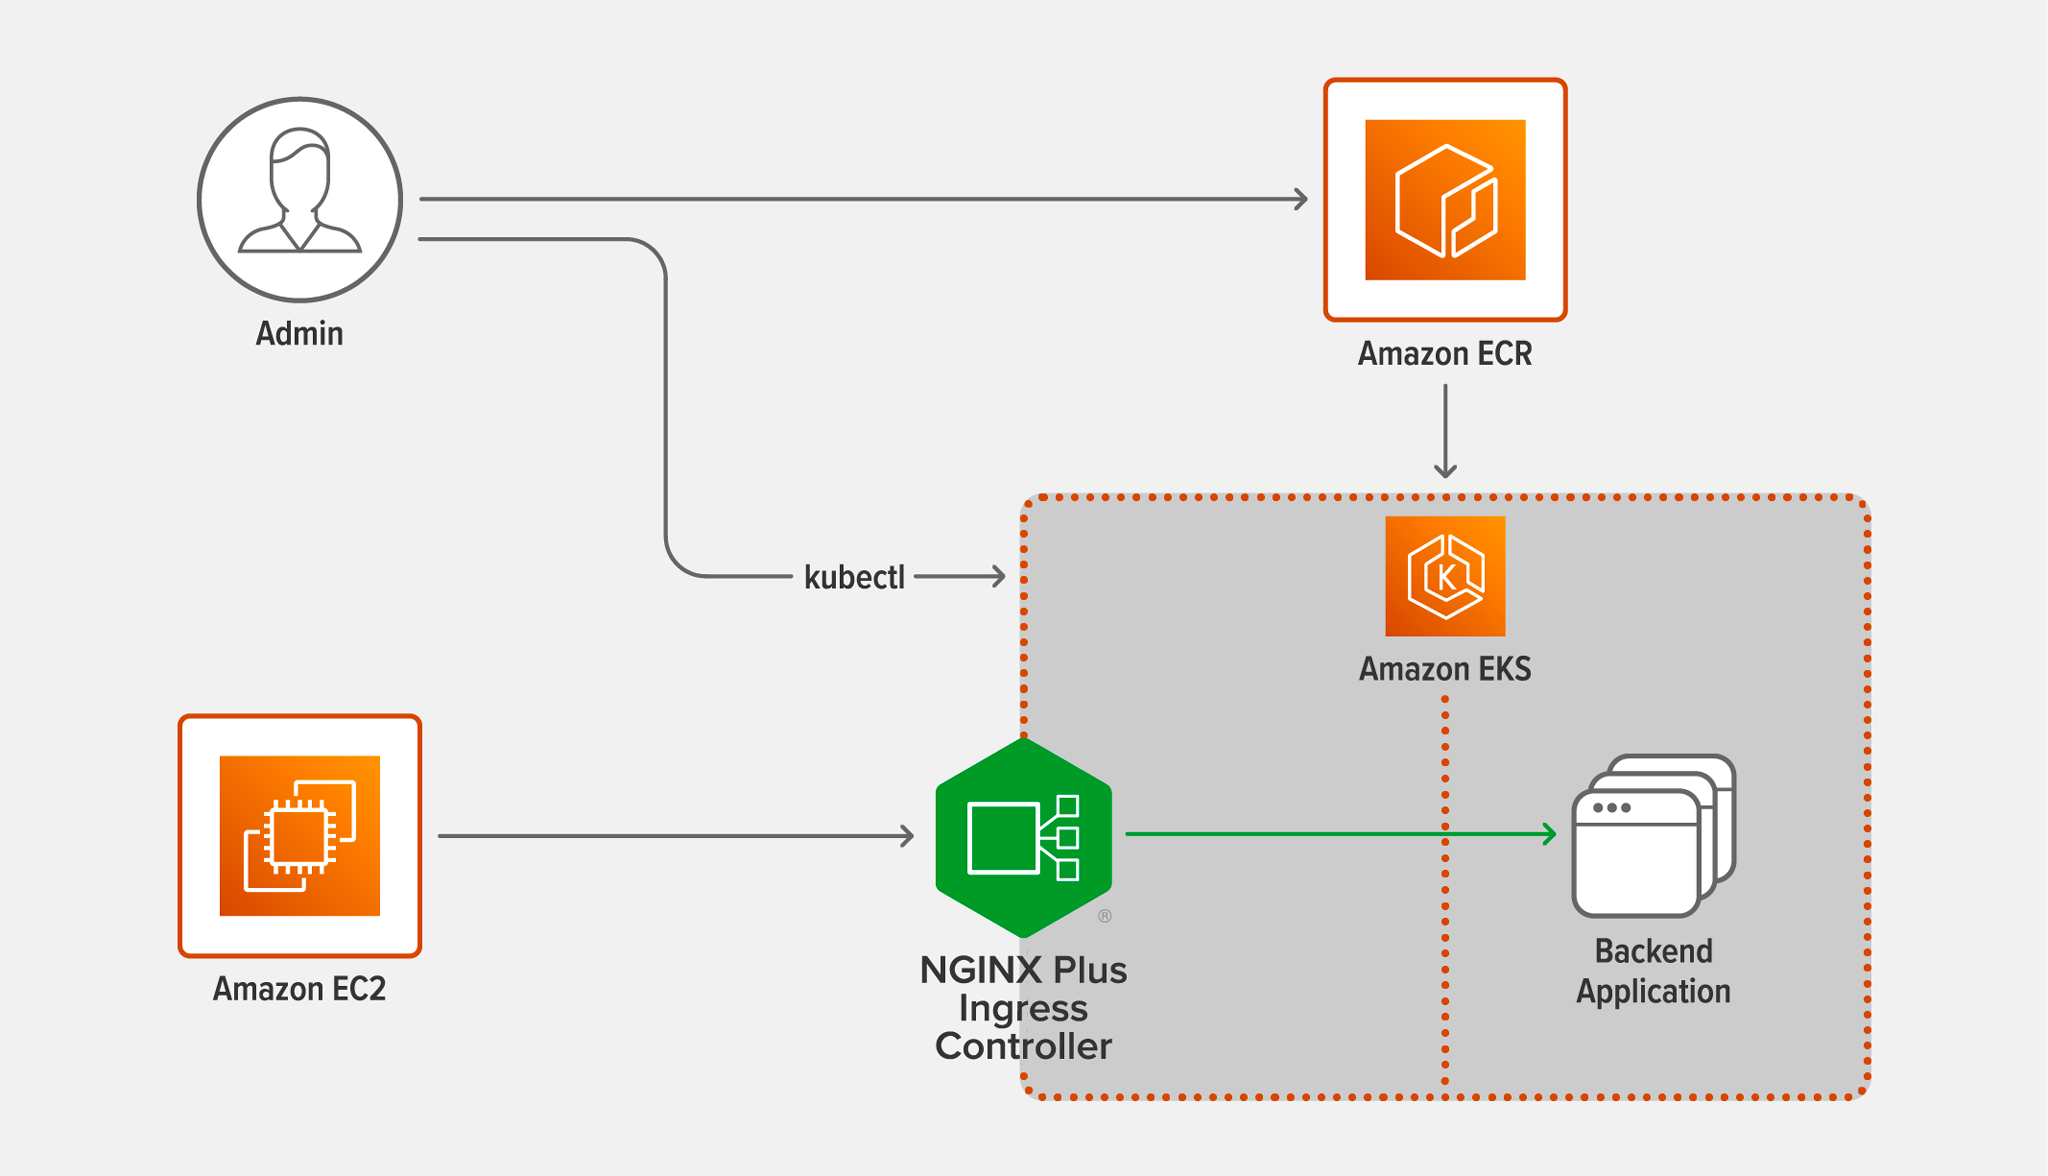
- Admin is the user who conducts the testing by running the commands specified in the following sections.
- Amazon ECR (Elastic Container Registry) hosts the official NGINX Plus Ingress Controller Docker image used in the testing. See Deploying NGINX Plus Ingress Controller.
- Amazon EC2 (Elastic Compute Cloud) hosts the c5n.9xlarge image where
wrkruns, generating the requests. See Testing Methodology. - Amazon EKS (Elastic Kubernetes Service) hosts the c5n.9xlarge images for NGINX Plus Ingress Controller and the backend application. See Creating the Amazon EKS Cluster.
- NGINX Plus Ingress Controller proxies the requests generated by
wrkto the backend application, and returns the application’s responses. See Deploying NGINX Plus Ingress Controller. - Backend Application responds to the requests proxied by NGINX. See Deploying the Backend Pods.
Creating the Amazon EKS Cluster
Before deploying the EKS cluster, perform these steps on the local machine, which is represented by the Admin icon in the diagram:
- Download
eksctl, the official command line interface for Amazon EKS. If you already haveeksctlinstalled on your machine, be sure to update it to the latest version. - Add the appropriate AWS admin credentials to the ${HOME}/.aws/credentials file.
- Download the YAML files for this blog from our Gist repo.
- Download rbac.yaml (or ap-rbac.yaml if you are using NGINX App Protect) from the NGINX Ingress Controller repo on GitHub.
To deploy the EKS cluster, run the following eksctl command on the local machine. (The --nodes flag is omitted, because by default the command creates the two nodes needed for the testing: one for NGINX Plus Ingress Controller and one for the base backend application.)
Note: You can deploy the EKS cluster in any region other than us-west-1. Subscribing to the NGINX Plus Ingress Controller image in the Amazon Marketplace for Containers (see the next section) is not supported in that region.
# eksctl create cluster --instance-types=c5n.9xlarge --managed --ssh-access=true --ssh-public-key=/path/to/public-keyTo connect to a cluster node over SSH, run this command. During the testing, you need to connect to the NGINX Plus Ingress Controller node to run the htop command and verify that the load from the wrk client is enough to take CPU usage on the node to 100%.
# ssh -i /path/to/private-key ec2-user@<public-IP-address-of-EKS-node>Deploying NGINX Plus Ingress Controller
Deploying the NGINX Plus Ingress Controller on Amazon EKS is now easier than ever.
-
Create an OIDC Identity Provider (IdP) for your EKS cluster.
# eksctl utils associate-iam-oidc-provider --region=<eks-cluster-region> --cluster=<eks-cluster-name> --approve -
Create
iamserviceaccount, the standard paired IAM Role and Service Account (IRSA) for EKS, and attach theAWSMarketplaceMeteringRegisterUsageIAM policy for monitoring the usage of the NGINX Plus Ingress Controller image and authorizing the deployment. This command automatically creates a Service Account with an annotation linking toiamserviceaccount.# eksctl create iamserviceaccount --name <service-account-name> --namespace nginx-ingress --cluster <eks-cluster-name> --region <eks-cluster-region> --attach-policy-arn arn:aws:iam::aws:policy/AWSMarketplaceMeteringRegisterUsage --approve -
In the YAML file for RBAC, edit the value of
namein thesubjectsfield to match theservice-account-nameyou set in the previous step. This is on line 104 in rbac.yaml and line 23 in ap-rbac.yaml. Also edit the value of namespace if necessary (line 105 or line 24), but the command above uses the default,nginx-ingress. -
Apply the YAML file (substitute ap-rbac.yaml as appropriate).
# kubectl apply –f rbac.yaml -
Install the Docker client software on the local machine.
-
Subscribe to the NGINX Plus Ingress Controller (Premium Edition) listing in the Amazon Marketplace for Containers.
-
Authenticate your Docker client with the Amazon ECR which hosts the NGINX Plus Ingress Controller Docker image.
-
Edit the following values in nginx-ingress.yaml:
kubernetes.io/hostnamein thenodeSelectorfield (line 23) – The label for the NGINX Plus Ingress Controller node in the EKS cluster, obtained from thekubectlgetnodes--show-labelscommandserviceAccountName(line 24) — The name of theiamserviceaccountIRSA, specified asservice-account-namein Step 2.imagein thecontainersfield (line 26) – The location of the NGINX Plus Ingress Controller Docker image in Amazon ECR
-
Apply the YAML manifest:
# kubectl apply –f nginx-ingress.yaml
Deploying the Backend Pods
Perform the following steps to deploy the backend application:
-
In backend-deployment.yaml, edit the value of
kubernetes.io/hostnamein thenodeSelectorfield (line 15), substituting the label obtained from thekubectlgetnodes--show-labelscommand. -
Apply the YAML manifest:
# kubectl apply –f backend-deployment.yaml -
Scale the backend application up to three replicas, enough to handle the load generated by
wrk:# kubectl scale deployment web-server-payload --replicas=3
Testing Methodology
Run the following wrk command on the client c5n.9xlarge AMI hosted in Amazon EC2, adjusting the values as required to make CPU usage on the NGINX Plus Ingress Controller instance hit 100% in each test run:
# wrk -t <number-of-threads> -c <number-of-connections> -d 180s http[s]://<address-of-NGINX-Plus-Ingress-Controller>- The
–coption specifies the number of TCP connections to create. Set this option as required to achieve 100% CPU usage, up to 500 connections. - The
–doption specifies how long to generate traffic (the duration of each test run). Set this option to 180 seconds (3 minutes). - The
–toption specifies the number of threads to create. Set this option as required to achieve 100% CPU usage, up to 16 threads (one for each CPU being used on the client during the test run).
We used the version of wrk available in GitHub in July 2021 and recommend using the current version when reproducing the tests.
Run tests to collect two performance metrics:
-
Requests per second (RPS) – The number of requests NGINX Plus Ingress Controller can process per second, averaged over a fixed time period. In this case use the http:// scheme in the
wrkcommand.NGINX Plus Ingress Controller accepts the requests for a 1-KB file (static content) and load balances them across the backend application pods. The file is roughly the size of a small CSS or JavaScript file, or a very small image.
-
SSL/TLS transactions per second (TPS) – The number of new HTTPS connections NGINX Plus Ingress Controller can establish and serve per second. In this case use the https:// scheme in the
wrkcommand. Use RSA with a 2048‑bit key size and Perfect Forward Secrecy; the SSL cipher isECDHE-RSA-AES256-GCM-SHA384.The client sends a series of HTTPS requests, each on a new connection. The client and NGINX Plus Ingress Controller perform a TLS handshake to establish a secure connection, then NGINX Plus Ingress Controller parses the request and returns a 0‑KB response. The connection is closed after the request is satisfied.
As noted in Creating the Amazon EKS Cluster, for simplicity you can run the NGINX Plus Ingress Controller on a c5n.9xlarge instance in every test run. To control how many CPUs are available during each test run (from 1 to 36 as specified in the table in Performance Analysis), set the parameter to the worker_processes directive.
Software Used
We used the following software for the testing:
- The client machine running
wrkgenerated the traffic that the Ingress Controller proxied. We used the version ofwrkthat was available in GitHub in July 2021 and recommend using the current version when reproducing the tests. - NGINX Plus Ingress Controller version 1.11.0
- Amazon Linux 2 LTS ran on all three machines with OpenSSL 1.0.2k–fips
Performance Analysis
As mentioned above, we ran the NGINX Plus Ingress Controller on a c5n.9xlarge instance in every test run, using the worker_processes directive to control how many CPUs were used. In the table below, we report the instance type in the c5n family that supports each number of CPUs, along with the monthly TCO for that instance type.
The table reports the number of RPS and SSL TPS achieved with different numbers of CPUs available to NGINX Plus Ingress Controller, from the tests described in Testing Methodology.
Note that RPS do not grow linearly with larger numbers of CPUs, and in fact the percentage improvement tends to decrease as the number of CPUs gets larger. The rate of improvement drops even further above 16 cores, because c5n.9xlarge instances are enabled with hyperthreading and equipped with 18 cores and 2 threads per core, for up to 36 CPUs total. Hyperthreading only marginally improves the number of RPS.
The relationship between SSL TPS and number of CPUs is also less than linear, but does not drop off as dramatically until we scale past 16 CPUs. Hyperthreading does improve performance of CPU bound, parallelizable operations such as TLS handshakes. Because of this, the performance of SSL TPS increases even when we scale past 18 CPUs.
| AWS Instance Type | CPUs | RPS | SSL TPS (RSA) | Average Monthly TCO |
|---|---|---|---|---|
| c5n.large | 1 | 45,000 | 6,700 | $100 |
| c5n.large | 2 | 80,000 | 12,600 | $100 |
| c5n.xlarge | 4 | 135,000 | 23,000 | $200 |
| c5n.2xlarge | 8 | 175,000 | 40,000 | $400 |
| c5n.4xlarge | 16 | 237,000 | 68,500 | $795 |
| c5n.9xlarge | 32 | 290,000 | 88,800 | $1790 |
| c5n.9xlarge | 36 | 300,000 | 92,800 | $1790 |
Conclusion
We have provided deployment details you can use to determine the expected performance of NGINX Plus Ingress Controller running in Amazon EKS. You can use it to test other families of EKS instances and to provision an affordable solution that satisfies your performance and scaling requirements for production workloads in Kubernetes.
Our results for HTTP RPS show that the percentage performance improvement declines as we double the number of CPUs, converging to roughly 300,000 RPS. The results for SSL TPS show that the performance increases nearly linearly as we double the number of CPUs, even when we start hyperthreading (using two threads per core) because TLS handshakes are CPU bound.
Check out the solution brief, and test the performance of NGINX Plus Ingress Controller with for yourself – get started today!
To try the NGINX Ingress Controller with NGINX Open Source, you can obtain the source code, or download a prebuilt container from DockerHub.