This is the third blog post in our series on deploying NGINX Open Source and NGINX Plus as an API gateway.
- Part 1 provides detailed instructions for several use cases of NGINX Open Source and NGINX Plus as the API gateway for RESTful, HTTP‑based APIs.
- Part 2 extends those use cases and looks at a range of safeguards that can be applied to protect and secure backend API services in production.
- This post explains how to deploy NGINX Open Source and NGINX Plus as an API gateway for gRPC services. Originally published in 2018, the post has been updated to leverage the support introduced in NGINX Plus Release 23 for the native gRPC health checking protocol. See Implementing Health Checks.
Note: Except as noted, all information in this post applies to both NGINX Plus and NGINX Open Source. For ease of reading, the rest of the blog refers simply to “NGINX” when the discussion applies to both versions.
The concepts and benefits of microservices application architectures have been well documented in recent years, and nowhere more so than on the NGINX blog. At the heart of microservices applications is the HTTP API, and the first two blog posts in this series use a hypothetical REST API to illustrate how NGINX addresses this style of application.
Despite the popularity of REST APIs with JSON message formats for modern applications, it is not an ideal approach for every scenario, or every organization. The most common challenges are:
- Documentation standards – Without good developer discipline or mandated documentation requirements, it is all too easy to end up with a number of REST APIs that lack an accurate definition. The Open API Specification has emerged as a generic interface description language for REST APIs, but its use is optional and requires strong governance within the development organization.
- Events and long‑lived connections – REST APIs, and their use of HTTP as the transport, largely dictate a request‑response pattern for all API calls. When the application requires server‑generated events, using solutions such as HTTP long polling and WebSocket can help, but the use of such solutions ultimately requires building a separate, adjacent API.
- Complex transactions – REST APIs are built around the concept of unique resources, each represented by a URI. When an application event calls for multiple resources to be updated then either multiple API calls are required, which is inefficient, or a complex transaction must be implemented at the backend, which contradicts the core principle of REST.
In recent years, gRPC has emerged as an alternative approach to building distributed applications, and microservices applications in particular. Originally developed at Google, gRPC was open sourced in 2015, and is now a project of the Cloud Native Computing Foundation. Significantly, gRPC uses HTTP/2 as its transport mechanism, taking advantage of its binary data format and multiplexed streaming capabilities.
The primary benefits of gRPC are:
- Tightly coupled interface definition language (protocol buffers)
- Native support for streaming data (in both directions)
- Efficient binary data format
- Automated code generation for many programming languages, enabling a true polyglot development environment without introducing interoperability problems
Defining the gRPC Gateway
The first two posts in this series described how multiple APIs can be delivered through a single entry point (for example, https://api.example.com). The default behavior and characteristics of gRPC traffic lead us to take the same approach when NGINX is deployed as a gRPC gateway. While it is possible to share both HTTP and gRPC traffic on the same hostname and port, there are a number of reasons why it is preferable to separate them:
- API clients for REST and gRPC applications expect error responses in different formats
- The relevant fields for access logs vary between REST and gRPC
- Because gRPC never deals with legacy web browsers, it can have a more rigorous TLS policy
To achieve this separation, we put the configuration for our gRPC gateway in its own server{} block in the main gRPC configuration file, grpc_gateway.conf, located in the /etc/nginx/conf.d directory.
We start by defining the format of entries in the access log for gRPC traffic (lines 1–4). In this example, we use a JSON format to capture the most relevant data from each request. Note, for example, that the HTTP method is not included, as all gRPC requests use POST. We also log the gRPC status code along with the HTTP status code. However, the gRPC status code can be generated in different ways. Under normal conditions, grpc-status is returned as an HTTP/2 trailer from the backend, but for some error conditions it might be returned as an HTTP/2 header, either by the backend or by NGINX itself. To simplify the access log, we use a map block (lines 6–9) to evaluate a new variable $grpc_status and obtain the gRPC status from wherever it originates.
This configuration contains two listen directives (lines 12 and 13) so that we can test both plaintext (port 50051) and TLS‑protected (port 443) traffic. The http2 parameter configures NGINX to accept HTTP/2 connections – note that this is independent of the ssl parameter. Note also that port 50051 is the conventional plaintext port for gRPC, but is not suitable for use in production.
The TLS configuration is conventional, with the exception of the ssl_protocols directive (line 23), which specifies TLS 1.2 as the weakest acceptable protocol. The HTTP/2 specification mandates the use of TLS 1.2 (or higher), which guarantees that all clients support the Server Name Indication (SNI) extension to TLS. This means that the gRPC gateway can share port 443 with virtual servers defined in other server{} blocks.
Running Sample gRPC Services
To explore the gRPC capabilities of NGINX, we’re using a simple test environment that represents the key components of a gRPC gateway, with multiple gRPC services deployed. We use two sample applications from the official gRPC guides: helloworld (written in Go) and RouteGuide (written in Python). The RouteGuide application is especially useful because it includes each of the four gRPC service methods:
- Simple RPC (single request‑response)
- Response‑streaming RPC
- Request‑streaming RPC
- Bidirectional‑streaming RPC
Both gRPC services are installed as Docker containers on our NGINX host. For complete instructions on building the test environment, see the Appendix.
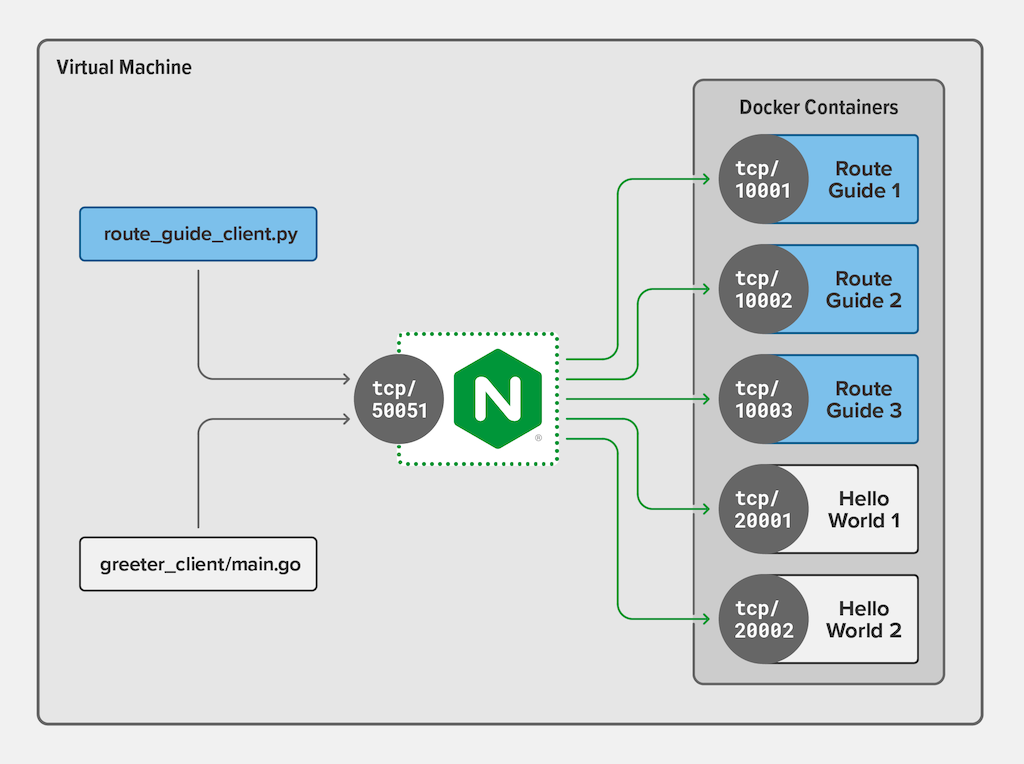
We configure NGINX to know about the RouteGuide and helloworld services, along with the addresses of the available containers.
We add an upstream block for each of the gRPC services (lines 40–45 and 47–51) and populate them with the addresses of the individual containers that are running the gRPC server code.
Routing gRPC Requests
With NGINX listening on the conventional plaintext port for gRPC (50051), we add routing information to the configuration, so that client requests reach the correct backend service. But first we need to understand how gRPC method calls are represented as HTTP/2 requests. The following diagram shows an abbreviated version of the route_guide.proto file for the RouteGuide service, illustrating how the package, service, and RPC method form the URI, as seen by NGINX.

The information carried in the HTTP/2 request can therefore be used for routing purposes by simply matching on the package name (here, routeguide or helloworld).
The first location block (line 26), without any modifiers, defines a prefix match such that /routeguide. matches all of the services and RPC methods defined in the corresponding .proto file for that package. The grpc_pass directive (line 27) therefore passes all requests from the RouteGuide client to the upstream group routeguide_service. This configuration (and the parallel one for the helloworld service on lines 29 and 30) provides a simple mapping between a gRPC package and its backend services.
Notice that the argument to the grpc_pass directives starts with the grpc:// scheme, which proxies requests using a plaintext gRPC connection. If the backend is configured for TLS, we can use the grpcs:// scheme to secure the gRPC connection with end‑to‑end encryption.
After running the RouteGuide client, we can confirm the routing behavior by reviewing the log file entries. Here we see that the RouteChat RPC method was routed to the container running on port 10002.
$ python route_guide_client.py
...
$ tail -1 /var/log/nginx/grpc_log.json | jq
{
  "timestamp": "2021-01-20T12:17:56+01:00",
  "client": "127.0.0.1",
  "uri": "/routeguide.RouteGuide/RouteChat",
  "http-status": 200,
  "grpc-status": 0,
  "upstream": "127.0.0.1:10002",
  "rx-bytes": 161,
  "tx-bytes": 212
}
Precise Routing
As shown above, the routing of multiple gRPC services to different backends is simple, efficient, and requires very few lines of configuration. However, the routing requirements in a production environment might be more complex and require routing based on other elements in the URI (the gRPC service or even individual RPC methods).
The following configuration snippet extends the previous example so that the bidirectional streaming RPC method RouteChat is routed to one backend and all other RouteGuide methods to a different backend.
The second location directive (line 7) uses the = (equals sign) modifier to indicate that this is an exact match on the URI for the RouteChat RPC method. Exact matches are processed before prefix matches, which means that no other location blocks are considered for the RouteChat URI.
Responding to Errors
gRPC errors are somewhat different from those for conventional HTTP traffic. Clients expect error conditions to be expressed as gRPC responses, which makes the default set of NGINX error pages (in HTML format) unsuitable when NGINX is configured as a gRPC gateway. We address this by specifying a set of custom error responses for gRPC clients.
The full set of gRPC error responses is a relatively long and largely static configuration, so we keep them in a separate file, errors.grpc_conf, and use the include directive (line 34) to reference them. Unlike HTTP/REST clients, gRPC client applications are not expected to handle a wide range of HTTP status codes. The gRPC documentation specifies how an intermediate proxy such as NGINX must convert HTTP error codes into gRPC status codes so that clients always receive a suitable response. We use the error_page directive to perform this mapping.
Each of the standard HTTP status codes is passed to a named location using the @ prefix so a gRPC‑compliant response can be generated. For example, the HTTP 404 response is internally redirected to the @grpc_unimplemented location, which is defined later in the file:
The @grpc_unimplemented named location is available only to internal NGINX processing – clients cannot request it directly, as no routable URI exists. Within this location, we construct a gRPC response by populating the mandatory gRPC headers and sending them, without a response body, using HTTP status code 204 (No Content).
We can use the curl(1) command to mimic a badly behaved gRPC client requesting a nonexistent gRPC method. Note, however, that curl is not generally suitable as a gRPC test client because protocol buffers use a binary data format. To test gRPC on the command line, consider using grpc_cli.
$ curl -i --http2 -H "Content-Type: application/grpc" -H "TE: trailers" -X POST https://grpc.example.com/does.Not/Exist
HTTP/2 204
server: nginx/1.19.5
date: Wed, 20 Jan 2021 15:03:41 GMT
grpc-status: 12
grpc-message: unimplemented
The grpc_errors.conf file referenced above also contains HTTP‑to‑gRPC status code mappings for other error responses that NGINX might generate, such as timeouts and client certificate errors.
Authenticating Clients with gRPC Metadata
gRPC metadata allows clients to send additional information alongside RPC method calls, without requiring that data to be part of the protocol buffers specification (.proto file). Metadata is a simple list of key‑value pairs, with each pair transmitted as a separate HTTP/2 header. Metadata is therefore easily accessible to NGINX.
Of the many use cases for metadata, client authentication is the most common for a gRPC API gateway. The following configuration snippet shows how NGINX Plus can use gRPC metadata to perform JWT authentication (JWT authentication is exclusive to NGINX Plus). In this example, the JWT is sent in the auth-token metadata.
Every HTTP request header is available to NGINX Plus as a variable called $http_header. Hyphens (-) in the header name are converted to underscores ( _ ) in the variable name, so the JWT is available as $http_auth_token (line 2).
If API keys are used for authentication, perhaps with existing HTTP/REST APIs, then these can also be carried in gRPC metadata and validated by NGINX. A configuration for API key authentication is provided in Part 1 of this blog series.
Implementing Health Checks
When load balancing traffic to multiple backends, it is important to avoid sending requests to backends that are down or otherwise unavailable. With NGINX Plus, we can use active health checks to proactively send out‑of‑band requests to backends and remove them from the load‑balancing rotation when they don’t respond to health checks as expected. In this way we ensure that client requests never reach backends that are out of service.
The following configuration snippet enables active health checks for the RouteGuide and helloworld gRPC services; to highlight the relevant configuration, it omits some directives that are included in the grpc_gateway.conf file used in previous sections.
For each route we now also specify the health_check directive (lines 17 and 21). As specified by the type=grpc argument, NGINX Plus uses the gRPC health checking protocol to send a health check to every server in the upstream group. However, our simple gRPC services do not implement the gRPC health checking protocol and so we expect them to respond with the status code that means “unimplemented” (grpc_status=12). When they do, that is enough to indicate that we are communicating with an active gRPC service.
With this configuration in place, we can take down any of the backend containers without gRPC clients experiencing delays or timeouts. Active health checks are exclusive to NGINX Plus; read more about gRPC health checks on our blog.
Applying Rate Limiting and Other API Gateway Controls
The sample configuration in grpc_gateway.conf is suitable for production use, with some minor modifications for TLS. The ability to route gRPC requests based on package, service, or RPC method means that existing NGINX functionality can be applied to gRPC traffic in exactly the same way as for HTTP/REST APIs, or indeed as for regular web traffic. In each case, the relevant location block can be extended with further configuration, such as rate limiting or bandwidth control.
Summary
In this third and final blog post of our series about deploying NGINX Open Source and NGINX Plus as an API gateway, we focused on gRPC as a cloud‑native technology for building microservices applications. We demonstrated how NGINX is able to deliver gRPC applications as effectively as it does HTTP/REST APIs, and how both styles of API can be published through NGINX as a multi‑purpose API gateway.
Instructions for setting up the test environment used in this blog post are in the appendix below, and you can download all of the files from our GitHub Gist repo.
Check out the other blog posts in this series:
- Part 1 explains how to configure NGINX in some essential HTTP‑based API gateway use cases.
- Part 2 explores more advanced use cases for protecting backend services from malicious or badly behaved clients.
To try NGINX Plus as an API gateway, start your free 30-day trial today or contact us to discuss your use cases. During your trial, use the complete set of configuration files from our GitHub Gist repo.
Appendix: Setting Up the Test Environment
The following instructions install the test environment on a virtual machine so that it is isolated and repeatable. However, there is no reason why it can’t be installed on a physical, “bare metal” server.
To simplify the test environment, we use Docker containers to run the gRPC services. This means that we don’t need multiple hosts for the test environment, but can still have NGINX make proxied connections with a network call, as in a production environment.
Using Docker also allows us to run multiple instances of each gRPC service on a different port without requiring code changes. Each gRPC service listens on port 50051 within the container which is mapped to a unique localhost port on the virtual machine. This in turn frees up port 50051 so that NGINX can use it as its listen port. Therefore, when the test clients connect using their preconfigured port of 50051, they reach NGINX.
Installing NGINX Open Source or NGINX Plus
-
Install NGINX Open Source or NGINX Plus according to the instructions in the NGINX Plus Admin Guide.
-
Copy the following files from the GitHub Gist repo to /etc/nginx/conf.d:
- grpc_gateway.conf
- errors.grpc_conf
Note: If not using TLS, comment out the
ssl_*directives in grpc_gateway.conf. - Start NGINX Open Source or NGINX Plus.
$ sudo nginx
Installing Docker
For Debian and Ubuntu, run:
$ sudo apt-get install docker.ioFor CentOS, RHEL, and Oracle Linux, run:
$ sudo yum install dockerInstalling the RouteGuide Service Containers
-
Build the Docker image for the RouteGuide containers from the following Dockerfile.
You can either copy the Dockerfile to a local subdirectory before the build, or specify the URL of the Gist for the Dockerfile as an argument to the
dockerbuildcommand:$ sudo docker build -t routeguide https://gist.githubusercontent.com/nginx-gists/87ed942d4ee9f7e7ebb2ccf757ed90be/raw/ce090f92f3bbcb5a94bbf8ded4d597cd47b43cbe/routeguide.DockerfileIt may take a few minutes to download and build the image. The appearance of the message
Successfullybuiltand a hexadecimal string (the image ID) signal the completion of the build. -
Confirm that the image was built by running
dockerimages.$ sudo docker images REPOSITORY TAG IMAGE ID CREATED SIZE routeguide latest 63058a1cf8ca 1 minute ago 1.31 GB python latest 825141134528 9 days ago 923 MB -
Start the RouteGuide containers.
$ sudo docker run --name rg1 -p 10001:50051 -d routeguide
$ sudo docker run --name rg2 -p 10002:50051 -d routeguide
$ sudo docker run --name rg3 -p 10003:50051 -d routeguide
As each command succeeds, a long hexadecimal string appears, representing the running container.
-
Check that all three containers are up by running
dockerps. (The sample output is split across multiple lines for ease of reading.)$ sudo docker ps CONTAINER ID IMAGE COMMAND STATUS ... d0cdaaeddf0f routeguide "python route_g..." Up 2 seconds ... c04996ca3469 routeguide "python route_g..." Up 9 seconds ... 2170ddb62898 routeguide "python route_g..." Up 1 minute ... ... PORTS NAMES ... 0.0.0.0:10003->50051/tcp rg3 ... 0.0.0.0:10002->50051/tcp rg2 ... 0.0.0.0:10001->50051/tcp rg1The
PORTScolumn in the output shows how each of the containers has mapped a different local port to port 50051 inside the container.
Installing the helloworld Service Containers
-
Build the Docker image for the helloworld containers from the following Dockerfile.
You can either copy the Dockerfile to a local subdirectory before the build, or specify the URL of the Gist for the Dockerfile as an argument to the
dockerbuildcommand:$ sudo docker build -t helloworld https://gist.githubusercontent.com/nginx-gists/87ed942d4ee9f7e7ebb2ccf757ed90be/raw/ce090f92f3bbcb5a94bbf8ded4d597cd47b43cbe/helloworld.DockerfileIt may take a few minutes to download and build the image. The appearance of the message
Successfullybuiltand a hexadecimal string (the image ID) signal the completion of the build. -
Confirm that the image was built by running
dockerimages.$ sudo docker images REPOSITORY TAG IMAGE ID CREATED SIZE helloworld latest e5832dc0884a 10 seconds ago 926MB routeguide latest 170761fa3f03 4 minutes ago 1.31GB python latest 825141134528 9 days ago 923MB golang latest d0e7a411e3da 3 weeks ago 794MB -
Start the helloworld containers.
$ sudo docker run --name hw1 -p 20001:50051 -d helloworld
$ sudo docker run --name hw2 -p 20002:50051 -d helloworld
As each command succeeds, a long hexadecimal string appears, representing the running container.
-
Check that the two helloworld containers are up by running
dockerps.$ sudo docker ps CONTAINER ID IMAGE COMMAND STATUS ... e0d204ae860a helloworld "go run greeter..." Up 5 seconds ... 66f21d89be78 helloworld "go run greeter..." Up 9 seconds ... d0cdaaeddf0f routeguide "python route_g..." Up 4 minutes ... c04996ca3469 routeguide "python route_g..." Up 4 minutes ... 2170ddb62898 routeguide "python route_g..." Up 5 minutes ... ... PORTS NAMES ... 0.0.0.0:20002->50051/tcp hw2 ... 0.0.0.0:20001->50051/tcp hw1 ... 0.0.0.0:10003->50051/tcp rg3 ... 0.0.0.0:10002->50051/tcp rg2 ... 0.0.0.0:10001->50051/tcp rg1
Installing the gRPC Client Applications
-
Install the programming language prerequisites, some of which may already be installed on the test environment.
-
For Ubuntu and Debian, run:
$ sudo apt-get install golang-go python3 python-pip git -
For CentOS, RHEL, and Oracle Linux, run:
$ sudo yum install golang python python-pip git
Note that
python-piprequires the EPEL repository to be enabled (runsudoyuminstallepel-releasefirst as necessary). -
-
Download the helloworld application:
$ go get google.golang.org/grpc -
Download the RouteGuide application:
$ git clone -b v1.14.1 https://github.com/grpc/grpc
$ pip install grpcio-tools
Testing the Setup
-
Run the helloworld client:
$ go run go/src/google.golang.org/grpc/examples/helloworld/greeter_client/main.go -
Run the RouteGuide client:
$ cd grpc/examples/python/route_guide $ python route_guide_client.py -
Check the NGINX logs to confirm that the test environment is operational:
$ tail /var/log/nginx/grpc_log.json