ProfitsBricks is a cloud‑based Infrastructure as a Service (IaaS) platform that launched in 2012. It lets you easily and quickly deploy high‑performance yet cost‑effective solutions in the cloud. It is easy to deploy NGINX Plus on ProfitBricks for use as a complete application delivery platform with advanced load balancing, caching, web serving, and media streaming capabilities, and with support provided by the experts at NGINX, Inc.
This post describes how to set up a highly available pair of NGINX Plus instances in the ProfitBricks environment.
Configuring a High-Availability NGINX Plus Pair in ProfitBricks
ProfitBricks provides an easy‑to‑use graphical user interface (GUI), called the Data Center Designer, for building an environment, and that is what we are using in this blog post.
To get NGINX Plus installed and deployed in the ProfitBricks cloud, you need a Data Center object. You can use an existing one or follow the instructions in Step 1 to create one. Within the Data Center you create Linux instances on which you install NGINX Plus in the normal way. For the following example, we deploy a pair of NGINX Plus instances in a highly available active‑passive pair with a virtual IP address (VIP) provisioned for assignment to the active primary instance.
These instructions assume you are logged into a ProfitBricks account.
Step 1: Create a Data Center
If you don’t already have a Data Center, create one:
-
Click Data Center in the main ProfitBricks menu bar at the top of the page. The Start Center tab opens.
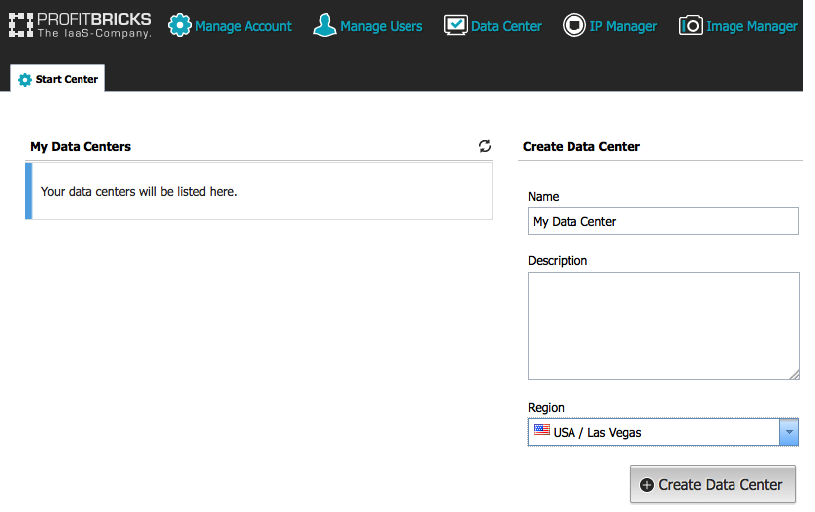
- Name your new Data Center. For this example we are using My Data Center.
- Choose a Region from the drop‑down menu. For this example we are using USA / Las Vegas.
- Click the Create Data Center button. The My Data Center tab opens.
Step 2: Reserve IP Addresses
To create an active‑passive pair of NGINX Plus instances we need at least three public IP addresses: one static public IP address for each NGINX Plus instance and one virtual IP address to be assigned to the active NGINX Plus instance.
-
Click IP Manager in the main ProfitBricks menu bar above the My Data Center tab. The Manage IP Addresses window pops up.
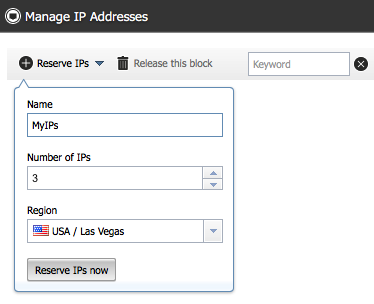
- Click Reserve IPs.
- Name the set of IP addresses. For this example we are using MyIPs.
- Set the Number of IPs to 3.
- Choose a Region from the drop‑down menu. For this example we are using USA / Las Vegas.
- Click the Reserve IPs now button to reserve three IP addresses. Select one of the reserved IP addresses as the VIP and the other two as the static IP addresses for the NGINX instances. The IP addresses in our example are:
- 158.xxx.xxx.122 – Static public IP address of the primary NGINX Plus instance
- 158.xxx.xxx.123 – Static public IP address of the backup NGINX Plus instance
- 158.xxx.xxx.124 – Virtual IP address
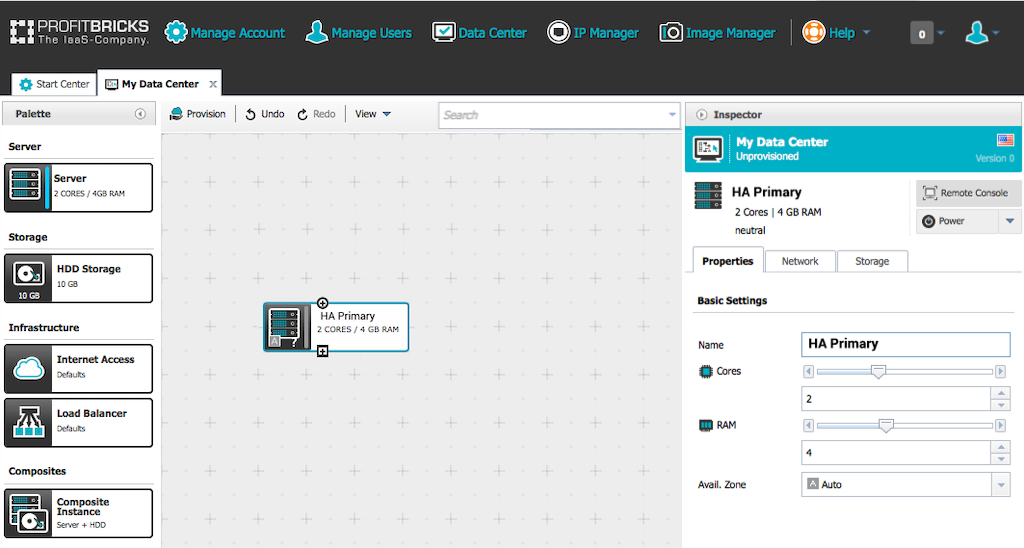
Step 3: Create the Primary NGINX Plus Instance
- From the Palette column on the left side of the My Data Center tab, drag a Server icon into the central work area.
-
In the Inspector column to the right of work area, name the server. For this example we are using HA Primary.
- Add storage:
- In the Inspector column, click the Storage tab to open it.
-
Click Add HDD Storage. The Create new attached Storage window pops up.
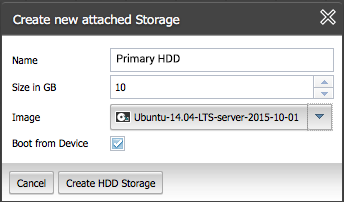
- Name the storage. For this example we are using Primary HDD.
- From the Image drop‑down menu, select ProfitBricks Images and then the operating system. For this example we are using Ubuntu-14.04-LTS-server-2015-10-01.
- Click the Create HDD Storage button.
- Configure networking:
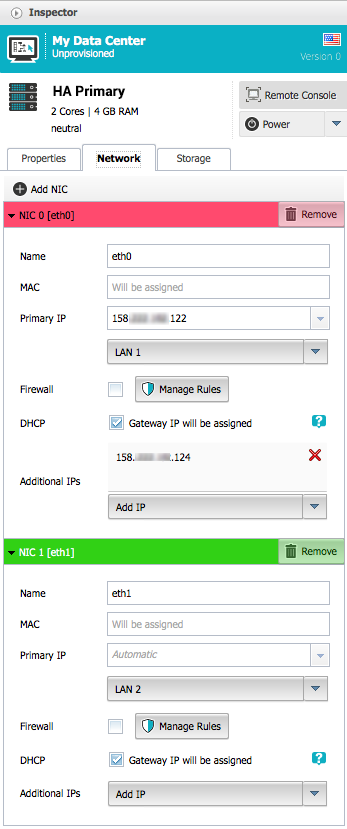
- Click the Network tab to open it.
- Click Add NIC.
- Type eth0 in the Name field.
- In the Primary IP field, type the static public IP address of the primary NGINX instance. For this example we are using 158.xxx.xxx.122.
- Click the Add IP drop‑down menu to associate the virtual IP address (VIP) with this instance. This enables the VIP to be moved between the primary and backup server instances.
- Select the name you assigned to the group of reserved IP addresses (in Substep 3 of Step 2). In this example, it is MyIPs.
- Select the address to use as the VIP. In this example, it is 158.xxx.xxx.124.
- Click Add NIC again. Adding a second interface is not required, but we will use it in testing the HA configuration after we finish configuring both the primary and backup instances.
- Type eth1 in the Name field.
-
Leave all the other fields as they are. ProfitBricks automatically associates a private IP address with eth1; it appears in the Primary IP field after you launch the instance in Step 5.
- Complete the configuration of this server, adjusting any other settings, such as the amount of memory or the number of cores, as appropriate for your needs.
Step 4: Set Up Internet Access
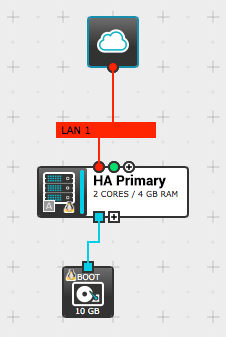
- Drag an Internet Access icon from the Palette column into the work area. (Placing this icon above the HA Primary icon keeps the work area maximally readable, because the line we will draw in the next step goes from the bottom of the Internet Access icon to the top of the HA Primary icon.)
-
Draw a line between the two icons by clicking on the circle on the bottom edge of the Internet Access icon and dragging the cursor to the leftmost circle on the top edge of the HA Primary icon, which corresponds to the eth0 interface. In our example, the circle for eth0 is red and the one for eth1 is green.
Step 5: Launch the Primary NGINX Plus Instance
- Click the Provision button above the top left corner of the work area. The Provision Data Center window pops up.
You can ignore the following warning in the popup window, because we’ll finish configuring the eth1 interface in Step 10:
NIC 1 [eth1] on "HA Primary" is unconnected and has no peers - Click the Provision Now button at the bottom of the popup window.
When the instance launches successfully, you will receive an email from ProfitBricks with details about your setup, including the root password.
Step 6: Install, Configure, and Test NGINX Plus
- In a terminal window, use
sshto connect to the newly created NGINX Plus instance, using the root password provided in the email from ProfitBricks. Follow the prompts to set a new password. - Install NGINX Plus by following the instructions at the NGINX Plus customer portal.
- Make any necessary configuration changes to NGINX Plus. In this example we’re using the default configuration files from the NGINX Plus installation package.
- Verify that you get the expected response when you send requests to the IP address assigned to eth0. Because we are using the default configuration, the expected response for us is the NGINX welcome page.
Step 7: Install the NGINX Plus HA Package
In the same terminal window, install the NGINX Plus HA package on the primary NGINX Plus instance. This command is appropriate for Ubuntu:
$ apt-get install nginx-ha-keepalivedStep 8: Snapshot the NGINX Plus Instance
Now that we have a working NGINX Plus instance, we take a snapshot to use as the basis for the second (backup) instance in our HA pair. This way we don’t have to install NGINX Plus on the second instance.
- In the ProfitBricks work area, click the Storage icon attached to the bottom edge of the HA Primary icon. The Inspector column changes to display information about it (in our example, the storage is named Primary HDD Storage).
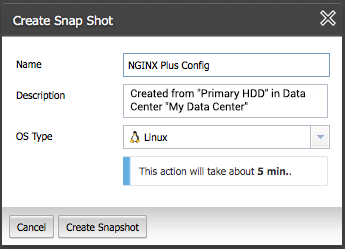
- Click the Create Snapshot button. The Create Snap Shot window pops up.
- Type the snapshot’s name in the Name field. For this example we using NGINX Plus Config.
- Click the Create Snapshot button.
Snapshot creation can take some time. You can track the progress by clicking Image Manager in the main ProfitBricks menu bar above the My Data Center tab, and opening the Snapshot tab in the Manage Images and Snap Shots window that pops up.
During snapshot creation you see the message in process. Once it is complete, you see a date and timestamp.
Step 9: Create the Backup NGINX Plus Instance
- Drag another Server icon from the Palette column to the work area. (We place it next to the HA Primary icon, because we will be connecting it to the same Internet Access icon HA Primary is already connected to.
- In the Inspector column, type the server name in the Name field. For this example we are using HA Backup.
- Add storage:
- In the Inspector column, click the Storage tab.
-
Click Add HDD Storage. The Create new attached Storage window pops up.
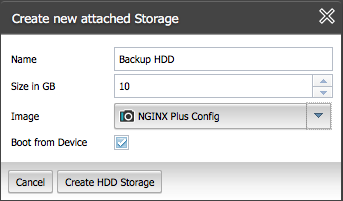
- Name the storage. For this example we are using Backup HDD.
- From the Image drop‑down menu, select Snapshots and then the snapshot you created in Step 8. In this example it is NGINX Plus Config.
- Click the Create HDD Storage button.
- Configure networking:
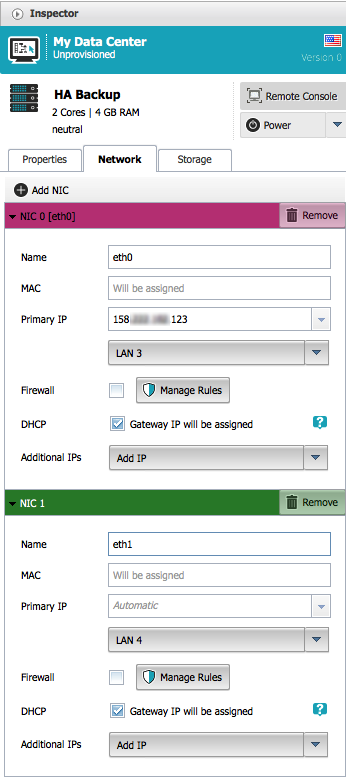
- Click the Network tab to open it.
- Click Add NIC.
- Type eth0 in the Name field.
- In the Primary IP field, type the static public IP address of the backup NGINX instance. For this example we are using 158.xxx.xxx.123.
- Click Add NIC again.
- Type eth1 in the Name field.
-
Leave all the other fields as they are. ProfitBricks automatically associates a private IP address with eth1; it appears in the Primary IP field after you launch the instance in Step 11.
- Complete the configuration of this server, adjusting any other settings, such as the amount of memory or the number of cores, as appropriate for your needs.
Step 10: Complete the Networking Configuration
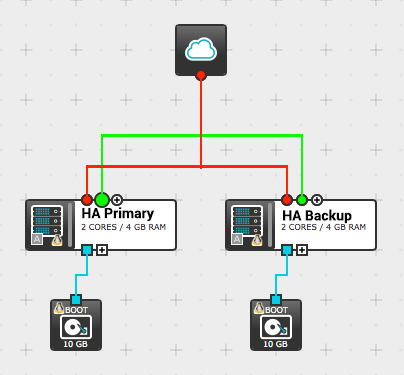
- Enable Internet access for the backup instance. Draw a line by clicking on the circle on the bottom edge of the Internet Access icon and dragging the cursor to the leftmost circle on the top edge of the HA Backup icon, which corresponds to the eth0 interface. In our example, the circle for eth0 is red.
- Connect the internal network interfaces of the primary and backup NGINX Plus instances by drawing a line from eth1 on HA Backup to eth1 on HA Primary (eth1 is represented by the green circle on the top edge of both icons in this example).
Step 11: Launch and Test the Backup NGINX Plus Instance
- Click the Provision button above the top left corner of the work area and then the Provision Now button at the bottom of the Provision Data Center window that pops up.
- In a new terminal, use
sshto connect to the backup NGINX Plus instance. Because we used the snapshot of the primary instance as the basis for this instance, the root password is the same for both. - Verify that you get the expected response when you send a request to the IP address assigned to eth0 on the backup instance (in our example, 158.xxx.xxx.123). Because we are using the default configuration in this example, for us the expected response is the NGINX welcome page.
Step 12: Configure High Availability
In Step 7 you installed the NGINX Plus high availability package on the primary instance. The package is also available on the backup instance because you created the backup from a snapshot of the primary. In this step you configure high availability on both instances by running the nginx-ha-setup script included in the package.
-
Run the nginx-ha-setup command in both of the separate terminal windows for the primary and backup NGINX Plus instances, at the same time:
$ nginx-ha-setupFollow the prompts, using the public IP addresses assigned to each instance.
- For the cluster IP address, enter the VIP (the public IP address that was not assigned as the static IP address of either instance). In our example, it is 158.xxx.xxx.124.
When the configuration succeeds, you have a working, highly available, active‑passive pair of NGINX Pus instances. When both instances are healthy, the VIP is assigned to the primary. If the primary goes down, keepalived transfers the VIP to the backup.
Keep in mind that the NGINX Plus configuration must be the same on the primary and backup instances for functioning to remain the same when roles change. If you make changes to the NGINX Plus configuration on one instance, remember to make the same change on the other instance.
For complete information about NGINX Plus HA, see the NGINX Plus Admin Guide.
Testing the NGINX Plus HA Configuration
There are multiple ways you can test an NGINX Plus HA configuration. In the following example, we use the standard ip command to force the primary instance to drop both IP addresses (its static address and the VIP) from its public interface (eth0), and confirm that the VIP moves to the backup instance.
Dropping both IP addresses makes the primary’s eth0 interface inaccessible, so instead of connecting directly to it, we connect first to the backup instance and from there to the internal eth1 interface on the primary instance. That is why we created eth1 interfaces on the primary and backup instances (in Step 3 and Step 9), then connected them in Step 10.
- Open an SSH connection to the backup NGINX Plus instance in each of two separate terminals. (If the connection you opened to the backup instance in Substep 2 of Step 11 is still open, you can use it as one of the two.)
-
Working in one terminal, open an SSH connection to the internal IP address (mapped to eth1) of the primary instance. (To obtain the address in ProfitBricks, click on the HA Primary icon in the work area, open the Network tab in the Inspector column, and look in the Primary IP field for the eth1 interface.)
In the following steps, we will refer to this terminal as B2P (for “backup to primary”) and the other terminal as B (for “backup”).
-
Run this command in both terminals to check the HA state of each instance:
# Terminal B2P $ cat /var/run/nginx-ha-keepalived.state STATE=MASTER # Terminal B $ cat /var/run/nginx-ha-keepalived.state STATE=BACKUP -
In terminal B2P, run this command to list the IP addresses of eth0 on the primary instance:
# Terminal B2P
$ ip addr show
The output confirms that the VIP is assigned to the primary instance.
Another way to verify the assignment of the VIP is to direct a request to it (either from a browser or with the
curlcommand). If the VIP is assigned to the primary, an entry corresponding to the request appears in the primary’s NGINX access log file, which is /var/log/nginx/access.log by default. -
In terminal B2P, run this command to make the primary instance drop both IP addresses from eth0 (the primary’s static public address and the VIP):
# Terminal B2P
$ ifdown eth0
As a result, keepalived moves the VIP to the backup instance.
-
Run this command in both terminals to check the HA state of each instance. The output is reversed from Step 3, indicating that the original backup is now the primary.
# Terminal B2P $ cat /var/run/nginx-ha-keepalived.state STATE=BACKUP # Terminal B $ cat /var/run/nginx-ha-keepalived.state STATE=MASTER -
In terminal B, run this command:
# Terminal B
$ ip addr show
The output verifies that the VIP is now assigned to the original backup instance. Again, you can direct a request to the VIP and verify that a corresponding entry appears in the NGINX access log file of the original backup instance rather than the original primary.
-
If you want to return to the original assignments of primary and backup, in terminal B2P run this command to have the primary reclaim the VIP:
# Terminal B2P
$ ifup eth0
Conclusion
ProfitBricks is an easy‑to‑use cloud platform and with the addition of NGINX Plus you can create a highly available, full‑featured application delivery platform.
Want to get started with NGINX Plus? Sign up for a free 30-day trial today or contact us to discuss your use cases.