[Editor – This post has been updated to refer to the NGINX Plus API, which replaces and deprecates the separate dynamic configuration module mentioned in the original version of the post.]
One of the great advantages of a microservices architecture is how quickly and easily you can scale service instances. With multiple service instances you need a load balancer and some way to quickly inform it of changes to the set of available service instances. This is known as service discovery. NGINX Plus provides two options for integrating with service discovery systems: the NGINX Plus API and Domain Name System (DNS) re‑resolution. This blog post focuses on the latter.
When you scale service instances (we’ll call them backends in this blog post) by adding or removing virtual machines (VMs) or containers, the configuration of the load balancer must be changed to reflect every change to the set of backends. Scaling can occur multiple times per day, per hour, or even per minute, depending on the application. Given the high frequency of configuration changes, they need to be automated, and one of the ways to accomplish this is service discovery via DNS.
Many platforms where you run your applications today, such as Kubernetes, support service discovery using DNS. We provide links at the end of this blog post to articles explaining how to integrate NGINX Plus with popular platforms and service discovery tools that use DNS.
A Quick Review of Key DNS Features
Before we explain how to configure service discovery via DNS, let’s take a quick look at some features of the DNS protocol that are particularly relevant or handy.
Time‑to‑Live
To prevent DNS clients from using stale information, DNS records include the time‑to‑live (TTL) field to define how long clients can consider the record valid. To comply with DNS standards, clients must query the DNS server for an update when a record is past its TTL. NGINX Plus honors the TTL by default, but also provides more granular control over the “lifetime” of a record – you can configure NGINX Plus to ignore TTLs and instead update records at a specified frequency. (We’ll discuss how NGINX Open Source deals with the TTL later in the post.)
DNS over TCP
By default, DNS clients and servers communicate over UDP, but if a domain name resolves to a large number of backend IP addresses, the complete response might not fit in a single UDP datagram, which is limited to 512 bytes. Using TCP instead of UDP solves this problem: when a full set of records doesn’t fit into one datagram, the server sets a truncation flag in its response, which tells the client to switch to TCP to get all the records. DNS over TCP is supported in NGINX version 1.9.11 and later, and NGINX Plus R9 and later. For more details, see Load Balancing DNS Traffic with NGINX and NGINX Plus on our blog.
SRV Records
DNS resolves hostnames into IP addresses, but what about port numbers? There are some cases – for example, when load balancing Docker containers – where you cannot rely on well‑known port numbers, because port numbers are dynamically assigned instead. DNS has a special type of record – the Service (SRV) record – that includes port numbers and a few other parameters. In R9 and later, NGINX Plus supports SRV records (and so can extract port information from them).
Editor – For an overview of all the new features in NGINX Plus R9, see Announcing NGINX Plus R9 on our blog.
Methods for Service Discovery with DNS for NGINX and NGINX Plus
Now we’ll show you five ways to use DNS for service discovery in NGINX and NGINX Plus, in order of increasing sophistication. The first three are available in both NGINX and NGINX Plus, and the last two in NGINX Plus only.
In this survey of service‑discovery methods, we’ll assume we have an authoritative name server for the zone example.com, with IP address 10.0.0.2. There are three backend servers that correspond to the domain name backends.example.com, as shown in the following output from the nslookup utility. With the first four methods we’ll discuss, NGINX and NGINX Plus request standard A records from DNS; with the final method, NGINX Plus requests SRV records instead.
$ nslookup backends.example.com 10.0.0.2
Server:		10.0.0.2
Address:	10.0.0.2#53

Name:	backends.example.com
Address: 10.0.0.11
Name:	backends.example.com
Address: 10.0.0.10
Name:	backends.example.com
Address: 10.0.0.12
Using DNS for Service Discovery with NGINX
We’ll start with showing you the three ways to use DNS with NGINX Open Source (as we mentioned above, you can also use them with NGINX Plus).
Using the Domain Name in the proxy_pass Directive
The simplest way to define the group of upstream servers (backends) is to specify a domain name as the parameter to the proxy_pass directive:
server {
    location / {
        proxy_pass http://backends.example.com:8080;
    }
}
As NGINX starts up or reloads its configuration, it queries a DNS server to resolve backends.example.com. The DNS server returns the list of three backends discussed above, and NGINX uses the default Round Robin algorithm to load balance requests among them. NGINX chooses the DNS server from the OS configuration file /etc/resolv.conf.
This method is the least flexible way to do service discovery and has the following additional drawbacks:
- If the domain name can’t be resolved, NGINX fails to start or reload its configuration.
- NGINX caches the DNS records until the next restart or configuration reload, ignoring the records’ TTL values.
- We can’t specify another load‑balancing algorithm, nor can we configure passive health checks or other features defined by parameters to the
serverdirective, which we’ll describe in the next section.
Using a Domain Name in an Upstream Server Group
To take advantage of the load‑balancing options NGINX provides, you can define the group of upstream servers in the upstream configuration block. But instead of identifying individual servers by IP address, use the domain name as the parameter to the server directive.
As with the first method, backends.example.com gets resolved into three backend servers as NGINX starts or reloads its configuration. But now we can define a more sophisticated load‑balancing algorithm, Least Connections, and use the max_fails parameter to enable passive health checks, specifying that NGINX marks a server as down when three consecutive requests fail.
upstream backends {
    least_conn;

    server backends.example.com:8080 max_fails=3;
}

server {
    location / {
        proxy_pass http://backends;
    }
}
Though this method enables us to choose the load‑balancing algorithm and configure health checks, it still has the same drawbacks with respect to start, reload, and TTL as the previous method.
Setting the Domain Name in a Variable
This method is a variant of the first, but enables us to control how often NGINX re‑resolves the domain name:
resolver 10.0.0.2 valid=10s;

server {
    location / {
        set $backend_servers backends.example.com;
        proxy_pass http://$backend_servers:8080;
    }
}
When you use a variable to specify the domain name in the proxy_pass directive, NGINX re‑resolves the domain name when its TTL expires. You must include the resolver directive to explicitly specify the name server (NGINX does not refer to /etc/resolv.conf as in the first two methods). By including the valid parameter to the resolver directive, you can tell NGINX to ignore the TTL and re‑resolve names at a specified frequency instead. Here we tell NGINX to re‑resolve names every 10 seconds.
Note: For TCP/UDP load balancing, this method of using a variable in the proxy_pass directive is supported in NGINX 1.11.3 and later, and NGINX Plus R10 and later.
This method eliminates two drawbacks of the first method, in that the NGINX startup or reload operation doesn’t fail when the domain name can’t be resolved, and we can control how often NGINX re‑resolves the name. However, because it doesn’t use an upstream group, you can’t specify the load‑balancing algorithm or other parameters to the server directive (as we did in the second method).
Using DNS for Service Discovery with NGINX Plus
Now we’ll look at the two methods for service discovery with DNS that are exclusive to NGINX Plus.
Using A Records with NGINX Plus
With NGINX Plus, we can re‑resolve DNS names as frequently as we want, and without the drawbacks discussed above for the first three methods. To use this feature, we need to:
- Include the
resolverdirective to specify the name server, as in the previous method. - Include the
zonedirective in theupstreamconfiguration block to allocate a shared‑memory zone. - Add the
resolveparameter to theserverdirective where we use the domain name.
Consider the following example:
resolver 10.0.0.2 valid=10s;

upstream backends {
    zone backends 64k;
    server backends.example.com:8080 resolve;
}

server {
    location / {
        proxy_pass http://backends;
    }
}
By default, NGINX Plus honors the TTL, re‑resolving names when records expire. To have NGINX Plus instead re‑resolve names at a specified frequency, include the valid parameter to the resolver directive.
In the snippet, every 10 seconds NGINX Plus queries the name server at 10.0.0.2 to resolve backends.example.com. If the name can’t be resolved, NGINX Plus doesn’t fail, either at start up, when reloading the configuration, or during runtime. Instead, the client sees the standard 502 error page.
Using SRV Records with NGINX Plus
NGINX Plus R9 and later supports DNS SRV records. This enables NGINX Plus to get not only IP addresses from a name server, but also port numbers, weights, and priorities. This is critical in microservices environments where the port numbers of services are often dynamically assigned.
Editor – For an overview of all the new features in NGINX Plus R9, see Announcing NGINX Plus R9 on our blog.
SRV records are defined by a triplet of the service name, the protocol for communication with the service, and the domain name. When querying the name server, we must supply all three of them. Our 10.0.0.2 name server has three SRV records with the triplet of service name http, protocol tcp, and domain name backends.example.com, as shown in this output from the nslookup utility:
$ nslookup -query=SRV _http._tcp.backends.example.com 10.0.0.2
Server:		10.0.0.2
Address:	10.0.0.2#53

_http._tcp.backends.example.com	service = 0 2 8090 backend-0.example.com.
_http._tcp.backends.example.com	service = 0 1 8091 backend-1.example.com.
_http._tcp.backends.example.com	service = 10 1 8092 backend-2.example.com.
When we query the hostname in each SRV record, we get its IP address:
$ nslookup backend-0.example.com 10.0.0.2
...
Name:	backend-0.example.com
Address: 10.0.0.10

$ nslookup backend-1.example.com 10.0.0.2
...
Name:	backend-1.example.com
Address: 10.0.0.11

$ nslookup backend-2.example.com 10.0.0.2
...
Name:	backend-2.example.com
Address: 10.0.0.12
Let’s look more closely at the information in first SRV record returned by the first nslookup command:
_http._tcp.backends.example.com service = 0 2 8090 backend-0.example.com._http._tcp.– The name and the protocol of theSRVrecord. We’ll specify this as the value of theserviceparameter to theserverdirective in the NGINX Plus configuration file (see below).0– The priority. The lower the value, the higher the priority. NGINX Plus designates servers with the highest priority as primary servers, and the rest of the servers as backup servers. This record has the lowest value (the highest priority) among all records, so NGINX Plus designates the corresponding backend as a primary server.2– The weight. NGINX Plus sets the backend’s weight to this value as it adds the backend to the upstream group (equivalent to theweightparameter on theserverdirective).8090– The port number. NGINX Plus sets the backend’s port to this value as it adds the backend to the upstream group.backend‑0.example.com– The hostname of the backend server. NGINX Plus resolves this name and adds the corresponding backend to the upstream group. If the name resolves to multiple records, NGINX Plus adds multiple servers.
Now let’s look at how we configure NGINX Plus to use SRV records. Here is the sample configuration file:
resolver 10.0.0.2 valid=10s;

upstream backends {
    zone backends 64k;
    server backends.example.com service=_http._tcp resolve;
}

server {
    location / {
        proxy_pass http://backends;
    }
}
Using the service parameter to the server directive, we specify the name and the protocol of SRV records we wish to resolve. In our case they are _http and _tcp respectively. Apart from the service parameter and the fact that we don’t specify a port, it looks the same as the configuration example from the previous section.
Based on the values returned by the first nslookup command in this section, NGINX Plus gets configured with three backend servers:
- 10.0.0.10 – Primary server with port 8090 and weight 2.
- 10.0.0.11 – Primary server with port 8091 and weight 1.
- 10.0.0.12 – Backup server with port 8092 and weight 1.
If we configure live activity monitoring for NGINX Plus, we can see those backends on the built‑in dashboard:
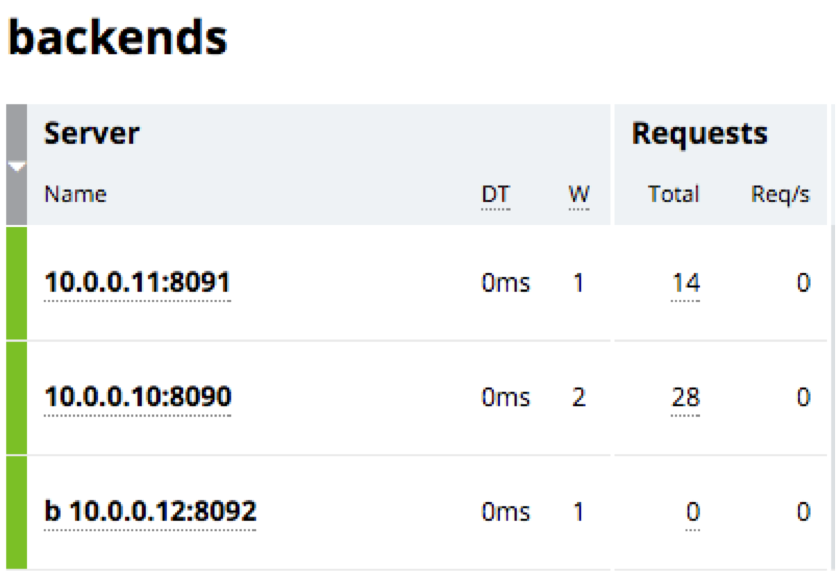
Note how requests are distributed according to the specified weights. The 10.0.0.11:8091 server (with weight 1) gets one‑third of the requests, while the 10.0.0.10:8090 server (with weight 2) gets two‑thirds. As a backup server, the 10.0.0.12:8092 server doesn’t get any requests unless the other two servers are down.
Caveats
When using DNS for service discovery with NGINX Plus, there are few things to keep in mind:
- The DNS server either needs to be highly available or have a backup server. If the DNS server becomes unavailable, NGINX Plus stops getting updates. It keeps the existing backends in the configuration (unless you restart it or reload the configuration), ignoring the TTL values of the corresponding records.
- You can specify multiple name servers with the
resolverdirective, so that if one of them is down, NGINX Plus tries the others. - As mentioned in the introduction, an alternative to DNS for service discovery with NGINX Plus is the NGINX Plus API, which enables you to make simple HTTP requests to add or remove servers in an upstream group.
Examples
If you’d like to dive into complete examples, check out these blog posts about integrating NGINX and NGINX Plus with service‑discovery platforms that use DNS:
- Service Discovery for NGINX Plus Using DNS
SRVRecords from Consul - Load Balancing Kubernetes Services with NGINX Plus
We&’ll update this list as we write more about new integration options in the future.
Conclusion
Service discovery via DNS, fully available in NGINX Plus, provides a simple way to update the configuration of the load balancer in a microservices environment. Support for SRV records in Release 9 and later makes NGINX Plus even more powerful, as it lets NGINX Plus get not only IP addresses, but also port numbers of backends.
Ready to try out service discovery with DNS for NGINX Plus, along with its other enhanced features? Start your free 30-day trial today or contact us to discuss your use cases.