The latest version of IBM Cloud Private was launched on March 20th at IBM Think 2018. This solution is also described in a press release.
Today’s enterprises, from global retailers to banks and airlines, have a mandate to modernize their traditional applications and infrastructure. They’re looking for new platforms and tools, development approaches, and IT providers to help them achieve the agility that web‑scale companies such as Google, Facebook, and Netflix have always provided.
IBM Cloud Private (ICP) is a platform for developing modern applications based on microservices architectures behind the enterprise’s firewall, and fits the enterprise’s need for compliance, security, support, and services.
ICP is an integrated environment for managing containers which includes Kubernetes as the container orchestrator, a private image repository, a management console, and monitoring frameworks. Because the platform is built around Kubernetes, you can leverage the NGINX Plus Ingress controller, which is described fully in NGINX and NGINX Plus Ingress Controllers for Kubernetes Load Balancing on our blog.
In this post, we cover how to replace the default Ingress controller in an ICP environment, utilizing a Vagrant‑based deployment of ICP. This is a easy way to stand up an ICP environment on a single node for development purposes, but ICP can also be deployed in an IBM Cloud (formerly SoftLayer) or OpenStack environment.
Preparing the Environment
Whichever deployment environment is chosen, the first step is to meet all of its requirements. We’re choosing to deploy with Vagrant on a local virtual machine (VM). This is a rather heavy‑weight system requiring a minimum of 10 GiB of RAM among its other requirements.
Once we have met all of the requirements, we run these commands to kick off the Vagrant deployment:
$ git clone https://github.com/IBM/deploy-ibm-cloud-private.git
$ cd deploy-ibm-cloud-private
$ vagrant up
It takes some time to provision the VM and start all of the required containers. The installation is complete when the following banner appears. We then run the vagrant ssh command to log into the Vagrant VM:
    icp: #############################################################################
    icp: #          IBM Cloud Private community edition installation complete!       #
    icp: #                  The web console is now available at:                     #
    icp: #                                                                           #
    icp: #                          https://192.168.50.100:8443                      #
    icp: #                   default username/password is admin/admin                #
    icp: #                                                                           #
    icp: #                          Documentation available at:                      #
    icp: #               https://www.ibm.com/support/knowledgecenter/SSBS6K          #
    icp: #                                                                           #
    icp: #                 Request access to the ICP-ce Public Slack!:               #
    icp: #                            http://ibm.biz/BdsHmN                          #
    icp: #############################################################################

$ vagrant ssh
Make note of the IP address displayed when the Vagrant build has completed (here, 192.168.50.100). In our use case, it becomes both the public IP address assigned to the Ingress Controller and the address for accessing the ICP GUI. At this point, you can also take the opportunity to configure remote access to the kubectl command‑line tool by following the instructions here.
Deleting the Default Ingress Controller
Once the ICP is up and running, the first thing that we do is delete its default Ingress controller. Since ICP is designed to run on either PowerPC or standard 64‑bit processors, there is an image for each. In this scenario, we are adding only a 64‑bit version, but we need to remove all of the default configurations by running these kubectl commands:
vagrant@primary:~$ kubectl -n kube-system delete ds/nginx-ingress-lb-ppc64le
daemonset "nginx-ingress-lb-ppc64le" deleted
vagrant@primary:~$ kubectl -n kube-system delete ds/nginx-ingress-lb-amd64
daemonset "nginx-ingress-lb-amd64" deleted
We also delete the Kubernetes Service and Deployment objects called default-http-backend, and the nginx-load-balancer-conf ConfigMap, as we will create our own.
vagrant@primary:~$ kubectl -n kube-system delete svc/default-http-backend
service "default-http-backend" deleted
vagrant@primary:~$ kubectl -n kube-system delete deployment/default-http-backend
deployment "default-http-backend" deleted
vagrant@primary:~$ kubectl -n kube-system delete configmap/nginx-load-balancer-conf
configmap "nginx-load-balancer-conf" deleted
Creating an NGINX Ingress Controller Docker Image for NGINX Plus
In order to use NGINX Plus as an Ingress controller, we first need to build an Ingress controller container image. NGINX, Inc. doesn’t distribute a prebuilt container image of NGINX Ingress Controller for NGINX Plus, but creating that image is straightforward and well documented at the NGINX Ingress controller repo on GitHub.
The first step is to clone the GitHub repo on the Vagrant VM:
vagrant@primary:~$ git clone https://github.com/nginxinc/kubernetes-ingress.git
Cloning into 'kubernetes-ingress'...
remote: Counting objects: 11149, done.
remote: Total 11149 (delta 0), reused 0 (delta 0), pack-reused 11149
Receiving objects: 100% (11149/11149), 20.79 MiB | 2.05 MiB/s, done.
Resolving deltas: 100% (3835/3835), done.
Checking connectivity... done.
Next, we verify the NGINX Plus certificate and key files associated with our NGINX Plus subscription or trial are in place, copying them if necessary:
vagrant@primary:~$ cd kubernetes-ingress/nginx-controller/
vagrant@primary:~/kubernetes-ingress/nginx-controller$ ls -la nginx-repo.*
-rw-rw-r-- 1 vagrant vagrant 1334 Mar 15 19:00 nginx-repo.crt
-rw-rw-r-- 1 vagrant vagrant 1704 Mar 15 19:01 nginx-repo.key
To securely store the NGINX Plus image, we log into the private image registry that is deployed as part of ICP. In this example, we are using the built‑in admin account:
vagrant@primary:~/kubernetes-ingress/nginx-controller$ docker login mycluster.icp:8500
Username: admin
Password: password
Login Succeeded
Now we build the NGINX Ingress controller image for NGINX Plus and upload it to the local image repo:
vagrant@primary:~/kubernetes-ingress/nginx-controller$ make clean
rm -f nginx-ingress
vagrant@primary:~/kubernetes-ingress/nginx-controller$ make DOCKERFILE=DockerfileForPlus
PREFIX=mycluster.icp:8500/kube-system/nginx-plus-ingress;
docker run --rm -v /home/vagrant/kubernetes-ingress/nginx-controller/../:/go/src/github.com/nginxinc/kubernetes-ingress -w /go/src/github.com/nginxinc/kubernetes-ingress/nginx-controller/ golang:1.9 go test ./...
...
Successfully built 14c9175da736
Successfully tagged mycluster.icp:8500/kube-system/nginx-plus-ingress:1.1.1
docker push mycluster.icp:8500/kube-system/nginx-plus-ingress:1.1.1
The push refers to repository [mycluster.icp:8500/kube-system/nginx-plus-ingress]
0d0d4a6ae01c: Mounted from default/nginx-plus-ingress
ac13d835531f: Mounted from default/nginx-plus-ingress
8e227d7592cb: Mounted from default/nginx-plus-ingress
dfa9320f47a2: Mounted from default/nginx-plus-ingress
2ebe8bc4efb9: Mounted from default/nginx-plus-ingress
5500ab547185: Mounted from default/nginx-plus-ingress
646527a83e96: Mounted from default/nginx-plus-ingress
014cf8bfcb2d: Mounted from default/nginx-plus-ingress
1.1.1: digest: sha256:79f9f8848cd97ae3651279144e079bd27258894435fb09a5f8fde06e2e9406b1 size: 1990
We can confirm that the image was successfully created by running this command:
vagrant@primary:~/kubernetes-ingress/nginx-controller$ kubectl get images --all-namespaces
NAMESPACE     NAME                 AGE
kube-system   nginx-plus-ingress   2m
As you can see, the image is part of the kube-system namespace. If you set a different path with the PREFIX argument to the make command, you need to issue the following command to update the scope from namespace to global. This is because NGINX Ingress Controller has to run as part of the kube-system namespace and needs access to the image.
vagrant@primary:~/kubernetes-ingress/nginx-controller$ kubectl -n kube-system edit image image-nameInstalling NGINX Ingress Controller with Helm Chart
Now that the NGINX Plus image has been created, we can install the new Ingress controller. The easiest way to do this is with the Helm Chart that is part of the kubernetes-ingress GitHub repo. In the helm-chart directory, there is a values-icp.yaml file specifically for this example, along with the default values.yaml file, which is for an NGINX Ingress controller used with NGINX Open Source.
The main differences between the default values.yaml file and the ICP version are the values of the namespace and tolerations parameters, which in the ICP version are kube-system and "icp" respectively. We set the kind parameter to daemonset because we are complying with the default ICP approach and deploying the Ingress controller as a Kubernetes DaemonSet. We are also setting some ICP‑specific values for the nodeselector parameter. To review all the settings, see the complete file in our GitHub repo.
Note that if for your own deployment you make changes to the make command shown above, you need to change the corresponding parameters in the .yaml file (such as repository and tag) to match.
With the updated values-icp.yaml file in place, we install NGINX Ingress Controller by running the helm install command. (We’ve split the final line of output into two line for readability.)
vagrant@primary:~/kubernetes-ingress/nginx-controller$ cd ..
vagrant@primary:~/kubernetes-ingress$ helm install --name nginx-plus-ingress -f helm-chart/values-icp.yaml helm-chart/
NAME:   nginx-plus-ingress
LAST DEPLOYED: Tue Mar 20 22:43:11 2018
NAMESPACE: default
STATUS: DEPLOYED

RESOURCES:
==> v1/Secret
NAME                   TYPE    DATA  AGE
default-server-secret  Opaque  2     2s

==> v1/ConfigMap
NAME          DATA  AGE
nginx-config  2     2s

==> v1beta1/DaemonSet
NAME                      DESIRED  CURRENT  READY  UP-TO-DATE  AVAILABLE  ...
nginx-ingress-controller  0        0        0      0           0

    ...NODE-SELECTOR                             AGE
       beta.kubernetes.io/arch=amd64,proxy=true  1s
Deploying the Demo Application
To quickly test the Ingress controller, we can deploy the simple complete-example application that is included with the kubernetes-ingress repo, following the instructions provided in the README.
vagrant@primary:~/kubernetes-ingress$ cd examples/complete-example
vagrant@primary:~/kubernetes-ingress/examples/complete-example$ kubectl create -f cafe.yaml
deployment "coffee" created
service "coffee-svc" created
deployment "tea" created
service "tea-svc" created
vagrant@primary:~/kubernetes-ingress/examples/complete-example$ kubectl create -f cafe-secret.yaml
secret "cafe-secret" created
vagrant@primary:~/kubernetes-ingress/examples/complete-example$ kubectl create -f cafe-ingress.yaml
ingress "cafe-ingress" created
We run this command to confirm the Ingress controller pod is running:
vagrant@primary:~/kubernetes-ingress/examples/complete-example$ kubectl -n kube-system get pods | grep nginx
nginx-ingress-controller-6r8c2                  1/1       Running            0          31s
Next we test that the Ingress controller is routing to our demo application properly. First we set the IC_IP environment variable to the IP address displayed in the output of the vagrant up command in Preparing the Environment (for us, 192.168.50.100). The we run curl commands to access the services.
vagrant@primary:~/kubernetes-ingress/examples/complete-example$ export IC_IP=192.168.50.100
vagrant@primary:~/kubernetes-ingress/examples/complete-example$ curl --resolve cafe.example.com:443:$IC_IP https://cafe.example.com/coffee --insecure
Server address: 10.1.189.69:80
Server name: coffee-7586895968-z7jxl
Date: 13/Mar/2018:23:11:02 +0000
URI: /coffee
Request ID: ff48a3670a937cafaf53f8d48b05f1cf
vagrant@primary:~/kubernetes-ingress/examples/complete-example$ curl --resolve cafe.example.com:443:$IC_IP https://cafe.example.com/tea --insecure
Server address: 10.1.189.68:80
Server name: tea-7cd44fcb4d-jzcq6
Date: 13/Mar/2018:23:11:14 +0000
URI: /tea
Request ID: ff15bdaf66651a0d9b5fda634dfc4cdd
Monitoring the Deployment
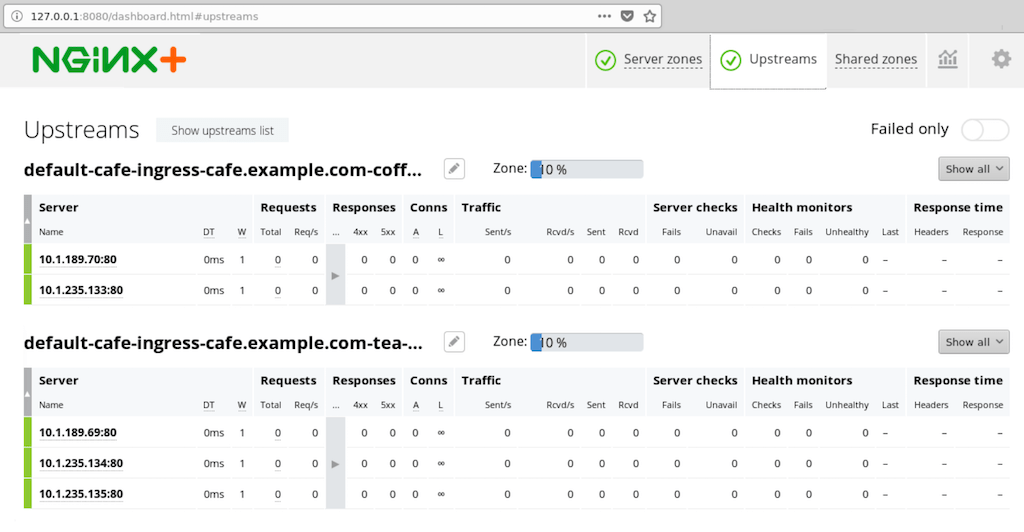
If we configure port‑forwarding for the NGINX Plus live activity monitoring dashboard as described in Step 5 of the installation instructions for NGINX Ingress Controller, we can track our deployment on the dashboard at port 8080:

And if we open the Upstreams tab, we can see that we have entries for both the coffee and tea applications we deployed.
Summary
In this blog post, we’ve shown how to replace the default Ingress controller in an IBM Cloud Private environment with Ingress controller for NGINX Plus, using a Vagrant‑based deployment of ICP. You can modify the steps above as needed for additional nodes, for production deployments, or for similar environments, such as IBM Cloud or OpenStack.
To try NGINX Ingress Controller with NGINX Plus and NGINX App Protect, start your free 30-day trial today or contact us to discuss your use cases.
To try NGINX Ingress Controller with NGINX Open Source, you can obtain the source code, or download a prebuilt container from DockerHub.