
In the first two posts in our series about securing SSL keys and certificates during transport and storage, we discussed using tools such as HashiCorp Vault and hardware security modules (HSMs) to secure SSL key and certificate data on disk for NGINX:
- Secure Distribution of SSL Private Keys with NGINX
- Protecting SSL Private Keys in NGINX with HashiCorp Vault
In many situations, storing SSL certificate data on disk is a tolerable risk as long as additional security guardrails are used to govern access to those certificates. But in some use cases there is an extra need to keep all security‑related components off of disk and only stored in and accessed from memory. The two most common use cases are environments with heightened securitys where any at‑rest storage is at risk, and environments where either the systems are ephemeral (such as containers) or the SSL certificates and keys are themselves ephemeral.
In this post we focus on the latter use case: short‑lived SSL certificate‑key pairs. We’re using HashiCorp Vault to issue ephemeral SSL certificates, and storing them in the NGINX Plus key‑value store, an in‑memory database.
NGINX Plus R18 and later supports a robust architecture for secure SSL key management, because SSL certificate‑key pairs can be loaded into memory and accessed via a variable such as a value in the NGINX Plus key‑value store. With the combination of NGINX Plus, SSL key storage and management via the key‑value store, and HashiCorp Vault, you can create a secure environment for SSL certificates by storing sensitive yet temporary SSL data in the key‑value store and never committing it to disk.
As well as issuing SSL certificates, HashiCorp Vault has many, many features for managing secure data. In an environment where ephemeral certificates are primarily required to secure data in transit and those certificates or the systems which use them are cycled frequently, we can take advantage of Vault as a certificate‑issuing authority (CA). In this post we configure and use Vault to highlight how to integrate real‑time Vault certificate‑issuing requests with the dynamic certificate‑loading feature in NGINX Plus.
Prerequisites
The blog makes the following assumptions:
- You have some familiarity with Vault
- Vault is already installed, configured, running as a service, and unsealed (see the Vault documentation)
- You have admin‑level access to the Vault instance
-
The following environment variables are configured on the indicated instances:
-
Vault instance:
VAULT_ADDR=https://127.0.0.1:8200VAULT_EXT=https://externally_accessible_Vault_IP_address:8200VAULT_TOKEN=initial_root_token
-
SSL management instances:
VAULT_EXT=https://externally_accessible_Vault_IP_address:8200VAULT_APP_TOKEN=NGINX_role_token
-
Architectural Design
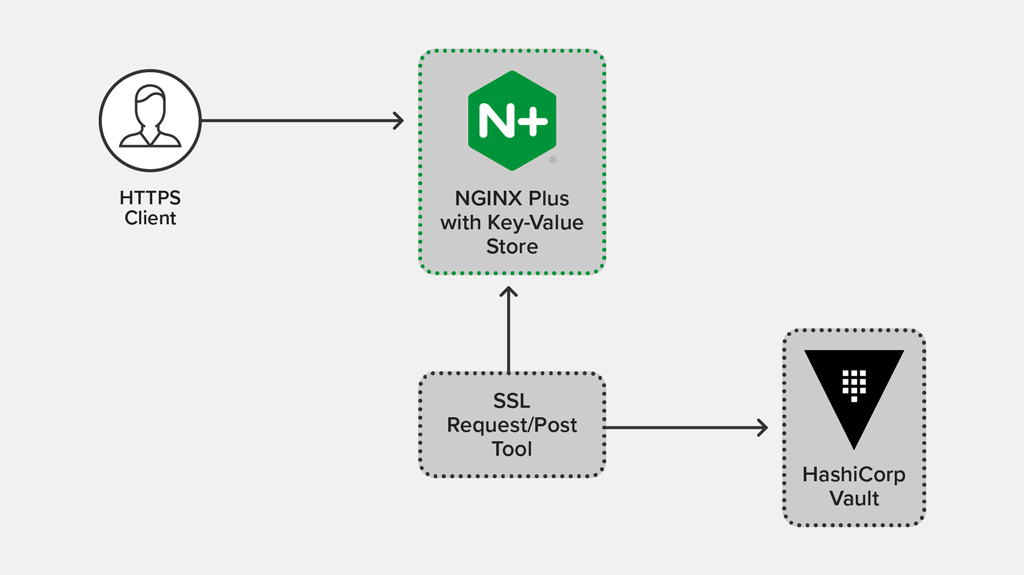
In the most basic sample deployment, some type of SSL request/post management tool is used to request ephemeral certificates from Vault and load them into the NGINX Plus key‑value store. In this example we’re using simple curl commands to simulate the SSL request/post tool. For testing, it’s acceptable to install both Vault and NGINX Plus on the same system, on different systems, in containers, and so on; the only requirement is that the tool you use to request certificates (curl in our case) and load them into NGINX Plus (also curl) is able to communicate with both Vault and NGINX Plus over HTTPS.
The following diagram depicts the architecture, in which:
- The request/post tool requests a new ephemeral PEM from Vault via an API call
- The tool writes the ephemeral PEM data to the in‑memory key‑value store via the NGINX Plus API, never writing to disk in the process
- An HTTPS client requests https://www.example.com from NGINX Plus, which uses the ephemeral certificate
Configuring HashiCorp Vault as an Ephemeral Certificate CA
There are two main procedures for configuring Vault as a CA for ephemeral certificates:
Configuring Vault as a CA
For testing purposes, we’re using Vault’s CA feature to generate and sign our ephemeral certificates. This allows us to use Vault as a one‑stop endpoint for these temporary certificates, but adapt as necessary if your architecture requires different tooling.
To use Vault as an issuing CA, we first configure its public key infrastructure (PKI) store to generate and issue new ephemeral certificates and keys. The following commands are appropriate when configuring Vault from the localhost instance.
Enabling PKI for NGINX Plus Certificate Requests
First we enable PKI support by defining a custom endpoint for NGINX Plus requests, and verifying the configuration.
# vault secrets enable -path pki/nginx-plus-ephem-certs pki
# vault secrets list
Creating the CA Issuer
We create a new CA within Vault to use just for our ephemeral certificate requests. It is also possible to import existing CA certificates into Vault rather than creating new ones; for instructions on importing your CA details, and information about additional options for building a PKI endpoint, see the Vault documentation.
We generate a CA that’s valid for one week (168 hours) and for safekeeping write the JSON‑formatted CA certificate‑key pair to a file:
# vault write -format=json pki/nginx-plus-ephem-certs/root/generate/internal common_name="Example\ Company" ttl=168h > NGINX-Plus-Ephem-CA.jsonNote that it’s not mandatory to save the output to a local JSON file. In dev environments or highly secure environments where it makes sense to regenerate the CA rather than keep any details of the CA on an accessible disk, you can either not store the resulting JSON or store the CA details back into Vault’s secure key store. See the Vault documentation on using the key store, or Protecting SSL Private Keys in NGINX with HashiCorp Vault on our blog.
Configuring Endpoints and Roles on the CA
With Vault configured to act as a local issuing CA, we can begin issuing ephemeral certificates from it. First we configure Vault to support requests via a certificate revocation list (CRL) endpoint for our NGINX Plus instances.
# vault write pki/nginx-plus-ephem-certs/config/urls issuing_certificates="$VAULT_EXT/v1/pki/nginx-plus-ephem-certs/ca" crl_distribution_points="$VAULT_EXT/v1/pki/nginx-plus-ephem-certs/crl"Now we create a role that gets assigned to Vault for our NGINX Plus instances (and only them) which allows these instances to request new certificates from the CA. When configuring the new role, you can define certificate requirements per role. As examples, there are two options below for the NGINX certificate request role: one which forces certificate requests to include an explicit domain, and one which allows you to generate certificates for any Common Name (CN) signed against the local CA. In our use case, both sample roles include support for Subject Alternative Name (SAN) strings within certificates.
Note: The following commands are examples only, and each has security implications that you need to review before use in a production environment.
Restrict certificate requests to a specific subdomain and allow SAN entries:
# vault write pki/nginx-plus-ephem-certs/roles/nginx-cert-requests allowed_domains=example.com allow_subdomains=true allow_ip_sans=true allow_alt_names=true key_bits=2048 max_ttl=72h no_store=trueAlternatively, allow any CN and SAN entries:
# vault write pki/nginx-plus-ephem-certs/roles/nginx-cert-requests allow_any_name=true allow_ip_sans=true allow_alt_names=true key_bits=2048 max_ttl=72h no_store=trueCreating a Read‑Only Policy for NGINX Plus Instances
Finally we add a HashiCorp Configuration Language (HCL) policy to Vault that allows only specific types of certificate requests. We recommend against sharing a Vault root access token or using it for day-to-day operations, so we generate an access token specifically for the NGINX Plus instances tied to this policy.
First we define an HCL policy for our new PKI endpoint by creating the file nginx-cert-requests.hcl with the following contents and saving it in the /etc/vault directory:
path "pki/nginx-plus-ephem-certs/issue/*" {
    capabilities = ["create","update"]
}
There are many more options available to further restrict access to the PKI endpoint, but in this example we’re simply granting rights to request new certificates.
Next we load the policy into Vault:
# vault policy write nginx-cert-requests /etc/vault/nginx-cert-requests.hclNow we create a unique access token for this new read‑only policy that is used to request ephemeral certificates for our NGINX Plus instances:
# vault token create -policy=nginx-cert-requestsWe save the value of token returned by this command in an environment variable called VAULT_APP_TOKEN on the system from which we will be requesting certificates. This is the token used to request new PEM data from Vault via the SSL management tool and to load SSL data into the key‑value store.
In a highly secure environment you may want to set a short time-to-live (TTL) on your read‑only token, regenerating and redistributing it on a recurring basis. For additional details and configuration options for creating tokens, see the Vault documentation.
We are now ready to request new ephemeral certificates from our secure Vault CA. To verify that we’re able to request new certificates, we run the following command on the system where we will issue the request command and load the resulting certificates into the key‑value store. This command passes the necessary certificate request information to Vault (such as CN, SAN, and duration) and Vault generates a certificate and key payload in JSON format. Here’s the JSON we’re submitting to Vault in the API call below, in a more easily readable form:
{
  "common_name":"www.example.com",
  "ip_sans":"10.10.1.1,192.168.76.76",
  "alt_names":"dev.example.com,eng.example.com",
  "ttl":"1h",
  "format":"pem_bundle"
}
# curl -ks --header "X-Vault-Token: $VAULT_APP_TOKEN" -X POST -d '{"common_name":"www.example.com","ip_sans":"10.10.1.1,192.168.76.76","alt_names":"dev.example.com,eng.example.com","ttl":"1h","format":"pem_bundle"}' $VAULT_EXT/v1/pki/nginx-plus-ephem-certs/issue/nginx-cert-requestsThe resulting JSON contains an SSL certificate, key, and data about the issuing CA. Because of the way we have configured Vault, this certificate data exists only in this JSON response – Vault does not store it. For our testing purposes this is the desired response, but if you need to save the SSL data for manual testing, you can pipe the output to a tool such as jq.
Configuring the NGINX Plus Key‑Value Store for SSL Storage
NGINX Plus can store and read SSL certificates and keys via its in‑memory key‑value store, allowing it to load certificates directly from memory rather than from disk. Further, NGINX Plus can use different certificates based on real‑time session data such as Server Name Indication (SNI) hosts or other criteria.
To configure NGINX Plus to load SSL data directly from memory, prefix the parameter to the ssl_certificate and ssl_certificate_key directives with data:. The prefix instructs NGINX Plus to interpret the string as raw certificate‑key PEM content which can be provided as a variable directly from the in‑memory key‑value store.
This design eliminates the need to store and distribute flat‑file certificates and keys from on‑disk repositories, and means they are no longer stored and accessible in deployment images, stored in backups, and so on.
In the following example, we are building an NGINX Plus configuration with the following features:
- A key‑value store called vault_ssl_pem to hold our combined certificate‑key PEM strings.
- The certificate is matched at connection time based on the SNI
Hostheader value of the incoming request (for example, the certificate is loaded from the key‑value store only when the hostname equals the configured key, such as www.example.com). - The SSL PEM data is loaded in the
serverblock bound to port 443. - Debug logging is enabled for testing, so we can capture the full PEM string used for each connection in the access log. (We do not recommend this configuration in production, as it generates a large amount of data and may introduce a security risk.)
- The NGINX Plus API endpoint has been configured to only accept HTTPS traffic to the /api location.
Create a configuration file in /etc/nginx/conf.d named ssl_keyval.conf with these contents:
log_format vault_ssl_keyval '$remote_addr [$time_local] - '
                            'ssl_server_name:"$ssl_server_name" '
                            'host:"$host" ';

keyval_zone zone=vault_ssl_pem:1m;
keyval $ssl_server_name $certificate_pem zone=vault_ssl_pem;

server {
    listen 443 ssl;
    access_log /var/log/nginx/vault-ssl-keystore-access.log vault_ssl_keyval;
    error_log  /var/log/nginx/vault-ssl-keystore-error.log debug;

    # Load PEMs from variable. Note the 'data:' prefix.
    ssl_certificate     data:$certificate_pem;
    ssl_certificate_key data:$certificate_pem;

    location / {
        root /usr/share/nginx/html;
        index index.html;
    }
}

server {
    listen 8443 ssl;
    access_log /var/log/nginx/status-api-access.log api;
    error_log  /var/log/nginx/status-api-error.log notice;

    ssl_certificate     /etc/nginx/ssl/nginx-ssl.crt;
    ssl_certificate_key /etc/nginx/ssl/nginx-ssl.key;

    location /api {
        api write=on;
        if ($request_method !~ ^(GET|POST|HEAD|OPTIONS|PUT|PATCH|DELETE)$) {
            return 405;
        }
    }
}
Loading SSL PEM Data into the NGINX Plus Key‑Value Store
Now we can load the PEM data directly into the vault_ssl_pem key‑value store via the NGINX Plus API.
Note that we have enabled the NGINX Plus API as read‑write. We strongly recommend that when dealing with loading sensitive data such as SSL keys, you enable SSL and authentication for your NGINX Plus API. As such, the examples below access the NGINX Plus API over HTTPS on port 8443.
We can test that NGINX Plus is configured correctly by running the following command to load PEM data (or in this case just the first line of an SSL PEM key as an example) for www.example.com into the key‑value store. NGINX_Plus_instance is the hostname of the NGINX Plus instance where we’ve configured the NGINX Plus API.
# curl -s -X POST -d '{"www.example.com":"-----BEGIN RSA PRIVATE KEY-----\n..."}' https://NGINX_Plus_instance:8443/api/6/http/keyvals/vault_ssl_pemThen we query the vault_ssl_pem key‑value store via the NGINX Plus API to verify that the PEM certificate and key data is the value associated with the www.example.com key:
# curl https://NGINX_Plus_instance:8443/api/6/http/keyvals/vault_ssl_pem
{"www.example.com":"-----BEGIN RSA PRIVATE KEY-----\n..."}
At this point we have configured NGINX Plus to dynamically retrieve the PEM certificate and key data from the in‑memory key‑value store for all HTTPS connections to the service named www.example.com on port 443.
To remove the SSL PEM data associated with the www.example.com key, we can make a PATCH call to the NGINX Plus API with a null value:
# curl -s -X PATCH -d '{"www.example.com":null}' https://NGINX_Plus_instance:8443/api/6/http/keyvals/vault_ssl_pemIntegrating Vault CA Certificate Requests with the NGINX Plus Key‑Value Store
Requesting and Loading a New Ephemeral Cert/Key PEM Into NGINX Plus Key‑Value Store
The final step is to request an ephemeral SSL key‑certificate PEM bundle from Vault and load it into the NGINX Plus key‑value store. When dealing with ephemeral certificates or a heightened security environment, it is ideal to request the new PEM data and load it into the internal key‑value store in one fluid step so that no data is ever stored on disk. To do this we simply combine the PEM request to Vault and the key‑value POST request to the NGINX Plus API, from the examples above, in a single command. We can run it from the SSL management tool or another central location that can access both the Vault API and the NGINX Plus API.
# echo "{\"www.example.com\":$( curl -ks --header "X-Vault-Token: $VAULT_APP_TOKEN" -X POST -d '{"common_name":"www.example.com","ip_sans":"10.10.1.1,192.168.76.76","alt_names":"dev.example.com,eng.example.com","ttl":"1h","format":"pem_bundle"}' $VAULT_EXT/v1/pki/nginx-plus-ephem-certs/issue/nginx-cert-requests | jq '.data | "\(.certificate)"' )}" | curl -ks -X POST -d @- https://NGINX_Plus_instance:8443/api/6/http/keyvals/vault_ssl_pemwhere:
- The
echocommand passes a string to the NGINX Plus API - The first
curlcommand requests a JSON‑formatted key‑certificate PEM from the newly created Vault CA - The
jqcommand extracts just the PEM data from the response generated by the Vault CA - The final
curlcommand makes aPOSTcall to the NGINX Plus API, inserting the PEM data into the vault_ssl_pem key‑value store
As in the previous section, we query the vault_ssl_pem key‑value store to verify that the certificate‑key PEM data is the value associated with the www.example.com key in the key‑value store:
# curl https://NGINX_Plus_instance:8443/api/6/http/keyvals/vault_ssl_pem
{"www.example.com":"-----BEGIN RSA PRIVATE KEY-----…"}
Once a new PEM data string has been loaded into the key‑value store for the www.example.com domain, all new HTTPS connections to the applicable NGINX Plus service use this certificate and key to secure connections. We run this command to test that this is working:
# curl https://www.example.comAssuming your key‑value store has valid PEM data for the www.example.com key, the HTTPS request succeeds. You can test that SNI matching to the PEM data in the key‑value store is working correctly by using something other than www.example.com, such as the IP address corresponding to that name, in the curl command to the NGINX Plus instance. This causes the SSL handshake to fail, which you can confirm in the error log (/var/log/nginx/vault-ssl-keystore-error.log).
# curl https://IP-address-for-www.example.comUpdating and Revoking Certificates
If you need to change, revoke, or remove the PEM data associated with a host, you can follow a similar approach as above, utilizing the API PATCH method to update the value for www.example.com in the key‑value store. This can be a great use case for cycling SSL certificates routinely on a fixed time scale, such as daily, or when you need to revoke a certificate.
To request a new certificate from Vault to update the value associated with www.example.com in the key‑value store, run a command similar to the one in the previous section but change the HTTP method from POST to PATCH in the second curl command, to push the updated PEM bundle to the key‑value store via the API:
# echo "{\"www.example.com\":$( curl -ks --header "X-Vault-Token: $VAULT_APP_TOKEN" -X POST -d '{"common_name":"www.example.com","ip_sans":"10.10.1.1,192.168.76.76","alt_names":"dev.example.com,eng.example.com","ttl":"1h","format":"pem_bundle"}' $VAULT_EXT/v1/pki/nginx-plus-ephem-certs/issue/nginx-cert-requests | jq '.data | "\(.certificate)"' )}" | curl -ks -X PATCH -d @- https://NGINX_Plus_instance:8443/api/6/http/keyvals/vault_ssl_pemTo completely remove or revoke the value associated with the www.example.com key, use PATCH with a null value:
# curl -s -X PATCH -d '{"www.example.com":null}' https://NGINX_Plus_instance:8443/api/6/http/key-vals/vault_ssl_pemConclusion
Once you verify that everything is working as expected, you can script these commands to Vault and the NGINX Plus API to rotate certificates as needed. You can also add this workflow to any CI/CD pipeline already in use for SSL certificate and key management, NGINX Plus deployments, or NGINX Plus key‑value store management. Additional certificate request details, such as unique CN and SAN directives, can be provided to Vault to generate certificates that only work with specific service names and with other specified criteria. This architecture allows for a very specific system of generating and storing customized ephemeral certificates in memory so that nothing is ever written to disk.
For deployments where it’s acceptable to store SSL keys on disk, see the other two blogs in this series:
- Secure Distribution of SSL Private Keys with NGINX
- Protecting SSL Private Keys in NGINX with HashiCorp Vault
Try NGINX Plus for yourself – start your free 30-day trial today or contact us to discuss your use cases.