
[Editor – Originally published in 2016, this post has been updated to use NGINX features that have been revised since then. For details, see Advanced Logging with the NGINX JavaScript Module and NGINX Plus Dashboard.]
We introduced TCP load balancing in NGINX Plus R5, and have continually added features in subsequent releases, as well as support for UDP load balancing. In this article we explore the key requirements for TCP load balancing and how NGINX Plus addresses them.
To explore the features of NGINX Plus we will use a simple test environment that represents the key components of an application with a scaled database backend. For complete instructions on building the test environment, see the Appendix.
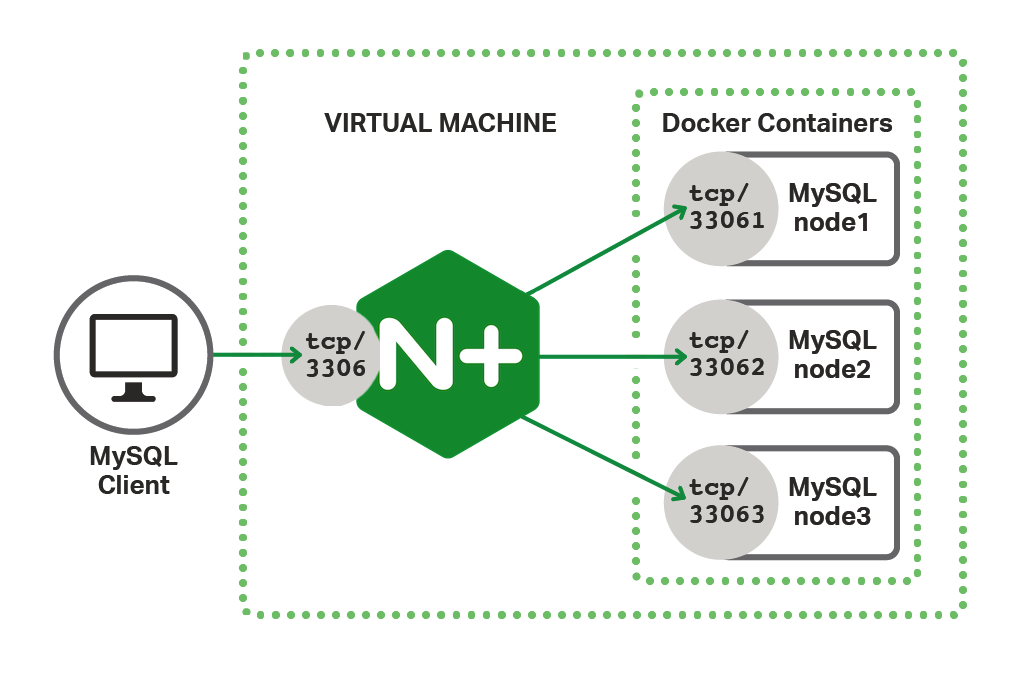
In this environment NGINX Plus acts as a reverse proxy for the database server, listening on the default MySQL port of 3306. This provides a simple interface to the client, while the backend MySQL nodes can be scaled out (and even taken offline) without affecting the client in any way. We use the MySQL command‑line tool as the client, which represents the frontend application in the test environment.
Many of the features described in this article apply to both NGINX Open Source and NGINX Plus. For brevity we’ll refer to NGINX Plus throughout, and explicitly call out the features that are not available in NGINX Open Source.
We will explore the following use cases:
- TCP load balancing
- High availability and health checks
- Logging and diagnostics
- Considerations for concurrent writes
TCP Load Balancing
Before configuring load balancing for any application it is important to understand how the application connects to the database. For most of our tests, we use the MySQL command‑line tool, mysql(1), to connect to the Galera cluster, run a query, and then close the connection. However, many application frameworks use a connection pool to minimize latency and make efficient use of database server resources.
TCP load balancing is configured in the stream configuration context, so we create our base MySQL load balancing configuration by adding a stream block to the main nginx.conf file.
This separates our TCP load balancing configuration from the main configuration file. We then create stream.conf in the same directory as nginx.conf. Note that by default, the conf.d directory is reserved for the http configuration context and so adding stream configuration files to that directory doesn’t work.
First we define an upstream group named galera_cluster, containing the three MySQL nodes in our Galera cluster. In our test environment they are each accessible on localhost with a unique port number. The zone directive defines an amount of memory that is shared across all of the NGINX Plus worker processes to maintain load‑balancing state. The server{} block configures how NGINX Plus deals with clients. NGINX Plus listens on the default MySQL port, 3306, and forwards all traffic to the Galera cluster defined in the upstream block.
To test that this basic configuration is working, we can use the MySQL client to return the hostname of the node in the Galera cluster that we connected to.
$ echo "SHOW VARIABLES WHERE Variable_name = 'hostname'" | mysql --protocol=tcp --user=nginx --password=plus -N 2> /dev/null
hostname	node1
To check that load balancing is working, we can repeat the same command.
$ !!;!!;!!
hostname	node2
hostname	node3
hostname	node1
This shows that the default round‑robin load‑balancing algorithm is operating correctly. However, if our application uses a connection pool to access the database (as suggested above), then opening connections to the cluster in a round‑robin fashion is likely to lead to an unbalanced number of connections on each node. In addition, we cannot equate a connection with a given workload, as connections may be idle (awaiting a query from the application) or busy processing a query. A more appropriate load‑balancing algorithm for long‑lived TCP connections is Least Connections, configured with the least_conn directive:
Now, when a client opens a new connection to the database, NGINX Plus chooses the cluster node with the smallest number of current connections.
High Availability and Health Checks
The great advantage of sharing the database workload across a cluster is that it also provides high availability. With the configuration discussed above, NGINX Plus marks a server as “down” and stops sending TCP packets to it if a new TCP connection cannot be established.
In addition to handling down servers in this way, NGINX Plus can also be configured to perform automatic, proactive health checks so that unavailable servers are detected before client requests are sent to them (this is an NGINX Plus‑only feature). Furthermore, the availability of servers can be tested with an application‑level health check, which means we can send a request to each server and check that we get a response that indicates good health. This extends our configuration as follows.
In this example, the match block defines the request and response data required to initiate a MySQL protocol version 10 handshake. The health_check directive in the server{} block applies this pattern and ensures that NGINX Plus forwards MySQL connections only to servers that are actually capable of accepting new connections. In this case we perform the health check every 20 seconds, exclude a server from the TCP load‑balancing pool after a single failure, and resume load balancing to it after 2 consecutive successful health checks.
Logging and Diagnostics
NGINX Plus provides flexible logging so that all of its TCP/UDP processing can be recorded for debugging or offline analysis. For TCP protocols such as MySQL, NGINX Plus writes a log entry when the connection is closed. The log_format directive defines what values appear in the logs. We can choose from any of the variables available to the Stream modules. We define the log format in the stream context, at the top of our stream.conf file.
Logging is enabled by adding the access_log directive in the server{} block, specifying the path to the log file and the name of the log format defined in the previous snippet.
This produces log entries such as the sample below.
$ tail -3 /var/log/nginx/galera_access.log
192.168.91.1 [23/Jul/2021:17:42:18 +0100] TCP 200 369 1611 127.0.0.1:33063 0.000 0.003 12.614 12.614
192.168.91.1 [23/Jul/2021:17:42:18 +0100] TCP 200 369 8337 127.0.0.1:33061 0.001 0.001 11.181 11.181
192.168.91.1 [23/Jul/2021:17:42:19 +0100] TCP 200 369 1611 127.0.0.1:33062 0.001 0.001 10.460 10.460
Advanced Logging with the NGINX JavaScript Module
NGINX JavaScript is the “NGINX native” programmatic configuration language. It is a unique JavaScript implementation for NGINX and NGINX Plus, designed specifically for server‑side use cases and per‑request processing.
[Editor – The following use case is just one of many for the NGINX JavaScript module. For the list of all use cases, see Use Cases for the NGINX JavaScript Module.
This post has been updated to use the refactored session (s) object for the Stream module introduced in NGINX JavaScript 0.2.4 and the js_import directive introduced in NGINX JavaScript 0.4.0.]
Within the Stream module for TCP/UDP load balancing, NGINX JavaScript provides access to the contents of request and response packets. This means that we can examine the client request corresponding to the SQL query and extract useful elements such as the SQL method, for example SELECT or UPDATE. NGINX JavaScript can then make such values available as a regular NGINX variables. In this example we put our JavaScript code in /etc/nginx/sql_method.js.
The getSqlMethod() function is passed a JavaScript object (s) which represents the current packet. Properties of this object such as fromUpstream and buffer provide us with the information we need about the packet and its context.
We first check that the TCP packet is coming from the client, as we don’t need to examine packets coming from the upstream MySQL server. Here, we are interested in the third client packet as the first two packets contain handshake and authentication information. The third client packet contains the SQL query. The beginning of this string is then compared with one of the SQL methods defined in the methods array. When we find a match we store the result in the global variable $method and write an entry to the error log. NGINX JavaScript logging is written to the error log at severity info and so does not appear by default.
The setSqlMethod() function is called when an NGINX variable of the same name is evaluated. When this happens, the variable is populated by the NGINX JavaScript global variable $method which was obtained from calls to the getSqlMethod() function.
Note that this NGINX JavaScript code is designed for the MySQL command‑line client, where a single query is executed. It does not accurately capture complex queries, or multiple queries over a long‑lived connection, although the code could be adapted for those use cases. For instructions for installing and enabling the NGINX JavaScript module, see the NGINX Plus Admin Guide.
To include the SQL method in our logs we include the $sql_method variable in the log_format directive.
We also need to extend our configuration to tell NGINX Plus how and when to execute the NGINX JavaScript code.
First we specify the location of the NGINX JavaScript code with the js_import directive and use the js_set directive to tell NGINX Plus to call the setSqlMethod() function when it needs to evaluate the $sql_method variable. Then, within the server{} block we use the js_filter directive to specify the function that will be called each time a packet is processed. Optionally we can add the error_log directive with the info option to enable NGINX JavaScript logging.
With this additional configuration in place our access log now looks like this.
$ tail -3 /var/log/nginx/galera_access.log
192.168.91.1 [23/Jul/2021:17:42:18 +0100] TCP 200 369 1611 127.0.0.1:33063 0.000 0.003 12.614 12.614 UPDATE
192.168.91.1 [23/Jul/2021:17:42:18 +0100] TCP 200 369 8337 127.0.0.1:33061 0.001 0.001 11.181 11.181 SELECT
192.168.91.1 [23/Jul/2021:17:42:19 +0100] TCP 200 369 1611 127.0.0.1:33062 0.001 0.001 10.460 10.460 UPDATE
NGINX Plus Dashboard
[Editor – This section has been updated to refer to the NGINX Plus API, which replaces and deprecates the separate extended Status module originally discussed here.]
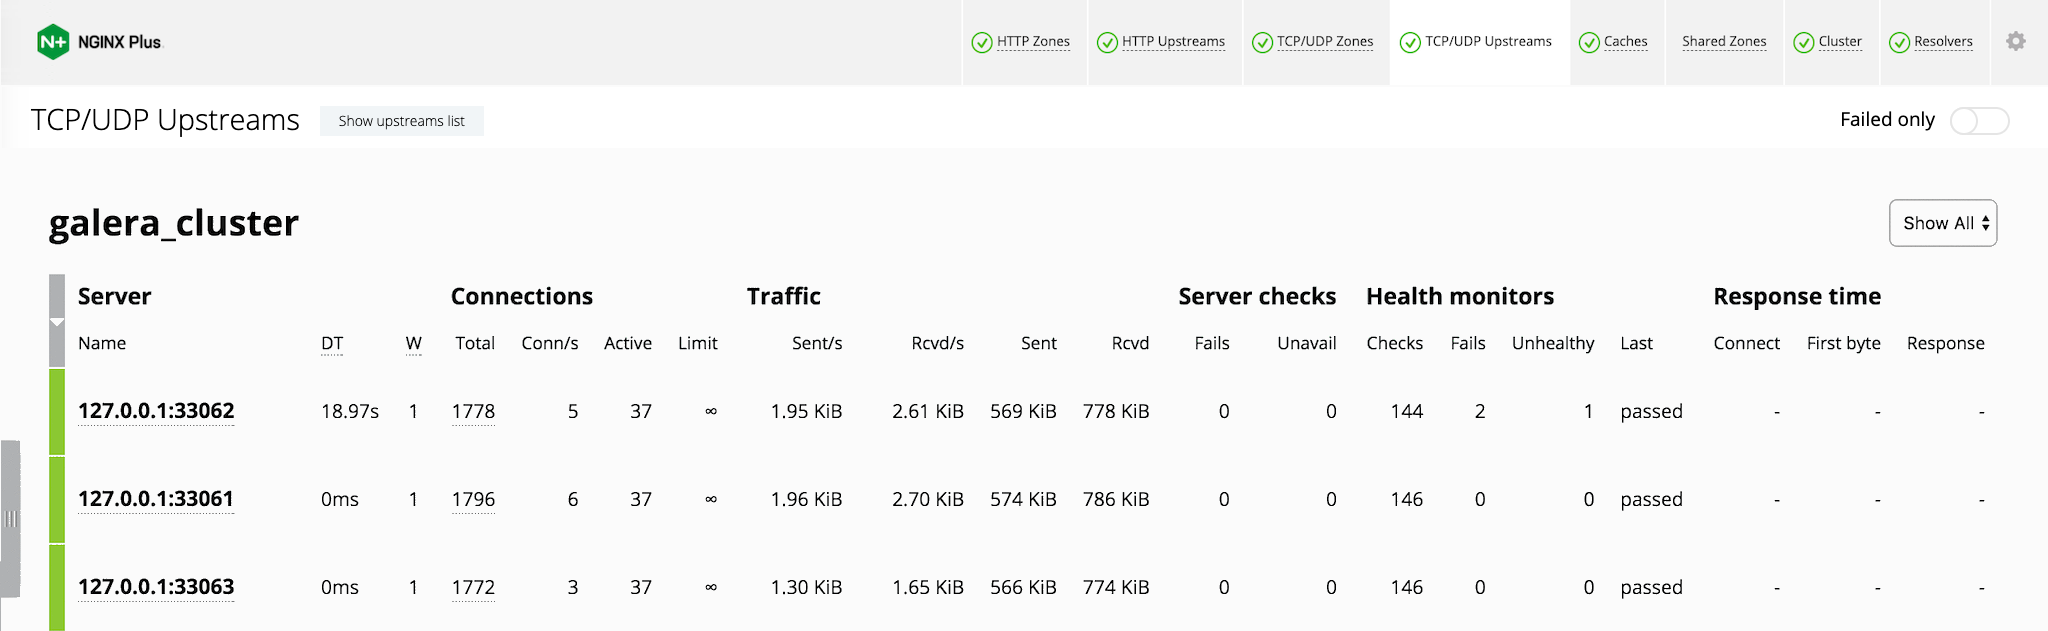
As well as logging MySQL activity in detail, we can observe real‑time metrics and the health of our upstream MySQL servers on the NGINX Plus live activity monitoring dashboard (NGINX Open Source provides a smaller set of metrics and through the Stub Status API only).
The NGINX Plus dashboard was introduced in NGINX Plus R7 and provides a web interface to the NGINX Plus API. We enable this by adding a new server{} block in the http context in a separate /etc/nginx/conf.d/dashboard.conf file:
We must also update the server{} block in stream.conf with the status_zone directive to enable monitoring data to be collected for our MySQL service.
With this configuration in place, the NGINX Plus dashboard is available on port 8080. In the following screenshot we can see our three MySQL servers, each showing the details of numerous ongoing connections and the current health status. We can see that the node listening on port 33062 previously had one brief outage of 18.97 seconds (reported in the DT column).
Considerations for Concurrent Writes
Galera Cluster presents each MySQL server node as a master database that performs both reads and writes. For many applications the ratio of reads to writes is so great that the risk of the same table row being updated by multiple clients at the same time is entirely acceptable when compared to the flexibility that comes from a multimaster database cluster. In situations where there is a higher risk of concurrent writes occurring, we have two options.
- Create two separate upstream groups, one for reads and one for writes, each listening on a different port. Dedicate one or more nodes in the cluster to writes, with all nodes included in the reads group. Client code must be updated to select the appropriate port for read and write operations. This approach is discussed in Advanced MySQL Load Balancing with NGINX Plus on our blog and favors a highly scaled environment with many MySQL server nodes.
- Keep a single upstream group and modify the client code to detect write errors. When a write error is detected, the code exponentially backs off before trying again, after the concurrency has ended. This approach is discussed in MySQL High Availability with NGINX Plus and Galera Cluster on our blog and favors a small cluster, where dedicating cluster nodes to writes would compromise high availability.
Summary
In this article we have explored several of the essential aspects of load balancing a TCP (or UDP) application such as MySQL. NGINX Plus provides a fully featured TCP/UDP load balancer to help you deliver applications with performance, reliability, security and scale – regardless of the type of traffic.
To try NGINX Plus, start your free 30-day trial today or contact us to discuss your use cases.
Appendix: Creating the Test Environment
The test environment is installed on a virtual machine so that it is isolated and repeatable. However, there is no reason why it cannot be installed on a physical, “bare metal” server.
Installing NGINX Plus
See the NGINX Plus Admin Guide.
Installing Galera Cluster for MySQL
In this example we install Galera Cluster on a single host using Docker containers for each node. The following instructions are adapted from Getting started Galera with Docker and assume that both Docker Engine and the MySQL command‑line tool are already installed.
-
Create a basic MySQL configuration file (my.cnf) to be copied to each Galera container by the Docker image.
-
Pull the Galera basic Docker image.
$ sudo docker pull erkules/galera:basic -
Create the first Galera node (node1), exposing the default MySQL port as 33061.
$ sudo docker run -p 33061:3306 --detach=true --name node1 -h node1 erkules/galera:basic --wsrep-cluster-name=local-test --wsrep-cluster-address=gcomm:// -
Create the second Galera node (node2). The MySQL port is exposed as 33062 and linked to node1 for intercluster communication.
$ sudo docker run -p 33062:3306 --detach=true --name node2 -h node2 --link node1:node1 erkules/galera:basic --wsrep-cluster-name=local-test --wsrep-cluster-address=gcomm://node1 -
Create the third and final Galera node (node3) in the same way as node2. The MySQL port is exposed as 33063.
$ sudo docker run -p 33063:3306 --detach=true --name node3 -h node3 --link node1:node1 erkules/galera:basic --wsrep-cluster-name=local-test --wsrep-cluster-address=gcomm://node1 -
Create a user account called nginx that can be used for remote access to the cluster from the host. This is performed by running the
mysql(1)command from within the Docker container itself.$ sudo docker exec -ti node1 mysql -e "GRANT ALL PRIVILEGES ON *.* TO 'nginx'@'172.17.0.1' IDENTIFIED BY 'plus'" -
Verify that you can connect to the Galera cluster from the host, using the TCP protocol.
$ mysql --protocol=tcp -P 33061 --user=nginx --password=plus -e "SHOW DATABASES" mysql: [Warning] Using a password on the command line interface can be insecure. +--------------------+ | Database | +--------------------+ | information_schema | | mysql | | performance_schema | +--------------------+ -
Finally, run the same command against another of the cluster nodes to show that the nginx user account has been replicated and the cluster is functioning correctly.
$ mysql --protocol=tcp -P 33062 --user=nginx --password=plus -e "SHOW DATABASES"
mysql: [Warning] Using a password on the command line interface can be insecure.
+--------------------+
| Database           |
+--------------------+
| information_schema |
| mysql              |
| performance_schema |
+--------------------+