


Since its introduction more than 15 years ago, NGINX has gained steadily in popularity and is now the most popular web server in the world, powering more than 350 million websites. In this case we think it’s smart to follow the crowd and use NGINX for all your web‑serving needs, and additionally to take advantage of its capabilities as a reverse proxy, content cache, load balancer, API gateway, and more.
This blog post guides you in getting NGINX up and running on Ubuntu 20.04 on Amazon Web Services (AWS) in an easy-to-use setup that doesn’t affect the settings on your personal computer. It covers both NGINX and NGINX Plus, the commercially supported version with additional enterprise‑grade features.
Once you complete the steps given here, you may want to continue with NGINX Core training (instructor‑led or on‑demand), a full‑day course where you’ll learn how to configure, administer, and manage NGINX. The course also readies you for our other instructor‑led and self‑paced courses on advanced topics.
The tutorial includes instructions for these tasks:
- Setting Up AWS
- Installing NGINX Software
- Opening Your Web Page
- Setting Up Sample Files
- Serving Pages and Images
- Setting Up a Proxy Server
Accessing a Terminal
For this tutorial, you need a terminal to connect to your Amazon Elastic Compute Cloud (EC2) instance. Macs have a built‑in terminal, but Windows users need to download PuTTY or an equivalent tool. If you prefer to use your own local terminal to set up NGINX or NGINX Plus and serve web content, feel free to skip to Setting up AWS.
Accessing a Terminal on MacOS
On Macs, you can use the built‑in terminal tool to do everything in this tutorial.
-
Click the magnifying glass icon at the right end of the top bar on the screen.
-
Type
terminalin the pop‑up box and press Enter. A separate terminal window opens.
Accessing a Terminal on Windows
Windows doesn’t come with a built‑in terminal, so you need to download one from the Internet. Along with AWS, we recommend PuTTY, an ssh client used throughout the world.
-
Access the PUTTY download page.
-
Download and install the file in a location of your choice, then open it. You can’t access the actual terminal until you finish the steps in the Setting up AWS, however.
Setting Up AWS
In this tutorial we assume that you have an Amazon Virtual Private Cloud (VPC) and can simply use the default VPC configuration that is created with most accounts. In this section, you set up your AWS deployment by creating an EC2 instance and connecting to it.
Note: The following procedure and screenshots for creating an EC2 instance were verified at the time of writing, but are subject to change by AWS. Adapt the instructions as necessary.
-
On the AWS home page, sign in to the (AWS Management) Console, or first create a new account if necessary.
-
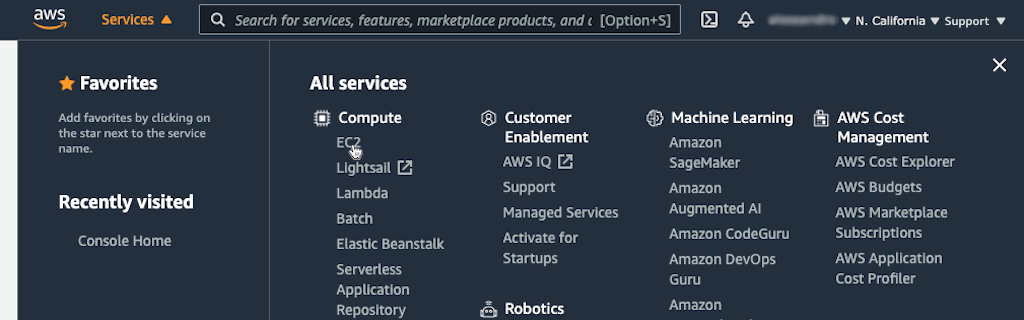
Click Services in the Console title bar, then EC2 in the Compute section.
-
Click the Launch Instance button on the EC2 Dashboard page that opens.
-
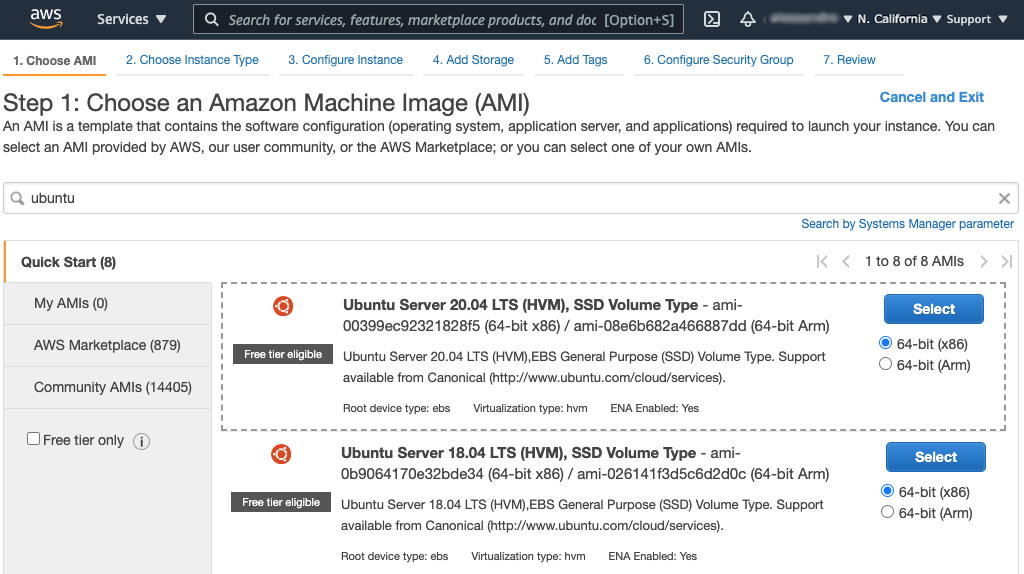
On the Step 1 page, click the Select button in the Ubuntu Server 20.04 LTS (HVM), SSD Volume Type row, and keep the default 64-bit (x86) architecture selection.
-
On the Step 2 page, select the t2.micro instance type, which as of this writing is marked Free tier eligible and selected by default. Click the Next: Configure Instance Details button.

-
On the Step 3 page, make sure the VPC you want to use is selected in the Network field, and that the Auto-assign Public IP field is set either to the default Use Subnet setting (Enable) or to Enable. Leave the rest of the settings at their defaults.

-
Click 6. Configure Security Group at the top of the page.
-
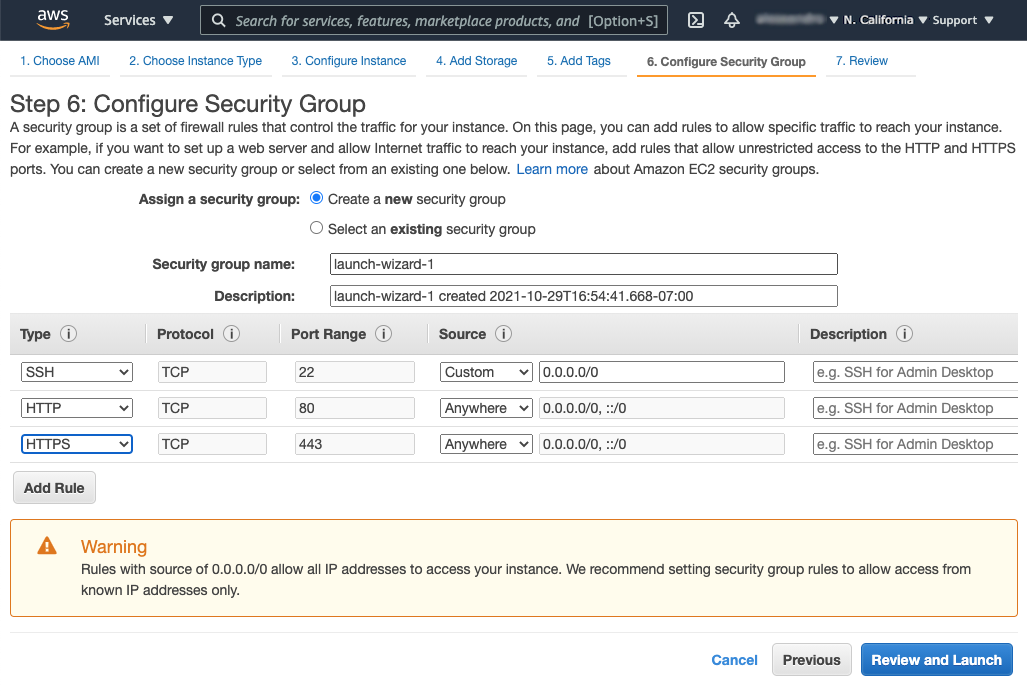
On the Step 6 page, perform the following steps to allow incoming HTTP and HTTPS traffic (by default EC2 instances accept only SSH traffic):
-
Click the Add Rule button below the table, then select HTTP from the drop‑down menu in the Type column. For the purposes of this tutorial, we are allowing access from any IP address (the value in the Source column is Anywhere 0.0.0.0/0, ::/0). For production environments, we recommend you follow the warning on the page which mandates use of security groups to control access.
-
Repeat the previous step for HTTPS.
-
Click the Review and Launch button at the bottom of the page.
-
-
On the Step 7 page, click the Launch button at the bottom.
-
In the box that pops up, create a new key pair:
-
Select Create a new key pair from the upper drop‑down menu.
-
Select a key pair type. In this tutorial, we’re selecting RSA.
-
Type a name in the Key pair name field, such as NGINX_key.
-
Click the Download Key Pair button.
-
As shown in the animated screenshot below, a check box replaces the Download Key Pair button. Click it to indicate that you can access the private key.
-
Click the Launch Instances button.

-
-
In your file manager utility, move the downloaded .pem file (in the tutorial, NGINX_key.pem) to a secure location. For the tutorial we’re placing it in the /Desktop/NGINX directory.
-
If using a Windows terminal, follow the AWS instructions to download the PuTTYgen utility and convert the .pem file to a .ppk file.
-
On the Launch Status page, click the View Instances button at the bottom.
-
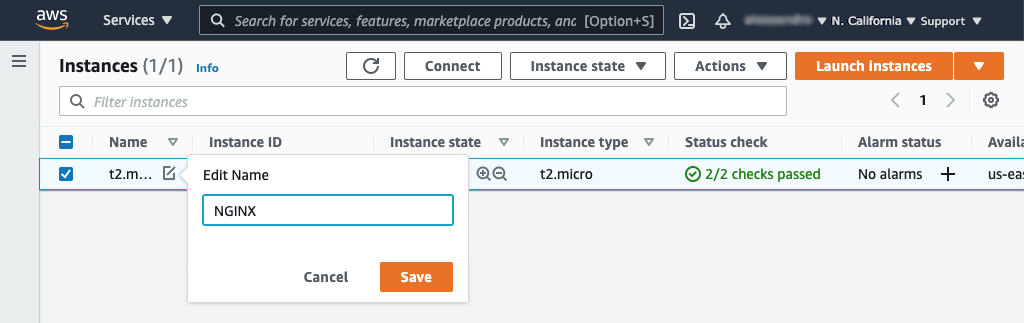
On the Instances page that opens, the new instance appears in the table. Give it a name:
-
Click the pencil icon in the Name column.
-
Type the name in the Edit Name pop‑up box and click the Save button.
-
-
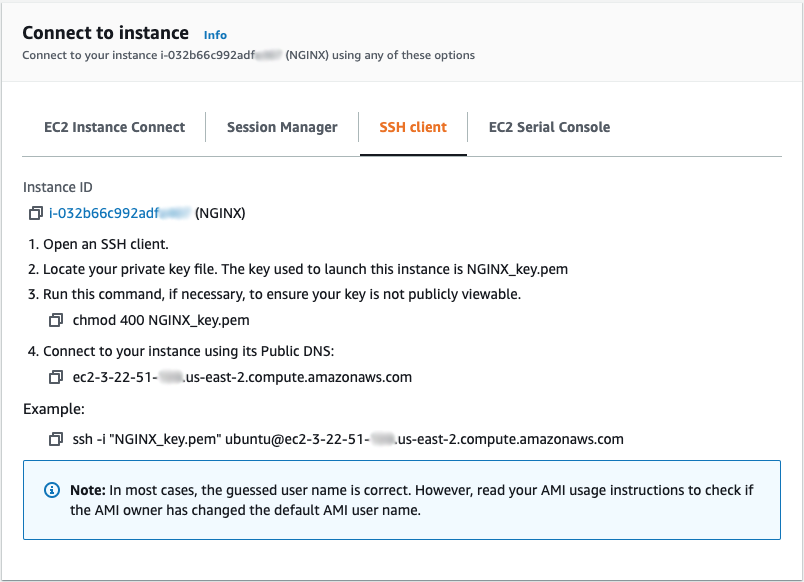
Click the Connect button at the top of the screen. A window like the following pops up. Open the SSH client tab and follow the instructions to connect to the instance. If using Windows, substitute .ppk for .pem in the commands.
Installing NGINX Software
Now that your AWS environment is set up, it’s time to install either NGINX Open Source or NGINX Plus, which you can try free for 30 days. Both options work in the context of this tutorial, but if you want to further explore the advanced features in NGINX Plus, please request a free trial.
Installing NGINX Open Source
Most Linux distributions and BSD variants make NGINX Open Source available in their standard package repositories, but it’s usually not the latest version. We recommend downloading NGINX Open Source directly from nginx.org. There are just a few extra steps for adding the NGINX repository to the Ubuntu package manager (apt).
To install NGINX Open Source, follow these steps:
-
Download the NGINX signing key:
$ sudo wget http://nginx.org/keys/nginx_signing.key -
Add the key:
$ sudo apt-key add nginx_signing.key -
Change directory to /etc/apt.
$ cd /etc/apt -
Edit the sources.list file, appending this text at the end:
deb http://nginx.org/packages/ubuntu focal nginx
deb-src http://nginx.org/packages/ubuntu focal nginx
Note: The
focalkeyword in each of these lines corresponds to Ubuntu 20.04. If you are using a different version of Ubuntu, substitute the first word of its release code name (for example,bionicfor Ubuntu 18.04). -
Update the NGINX software:
$ sudo apt-get update -
Install NGINX:
$ sudo apt-get install nginx -
Type
Ywhen prompted. -
Start NGINX:
$ sudo systemctl start nginx.service -
Check its status:
$ sudo systemctl status nginx.service -
Continue to Opening Your Web Page.
Installing NGINX Plus
-
If you don’t already have NGINX Plus, sign up for a 30‑day free trial.
-
When you receive the email notification that your trial subscription is available, follow the instructions provided to download your security certificate, private key, and JWT, and then to install NGINX Plus.
-
When installation is complete and NGINX Plus is running, continue to Opening Your Web Page.
Opening Your Web Page
Now that you’ve started the NGINX software, take a look at the web page that NGINX and NGINX Plus serve by default before you configure them to deliver your site’s content. Follow these steps:
-
Navigate to the Instances tab on the EC2 Dashboard if you are not there already. (One way is to click Services in the top Console navigation bar, EC2 in the Compute section, and Instances in the left‑hand navigation column.)
-
Scroll right in the table until you can see the instance’s public IP address in the Public IPv4 address column (in the screenshot, it’s 3.22.51.xxx). Select the address and copy it into the paste buffer.

-
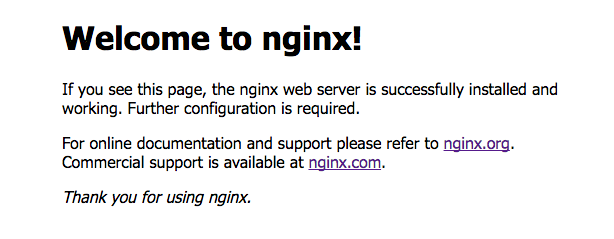
Open a new browser tab and paste the address into the address bar. The default Welcome to nginx! page appears, indicating that NGINX is installed and running but not yet configured.
Setting Up Sample Files
With a working version of NGINX or NGINX Plus installed, it’s time to put it to good use! Begin by setting up some files and directories.
-
Change directory to your home directory if you are not already there. In the following instructions, it is /home/ubuntu.
-
Create a directory called public_html and change into it.
-
In the public_html directory, create a file called index.html and a directory called application1.
-
In the application1 directory, create a file called app1.html with some text in it.
-
Change back to your home directory.
-
Create a directory called data.
-
In the data directory, create a directory called images.
Serving Pages and Images
Our first use case for NGINX or NGINX Plus is to serve pages and images to users via a web page.
-
Change directory to /etc/nginx/conf.d.
-
Rename default.conf to default.conf.bak to prevent NGINX or NGINX Plus from using it as the default configuration file.
-
Create a file called server1.conf with this configuration in it:
server { root /home/ubuntu/public_html; location /application1 { } location /images { root /home/ubuntu/data; } } -
Change directory to ~/data/images.
-
Find an image that you want to serve and copy it to the directory (~/data/images). As an example, the following command copies over the NGINX logo:
$ curl -o NGINX-logo.png https://www.nginx.com/wp-content/uploads/2021/11/NGINX-logo-2020.png -
Reload NGINX or NGINX Plus:
$ sudo nginx -s reload -
In a web browser request the image at this URL, where NGINX-server is the public IP address of your EC2 instance:
https://NGINX-server/images/NGINX-logo.png
-
Also access the application and observe what you get:
https://NGINX-server/application1/app1.html
Setting Up a Proxy Server
Now that you have a working web server, it’s time to learn how to configure it to route traffic. This capability enables you to pass traffic through to other servers and is a major step towards setting up load balancing. Follow these steps:
-
In the ~/data directory, create a directory called server2.
-
In the server2 directory, create a directory called sampleApp.
-
In the sampleApp directory, create a file named index.html with some text in it.
-
Change directory to /etc/nginx/conf.d.
-
Create a file called server2.conf with this configuration in it:
server { listen 8080; root /home/ubuntu/data/server2; } -
Modify server1.conf by adding a
proxy_passdirective in the firstlocationblock, as follows:server { root /home/ubuntu/public_html; location /application1 { proxy_pass http://localhost:8080/sampleApp; } location /images { root /home/ubuntu/data; } }Directive documentation:
location,proxy_pass,root,server -
Reload NGINX or NGINX Plus:
$ sudo nginx -s reload -
Access the following URL in your browser and observe what has changed compared to when you accessed it in Serving Pages and Images:
https://NGINX-server/application1/index.html
So that’s it! You now have a working Ubuntu instance running NGINX, which is ready to run as a proxy server.
For instructions on deploying NGINX and NGINX Plus on AWS for additional use cases, see our deployment guides.
Conclusion
In this tutorial, you learned how to set up NGINX or NGINX Plus to serve files and images over the Internet, and to act as a reverse proxy. If you want to learn about NGINX in more depth, we offer the NGINX Core training course (instructor‑led or on‑demand) which covers the topics from this tutorial as well as more essentials of web serving and application delivery, including load balancing, location‑based routing, and security. Also check out the documentation at nginx.org and the NGINX Plus Admin Guide – except as noted, the articles apply to NGINX Open Source as well as NGINX Plus.


