Editor – This is the second part of a series on high‑capacity and high‑availability caching:
- Shared Caches with NGINX Plus Cache Clusters, Part 1
- Shared Caches with NGINX Plus Cache Clusters, Part 2 (this post)
How can you build a large‑capacity, highly available cache cluster using NGINX or NGINX Plus? This posts describes how to use two or more NGINX or NGINX Plus cache servers to create a highly available cache cluster. (Except as noted, the method described here applies equally to NGINX Open Source and NGINX Plus, but for brevity we’ll refer to NGINX Plus only.)
Review – The Sharded Cache Solution
The first part of this series described a pattern for creating very large, sharded cache clusters.
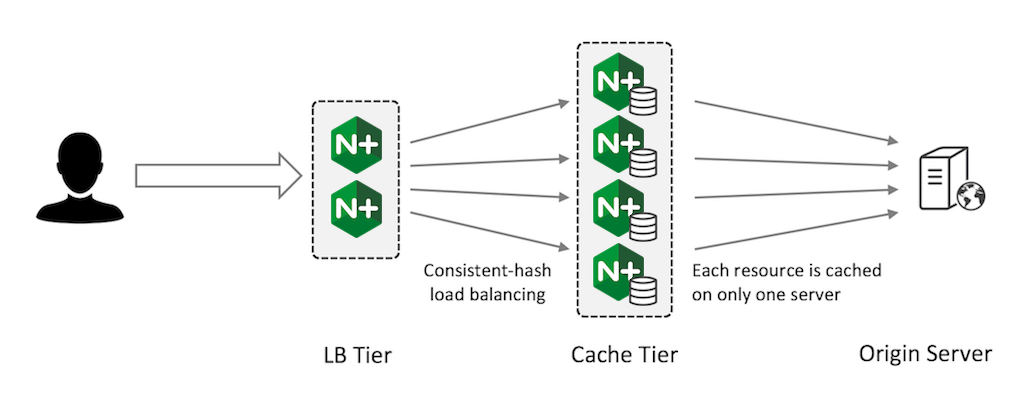
This pattern is effective when you need to create a very large‑capacity cache that can be scaled up at will. Because each resource is only cached on one server, it is not fully fault‑tolerant, but the consistent‑hash load balancing ensures that if a server fails, only its share of the cached content is invalidated.
Creating a Highly Available Cache Cluster
If minimizing the number of requests to your origin servers at all costs is your primary goal, then the cache sharding solution is not the best option. Instead, a solution with careful configuration of primary and secondary NGINX Plus instances can meet your requirements:

The primary NGINX Plus instance receives all traffic and forwards requests to the secondary instance. The secondary instance retrieves the content from the origin server and caches it; the primary instance also caches the response from the secondary and returns it to the client.
Both devices have fully populated caches and the cache is refreshed according to your configured timeouts.
Configuring the Primary Cache Server
Configure the primary cache server to forward all requests to the secondary server and cache responses. As indicated by the backup parameter to the server directive in the upstream group, the primary server forwards requests directly to the origin server in the event that the secondary server fails:
proxy_cache_path /tmp/mycache keys_zone=mycache:10m;

server {
    status_zone mycache;          # for NGINX Plus extended status

    listen 80;

    proxy_cache mycache;
    proxy_cache_valid 200 15s;

    location / {
        proxy_pass http://secondary;
    }
}

upstream secondary {
    zone secondary 128k;          # for NGINX Plus extended status

    server 192.168.56.11;         # secondary
    server 192.168.56.12 backup;  # origin
}
Configuring the Secondary Cache Server
Configure the secondary cache server to forward requests to the origin server and cache responses.
proxy_cache_path /tmp/mycache keys_zone=mycache:10m;

server {
    status_zone mycache;          # for NGINX Plus extended status

    listen 80;

    proxy_cache mycache;
    proxy_cache_valid 200 15s;

    location / {
        proxy_pass http://origin;
    }
}

upstream origin {
    zone origin 128k;            # for NGINX Plus extended status

    server 192.168.56.12;        # origin
}
Configuring High Availability
Finally, you need to configure high availability (HA) so that the secondary server takes the incoming traffic if the primary fails; the primary takes the traffic back when it subsequently recovers.
In this example, we use the active‑passive HA solution for NGINX Plus. The externally advertised virtual IP address is 192.168.56.20, and the primary cache server acts as the primary node for HA in the cluster. If you are using NGINX Open Source, you can manually install and configure keepalived or a different HA solution.
Failover Scenarios
Recall that we want to create a highly available cache cluster that continues to operate even if a cache server fails. We don’t want the load on the origin server to increase, either when a cache server fails or when it recovers and needs to refresh stale content.
Suppose the primary fails and the NGINX Plus HA solution transfers the external IP address to the secondary.

The secondary has a full cache and continues to operate as normal. There is no additional load on the origin server.
When the primary cache server recovers and starts receiving client traffic, its cache will be out of date and many entries will have expired. The primary will refresh its local cache from the secondary cache server; because the cache on the secondary server is already up‑to‑date, there is no increase in traffic to the origin server.
Now suppose the secondary fails. The primary detects this (using a health check configured as part of the HA solution) and forwards traffic directly to the backup server (which is the origin server).

The primary server has a full cache and continues to operate as normal. Once again, there is no additional load on the origin server.
When the secondary recovers, its cache will be out of date. However, it will only receive requests from the primary when the primary’s cache expires, at which point the secondary’s copy will also have expired. Even though the secondary needs to make a request for content from the origin server, this does not increase the frequency of requests to the origin. There’s no adverse effect on the origin server.
Testing the Failover Behavior
To test our HA solution, we configure the origin server to log requests and to return the current time for each request. This means that the origin server’s response changes every second:
access_log /var/log/nginx/access.log;

location / {
    return 200 "It's now $time_localn";
}
The primary and secondary cache servers are already configured to cache responses with status code 200 for 15 seconds. This typically results in cache updates every 15 or 16 seconds.
proxy_cache_valid 200 15s;Verifying Cache Behavior
Once per second, we send an HTTP request to the highly available virtual IP address for the cache cluster. The response does not change until the caches on the primary and secondary servers expire and the response is refreshed from the origin server. This happens every 15 or 16 seconds.
$ while sleep 1 ; do curl http://192.168.56.20/ ; done
It's now 9/Feb/2017:06:35:03 -0800
It's now 9/Feb/2017:06:35:03 -0800
It's now 9/Feb/2017:06:35:03 -0800
It's now 9/Feb/2017:06:35:19 -0800
It's now 9/Feb/2017:06:35:19 -0800
^C
We can also inspect the logs on the origin server to confirm that it is receiving a request only every 15 or 16 seconds.
Verifying Failover
We can verify that the failover is working correctly by stopping either the primary or the secondary server, for example, by stopping the nginx processes. The constant‑load test continues to run, and the response is consistently cached.
Inspecting the access log on the origin server confirms that it only ever receives a request every 15 to 16 seconds, no matter which of the cache servers fails or recovers.
Timing of Cache Updates
In a stable situation, the cached content is normally updated every 15 to 16 seconds. The content expires after 15 seconds, and there is a delay of up to 1 second before the next request is received, causing a cache update.
Occasionally, the cache will appear to update more slowly (up to 30 seconds between changes in content). This occurs if the primary cache server’s content expires and the primary retrieves cached content that is almost expired from the secondary. If this presents a problem, you can configure a shorter cache timeout on the secondary server.
Summary
Tiering caches between two or more NGINX cache servers in the way we’ve described here is an effective way to create a highly available cache cluster that minimizes the load on origin servers, protecting them from spikes of traffic when one of the cache servers fails or recovers.
The total capacity of the cache is limited to the capacity of a single cache server. The first part of this series describes an alternative sharded cache pattern that partitions a cache across a cluster of cache servers. In that case, the total capacity is the sum of all of the cache servers, but content is not replicated to protect against spikes in traffic to the origin server if a cache server fails.
Try out high‑availability caching on your own servers – start your free 30-day trial today or contact us to discuss your use cases.