NGINX.COM
Web Server Load Balancing with NGINX Plus

How NGINX Gateway Fabric Implements Complex Routing Rules

NGINX Gateway Fabric is an implementation of the Kubernetes Gateway API specification that uses NGINX as the data plane. It handles Gateway API resources such as GatewayClass, Gateway, ReferenceGrant, and HTTPRoute to configure NGINX as an HTTP load balancer that exposes applications running in Kubernetes to outside of the cluster.

In this blog post, we explore how NGINX Gateway Fabric uses the NGINX JavaScript scripting language (njs) to simplify an implementation of HTTP request matching based on a request’s headers, query parameters, and method.

Before we dive into NGINX JavaScript, let’s go over how NGINX Gateway Fabric configures the data plane.

Configuring NGINX from Gateway API Resources Using Go Templates

To configure the NGINX data plane, we generate configuration files based on the Gateway API resources created in the Kubernetes cluster. These files are generated from Go templates. To generate the files, we process the Gateway API resources, translate them into data structures that represent NGINX configuration, and then execute the NGINX configuration templates by applying them to the NGINX data structures. The NGINX data structures contain fields that map to NGINX directives.

For the majority of cases, this works very well. Most fields in the Gateway API resources can be easily translated into NGINX directives. Take, for example, traffic splitting. In the Gateway API, traffic splitting is configured by listing multiple Services and their weights in the backendRefs field of an HTTPRouteRule.

This configuration snippet splits 50% of the traffic to service-v1 and the other 50% to service-v2:


backendRefs: 
- name: service-v1 
   port: 80 
   weight: 50 
- name: service-v2 
   port: 80 
   weight: 50 

Since traffic splitting is natively supported by the NGINX HTTP split clients module, it is straightforward to convert this to an NGINX configuration using a template.

The generated configuration would look like this:


split_clients $request_id $variant { 
    50% upstream-service-v1; 
    50% upstream-service-v2; 
}  

In cases like traffic splitting, Go templates are simple yet powerful tools that enable you to generate an NGINX configuration that reflects the traffic rules that the user configured through the Gateway API resources.

However, we found that more complex routing rules defined in the Gateway API specification could not easily be mapped to NGINX directives using Go templates, and we needed a higher-level language to evaluate these rules. That’s when we turned to NGINX JavaScript.

What Is NGINX JavaScript?

NGINX JavaScript is a general-purpose scripting framework for NGINX and NGINX Plus that’s implemented as a Stream and HTTP NGINX module. The NGINX JavaScript module allows you to extend NGINX’s configuration syntax with njs code, a subset of the JavaScript language that was designed to be a modern, fast, and robust high-level scripting tailored for the NGINX runtime. Unlike standard JavaScript, which is primarily intended for web browsers, njs is a server-side language. This approach was taken to meet the requirements of server-side code execution and to integrate with NGINX’s request-processing architecture.

There are many use cases for njs (including response filtering, diagnostic logging, and joining subrequests) but this blog specifically explores how NGINX Gateway Fabric uses njs to perform HTTP request matching.

HTTP Request Matching

Before we dive into the NGINX JavaScript solution, let’s talk about the Gateway API feature being implemented.

HTTP request matching is the process of matching requests to routing rules based on certain conditions (matches) – e.g., the headers, query parameters, and/or method of the request. The Gateway API allows you to specify a set of HTTPRouteRules that will result in client requests being sent to specific backends based on the matches defined in the rules.

For example, if you have two versions of your application running on Kubernetes and you want to route requests with the header version:v2 to version 2 of your application and all other requests version 1, you can achieve this with the following routing rules:


rules: 
  - matches: 
      - path: 
          type: PathPrefix 
          value: / 
    backendRefs: 
      - name: v1-app 
        port: 80 
  - matches: 
      - path: 
          type: PathPrefix 
          value: / 
        headers: 
          - name: version 
            value: v2 
    backendRefs: 
      - name: v2-app 
        port: 80 

Now, say you also want to send traffic with the query parameter TEST=v2 to version 2 of your application, you can add another rule that matches that query parameter:


- matches 
  - path: 
      type: PathPrefix 
      value: /coffee 
    queryParams: 
      - name: TEST 
        value: v2 

These are the three routing rules defined in the example above:

  1. Matches requests with path / and routes them to backend v1-app
  2. Matches requests with path / and the header version:v2 and routes them to the backend v2-app.
  3. Matches requests with path / and the query parameter TEST=v2 and routes them to the backend v2-app.

NGINX Gateway Fabric must process these routing rules and configure NGINX to route requests accordingly. In the next section, we will use NGINX JavaScript to handle this routing.

The NGINX JavaScript Solution

To determine where to route a request when matches are defined, we wrote a location handler function in njs – named redirect – which redirects requests to an internal location block based on the request’s headers, arguments, and method.

Let’s look at the NGINX configuration generated by NGINX Gateway Fabric for the three routing rules defined above.

Note: this config has been simplified for the purpose of this blog.


# nginx.conf 
load_module /usr/lib/nginx/modules/ngx_http_js_module.so; # load NGINX JavaScript Module 
events {}  
http {  
    js_import /usr/lib/nginx/modules/httpmatches.js; # Import the njs script 
    server {  
        listen 80; 
        location /_rule1 {  
            internal; # Internal location block that corresponds to rule 1 
            proxy_pass http://upstream-v1-app$request_uri;  
         }  
        location /_rule2{  
            internal; # Internal location block that corresponds to rule 2 
            proxy_pass http://upstream-v2-app$request_uri; 
        } 
  location /_rule3{ 
internal; # Internal location block that corresponds to rule 3 
proxy_pass http://upstream-v2-app$request_uri; 
  } 
        location / {  
            # This is the location block that handles the client requests to the path / 
           set $http_matches "[{\"redirectPath\":\"/_rule2\",\"headers\":[\"version:v2\"]},{\"redirectPath\":\"/_rule3\",\"params\":[\"TEST=v2\"]},{\"redirectPath\":\"/_rule1\",\"any\":true}]"; 
             js_content httpmatches.redirect; # Executes redirect njs function 
        } 
     }  
} 

The js_import directive is used to specify the file that contains the redirect function and the js_content directive is used to execute the redirect function.

The redirect function depends on the http_matches variable. The http_matches variable contains a JSON-encoded list of the matches defined in the routing rules. The JSON match holds the required headers, query parameters, and method, as well as the redirectPath, which is the path to redirect the request to a match. Every redirectPath must correspond to an internal location block.

Let’s take a closer look at each JSON match in the http_matches variable (shown in the same order as the routing rules above):

  1. {"redirectPath":"/_rule1","any":true} – The “any” boolean means that all requests match this rule and should be redirected to the internal location block with the path /_rule1.
  2. {"redirectPath":"/_rule2","headers"[“version:v2”]} – Requests that have the header version:v2 match this rule and should be redirected to the internal location block with the path /_rule2.
  3. {"redirectPath":"/_rule3","params"[“TEST:v2”]} – Requests that have the query parameter TEST=v2 match this rule and should be redirected to the internal location block with the path /_rule3.

One last thing to note about the http_matches variable is that the order of the matches matters. The redirect function will accept the first match that the request satisfies. NGINX Gateway Fabric will sort the matches according to the algorithm defined by the Gateway API to make sure the correct match is chosen.

Now let’s look at the JavaScript code for the redirect function (the full code can be found here):


// httpmatches.js 
function redirect(r) { 
  let matches; 

  try { 
    matches = extractMatchesFromRequest(r); 
  } catch (e) { 
    r.error(e.message); 
    r.return(HTTP_CODES.internalServerError); 
    return; 
  } 

  // Matches is a list of http matches in order of precedence. 
  // We will accept the first match that the request satisfies. 
  // If there's a match, redirect request to internal location block. 
  // If an exception occurs, return 500. 
  // If no matches are found, return 404. 
  let match; 
  try { 
    match = findWinningMatch(r, matches); 
  } catch (e) { 
    r.error(e.message); 
    r.return(HTTP_CODES.internalServerError); 
    return; 
  } 

  if (!match) { 
    r.return(HTTP_CODES.notFound); 
    return; 
  } 

  if (!match.redirectPath) { 
    r.error( 
      `cannot redirect the request; the match ${JSON.stringify( 
        match, 
      )} does not have a redirectPath set`, 
    ); 
    r.return(HTTP_CODES.internalServerError); 
    return; 
  } 

  r.internalRedirect(match.redirectPath); 
} 

The redirect function accepts the NGINX HTTP request object as an argument and extracts the http_matches variable from it. It then finds the winning match by comparing the request’s attributes (found on the request object) to the list of matches and internally redirects the request to the winning match’s redirect path.

Why Use NGINX JavaScript?

While it’s possible to implement HTTP request matching using Go templates to generate an NGINX configuration, it’s not straightforward when compared to simpler use cases like traffic splitting. Unlike the split_clients directive, there’s no native way to compare a request’s attributes to a list of matches in a low-level NGINX configuration.

We chose to use njs to HTTP request match in NGINX Gateway Fabric for these reasons:

  • Simplicity – Makes complex HTTP request matching easy to implement, enhancing code readability and development efficiency.
  • Debugging – Simplifies debugging by allowing descriptive error messages, speeding up issue resolution.
  • Unit Testing – Code can be thoroughly unit tested, ensuring robust and reliable functionality.
  • Extensibility – High-level scripting nature enables easy extension and modification, accommodating evolving project needs without complex manual configuration changes.
  • Performance – Purpose-built for NGINX and designed to be fast.

Next Steps

If you are interested in our implementation of the Gateway API using the NGINX data plane, visit our NGINX Gateway Fabric project on GitHub to get involved:

  • Join the project as a contributor
  • Try the implementation in your lab
  • Test and provide feedback

And if you are interested to chat about this project and other NGINX projects, stop by the NGINX booth at KubeCon North America 2023. NGINX, part of F5, is proud to be a Platinum Sponsor of KubeCon NA, and we hope to see you there!

To learn more about njs, check out additional examples or read this blog.
Configure NGINX Plus for SAML SSO with Microsoft Entra ID

To enhance security and improve user experience, F5 NGINX Plus (R29+) now has support for Security Assertion Markup Language (SAML). A well-established protocol that provides single sign-on (SSO) to web applications, SAML enables an identity provider (IdP) to authenticate users for access to a resource and then passes that information to a service provider (SP) for authorization.

In this blog post, we cover step-by-step how to integrate NGINX with Microsoft Entra ID, formerly known as Azure Active Directory (Azure AD), using a web application that does not natively support SAML. We also cover how to implement SSO for the application and integrate it with the Microsoft Entra ID ecosystem. By following the tutorial, you’ll additionally learn how NGINX can extract claims from a SAML assertion (including UPN, first name, last name, and group memberships) and then pass them to the application via HTTP headers.

The tutorial includes three steps:

  1. Configuring Microsoft Entra ID as an IdP
  2. Configuring SAML settings and NGINX Plus as a reverse proxy
  3. Testing the configuration

To complete this tutorial, you need:

  • NGINX Plus (R29+), which you can get as a free 30-day trial
  • A free or enterprise Microsoft Entra ID account
  • A valid SSL/TLS certificate installed on the NGINX Plus server (this tutorial uses dev.sports.com.crt and dev.sports.com.key)
  • To verify the SAML assertions, which can be done by downloading the public certificate demonginx.cer from the IdP

Note: This tutorial does not apply to NGINX Open Source deployments because the key-value store is exclusive to NGINX Plus.

Using NGINX Plus as a SAML Service Provider

In this setup, NGINX Plus acts as a SAML SP and can participate in an SSO implementation with a SAML IdP, which communicates indirectly with NGINX Plus via the User Agent.

The diagram below illustrates the SSO process flow, with SP initiation and POST bindings for request and response. It is critical to again note that this communication channel is not direct and is managed through the User Agent.

Figure 1: SAML SP-Initiated SSO with POST bindings for AuthnRequest and Response

Step 1: Configure Microsoft Entra ID as an Identity Provider

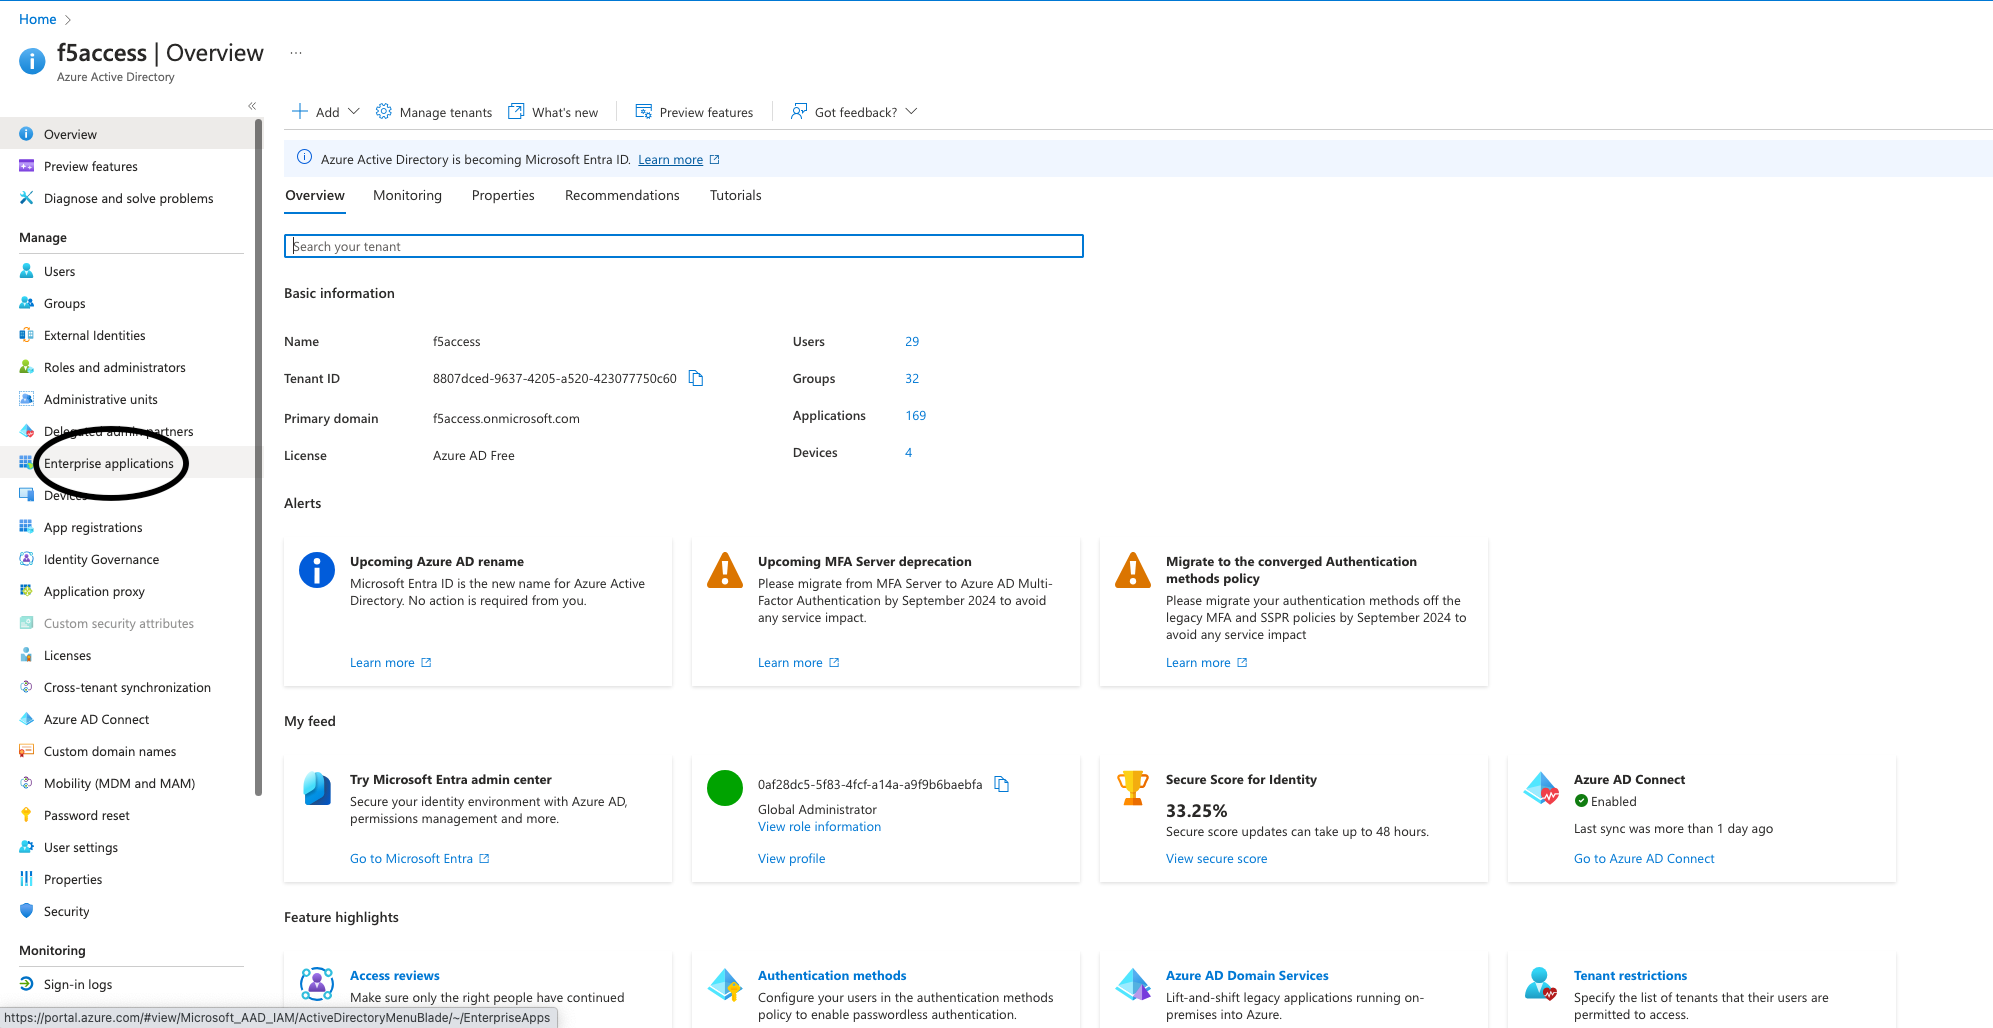
To access your Microsoft Entra ID management portal, sign in and navigate to the left-hand panel. Select Microsoft Entra ID and then click on the directory’s title that requires SSO configuration. Once selected, choose Enterprise applications.


Figure 2: Choosing Enterprise applications in the management portal

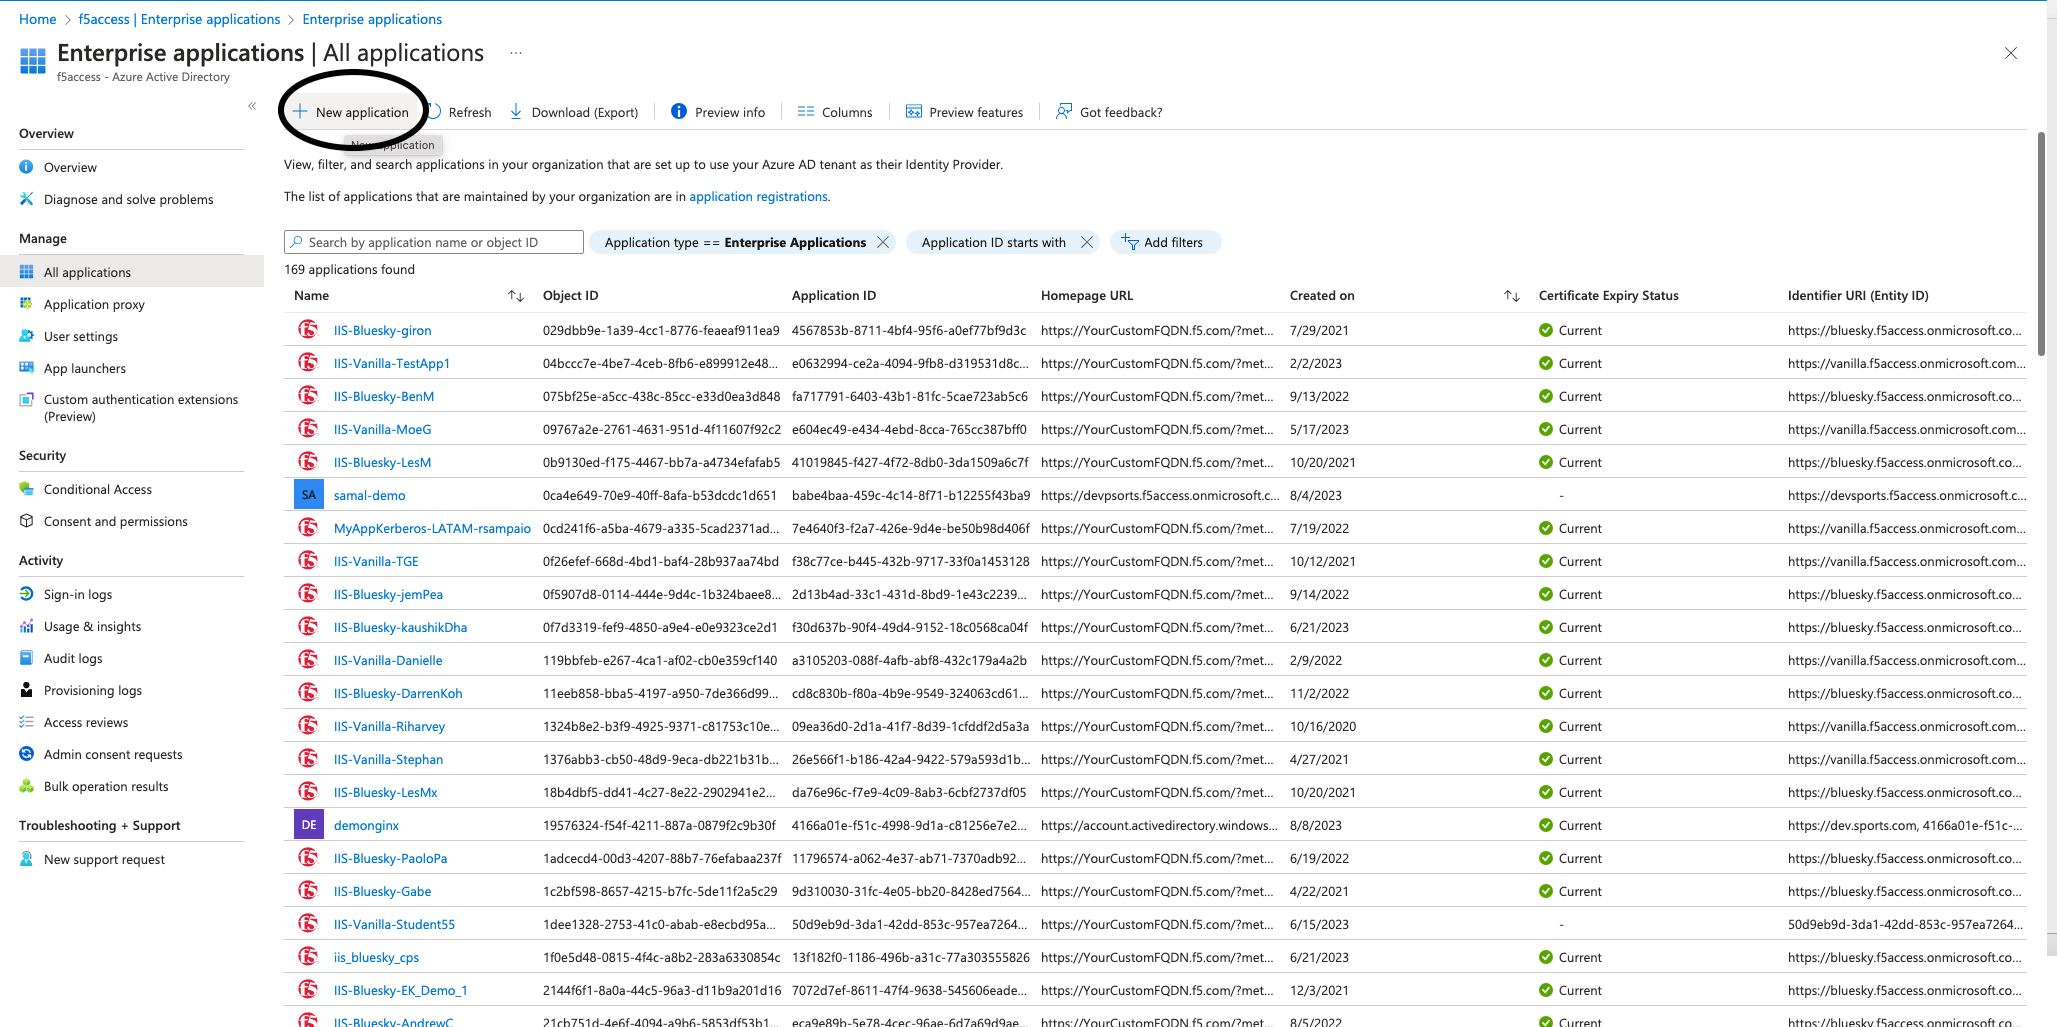
To create an application, click the New application button at the top of the portal. In this example, we created an application called demonginx.

Figure 3: Creating a new application in Microsoft Entra ID

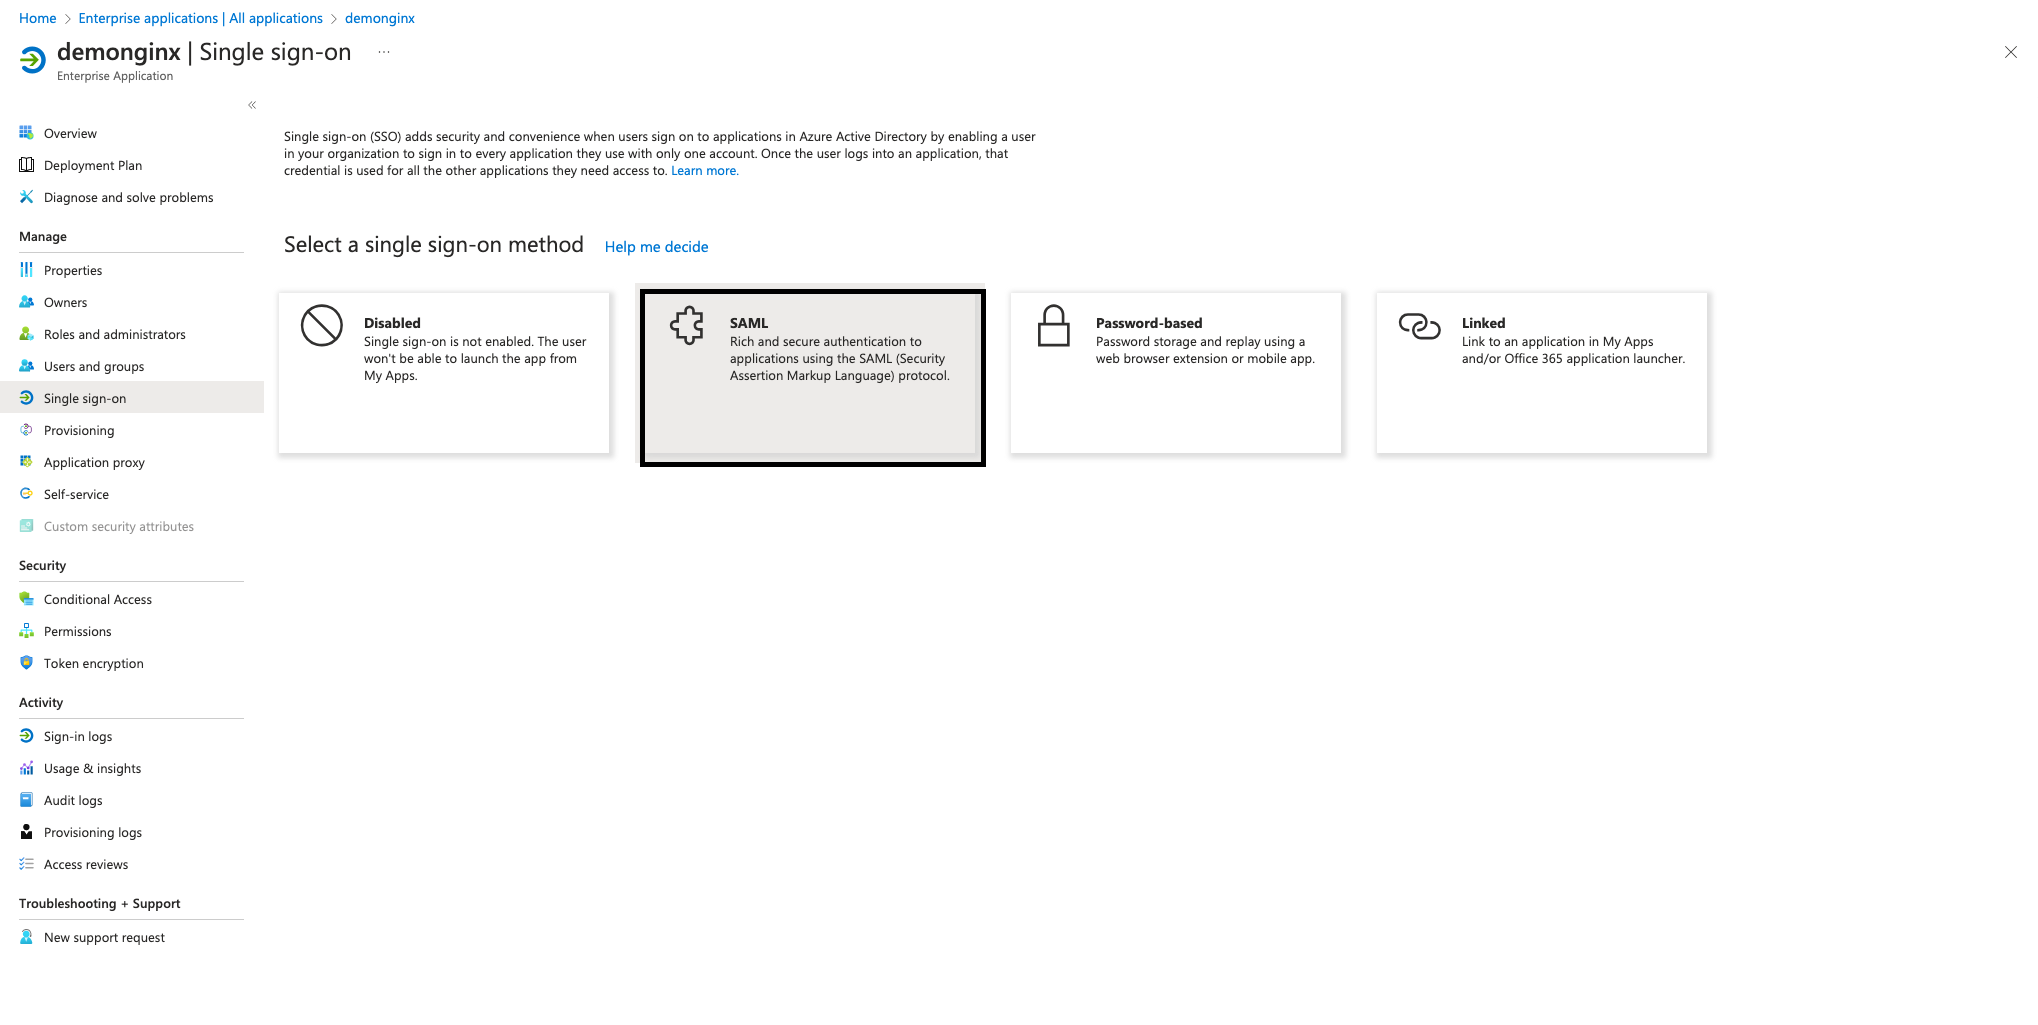
After you’re redirected to the newly created application Overview, go to Getting Started via the left menu and click Single sign-on under Manage. Then, select SAML as the single sign-on method.

Figure 4: Using the SSO section to start the SAML configuration

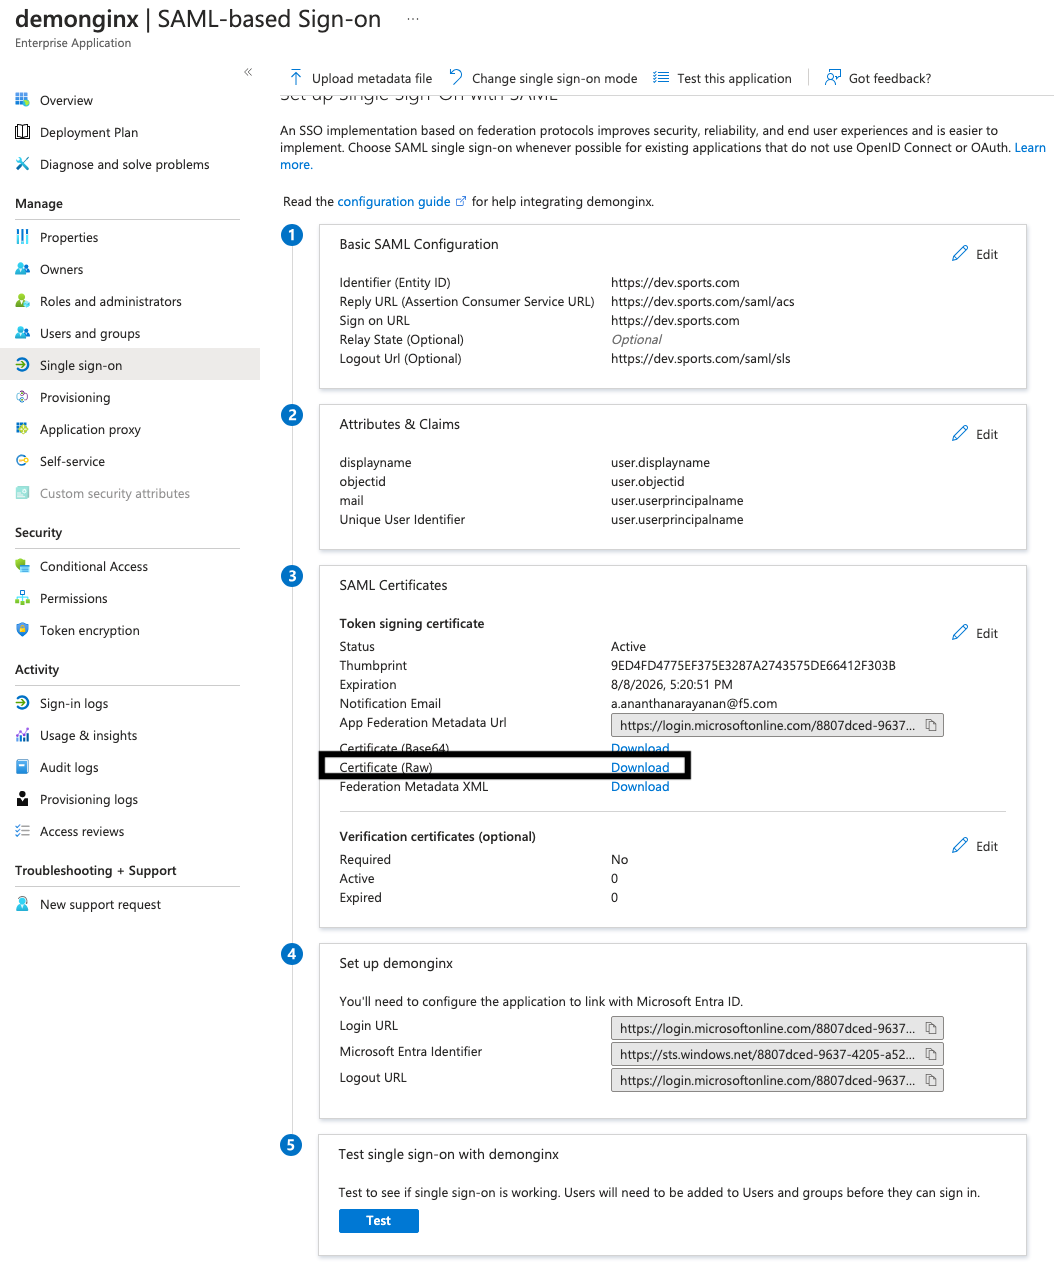
To set up SSO in your enterprise application, you need to register NGINX Plus as an SP within Microsoft Entra ID. To do this, click the pencil icon next to Edit in Basic SAML Configuration, as seen Figure 5.

Add the following values then click Save:

  • Identifier (Entity ID) – https://dev.sports.com
  • Reply URL (Assertion Consumer Service URL) – https://dev.sports.com/saml/acs
  • Sign on URL: https://dev.sports.com
  • Logout URL (Optional): https://dev.sports.com/saml/sls

The use of verification certificates is optional. When enabling this setting, two configuration options in NGINX must be addressed:

  1. To verify the signature with a public key, you need to set $saml_sp_sign_authn to true. This instructs the SP to sign the AuthnRequest sent to the IdP.
  2. Provide the path to the private key that will be used for this signature by configuring the $saml_sp_signing_key. Make sure to upload the corresponding public key certificate to Microsoft Entra ID for signature verification.

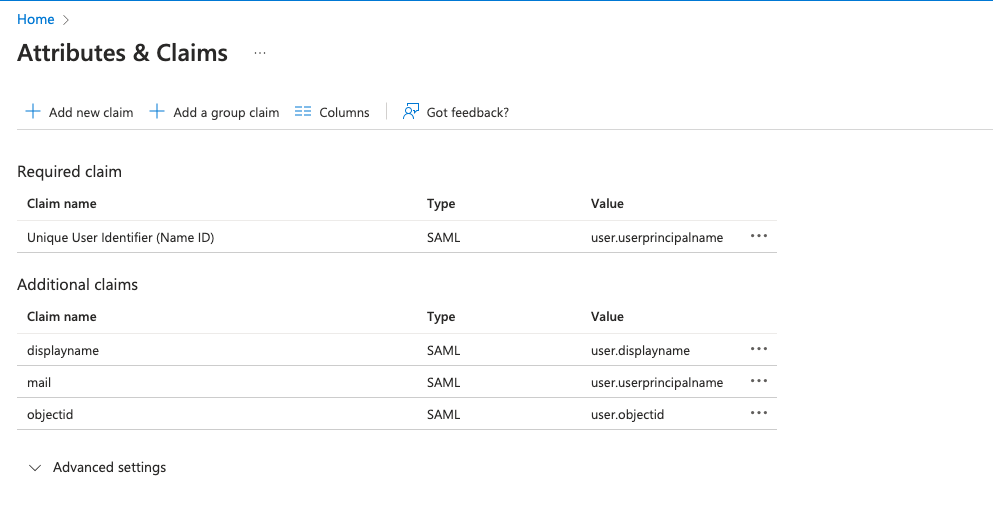
Note: In this demo, attributes and claims have been modified, and new SAML attributes are added. These SAML attributes are sent by the IdP. Ensure that your NGINX configuration is set up to properly receive and process these attributes. You can check and adjust related settings in the NGINX GitHub repo.

Download the IdP Certificate (Raw) from Microsoft Entra ID and save it to your NGINX Plus instance.

Figure 5: Downloading the IdP Certificate (Raw) from Microsoft Entra ID

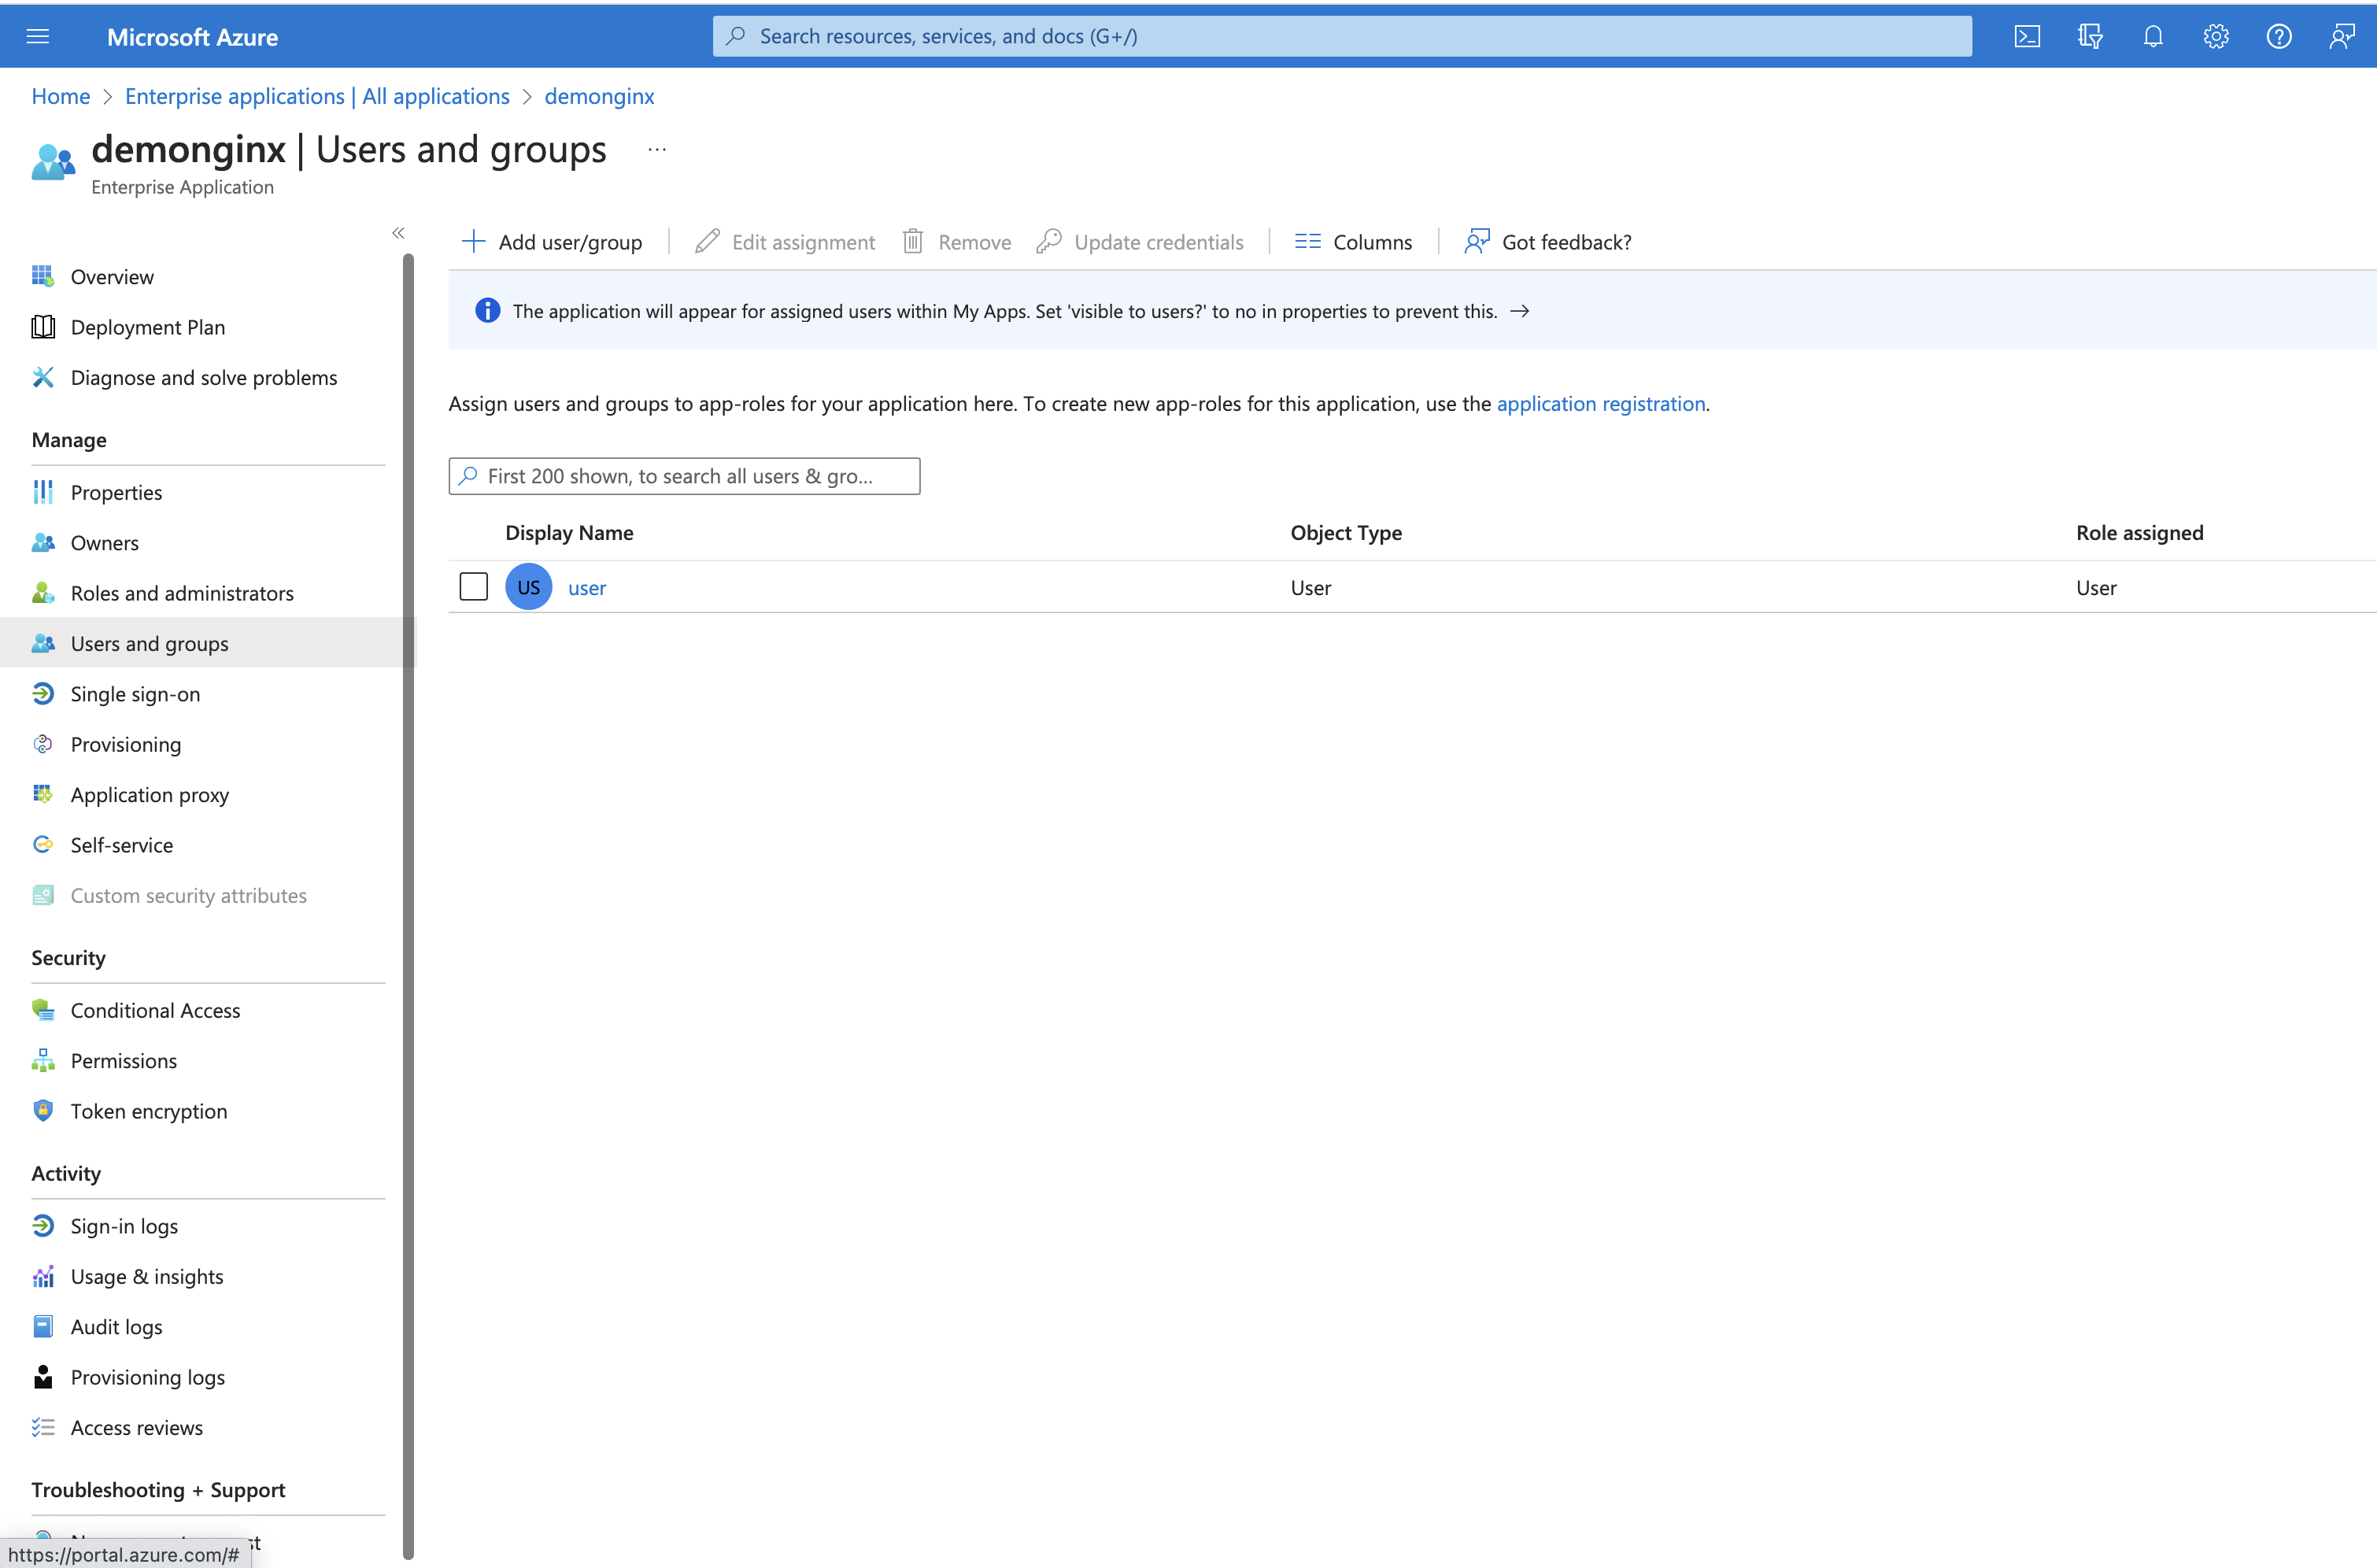
Figure 6: Adding a new user or group

In Microsoft Entra ID, you can grant access to your SSO-enabled company applications by adding or assigning users and groups.

On the left-hand menu, click User and groups and then the top button Add user/group.

Step 2: Configure SAML Settings and NGINX Plus as a Reverse Proxy

Ensure you have the necessary certificates before configuring files in your NGINX Plus SP:

  • Certificates for terminating TLS session (dev.sports.com.crt and dev.sports.com.key)
  • Certificate downloaded from Microsoft Entra ID for IdP signing verification (demonginx.cer)

Note: The certificates need to be in SPKI format.

To begin this step, download the IdP certificate from Microsoft Entra ID for signing verification. Then, convert PEM to DER format:

openssl x509 -in demonginx.cer -outform DER -out demonginx.der

In case you want to verify SAML SP assertions, it’s recommended to use public/private keys that are different from the ones used for TLS termination.

Extract the public key certificate in SPKI format:

openssl x509 -inform DER -in demonginx.der -pubkey -noout > demonginx.spki

Edit the frontend.conf file to update these items:

  • ssl_certificate – Update to include the TLS certificate path.
  • ssl_certificate_key – Update to include the TLS private key path.

In production deployment, you can use different backend destinations based on the business requirement. In this example, the backend provides a customized response:

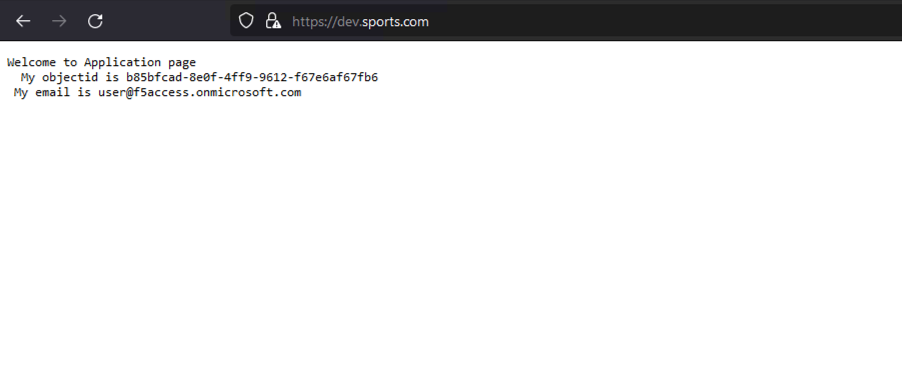
“Welcome to Application page\n My objectid is $http_objectid\n My email is $http_mail\n”;

We have modified the attributes and claims in Microsoft Entra ID by adding new claims for the user’s mail and objectid. These updates enable you to provide a more personalized and tailored response to your application, resulting in an improved user experience.

Figure 7: Modified attributes and claims in Microsoft Entra ID

The next step is to configure NGINX, which will proxy traffic to the backend application. In this demo, the backend SAML application is publicly available at https://dev.sports.com.

Edit your frontend.conf file:


# This is file frontend.conf 
# This is the backend application we are protecting with SAML SSO 
upstream my_backend { 
    zone my_backend 64k; 
    server dev.sports.com; 
} 

# Custom log format to include the 'NameID' subject in the REMOTE_USER field 
log_format saml_sso '$remote_addr - $saml_name_id [$time_local] "$request" "$host" ' 
                    '$status $body_bytes_sent "$http_referer" ' 
                    '"$http_user_agent" "$http_x_forwarded_for"'; 

# The frontend server - reverse proxy with SAML SSO authentication 
# 
server { 
    # Functional locations implementing SAML SSO support 
    include conf.d/saml_sp.server_conf; 
 

    # Reduce severity level as required 
    error_log /var/log/nginx/error.log debug; 
    listen 443 ssl; 
    ssl_certificate     /home/ubuntu/dev.sports.com.crt; 
    ssl_certificate_key  /home/ubuntu/dev.sports.com.key; 
    ssl_session_cache shared:SSL:5m; 
 

    location / { 
        # When a user is not authenticated (i.e., the "saml_access_granted." 
        # variable is not set to "1"), an HTTP 401 Unauthorized error is 
        # returned, which is handled by the @do_samlsp_flow named location. 
        error_page 401 = @do_samlsp_flow; 

        if ($saml_access_granted != "1") { 
            return 401; 
        } 

        # Successfully authenticated users are proxied to the backend, 
        # with the NameID attribute passed as an HTTP header        
        proxy_set_header mail $saml_attrib_mail;  # Microsoft Entra ID's user.mail 
        proxy_set_header objectid $saml_attrib_objectid; # Microsoft Entra ID's objectid 
        access_log /var/log/nginx/access.log saml_sso; 
        proxy_pass http://my_backend; 
        proxy_set_header Host dev.sports.com; 
        return 200 "Welcome to Application page\n My objectid is $http_objectid\n My email is $http_mail\n"; 
        default_type text/plain; 

   } 
} 
# vim: syntax=nginx         

For the attributes saml_attrib_mail and saml_attrib_ objectid to reflect in NGINX configurations, update the key-value store part of saml_sp_configuration.conf as follows:


keyval_zone    zone=saml_attrib_mail:1M                state=/var/lib/nginx/state/saml_attrib_email.json   timeout=1h; 
keyval   $cookie_auth_token $saml_attrib_mail    zone=saml_attrib_mail; 

 keyval_zone zone=saml_attrib_objectid:1M            state=/var/lib/nginx/state/saml_attrib_objectid.json   timeout=1h; 
keyval   $cookie_auth_token $saml_attrib_objectid   zone=saml_attrib_objectid; 

Next, configure the SAML SSO configuration file. This file contains the primary configurations for the SP and IdP. To customize it according to your specific SP and IdP setup, you need to adjust the multiple map{} blocks included in the file.

This table provides descriptions of the variables within saml_sp_configuration.conf:

Variable Description
saml_sp_entity_id The URL used by the users to access the application.
saml_sp_acs_url The URL used by the service provider to receive and process the SAML response, extract the user’s identity, and then grant or deny access to the requested resource based on the provided information.
saml_sp_sign_authn Specifies if the SAML request from SP to IdP should be signed or not. The signature is done using the SP signing key and you need to upload the associated certificate to the IdP to verify the signature.
saml_sp_signing_key The signing key that is used to sign the SAML request from SP to IdP. Make sure to upload the associated certificate to the IdP to verify the signature.
saml_idp_entity_id The identity that is used to define the IdP.
saml_idp_sso_url The IdP endpoint to which the SP sends the SAML assertion request to initiate the authentication request.
saml_idp_verification_certificate The certification used to verify signed SAML assertions received from the IdP. The certificate is provided by the IdP and needs to be in SPKI format.
saml_sp_slo_url The SP endpoint that the IdP sends the SAML LogoutRequest to (when initiating a logout process) or the LogoutResponse to (when confirming the logout).
saml_sp_sign_slo Specifies if the logout SAML is to be signed by the SP or not.
saml_idp_slo_url The IdP endpoint that the SP sends the LogoutRequest to (when initiating a logout process) or LogoutResponse to (when confirming the logout).
saml_sp_want_signed_slo Specifies if the SAML SP wants the SAML logout response or request from the IdP to be signed or not.

The code below shows the edited values only for this use case at saml_sp_configuration.conf.

Note: Make sure the remaining parts of the configuration file still appear in the file (e.g., the key-value stores). Also ensure that you properly adjust the variables within the saml_sp_configuration.conf file based on your deployment.

 
# SAML SSO configuration 

map $host $saml_sp_entity_id { 
    # Unique identifier that identifies the SP to the IdP. 
    # Must be URL or URN. 
    default "https://dev.sports.com"; 
} 

map $host $saml_sp_acs_url { 
    # The ACS URL, an endpoint on the SP where the IdP  
    # will redirect to with its authentication response. 
    # Must match the ACS location defined in the "saml_sp.serer_conf" file. 
    default "https://dev.sports.com/saml/acs"; 
} 

map $host $saml_sp_request_binding { 
    # Refers to the method by which an authentication request is sent from 
    # the SP to an IdP during the Single Sign-On (SSO) process. 
    # Only HTTP-POST or HTTP-Redirect methods are allowed. 
    default 'HTTP-POST'; 
} 

map $host $saml_sp_sign_authn { 
    # Whether the SP should sign the AuthnRequest sent to the IdP. 
    default "false"; 
} 

map $host $saml_sp_decryption_key { 
    # Specifies the private key that the SP uses to decrypt encrypted assertion 
    # or NameID from the IdP. 
    default ""; 
} 

map $host $saml_sp_force_authn { 
    # Whether the SP should force re-authentication of the user by the IdP. 
    default "false"; 
} 

map $host $saml_sp_nameid_format { 
    # Indicates the desired format of the name identifier in the SAML assertion 
    # generated by the IdP. Check section 8.3 of the SAML 2.0 Core specification 
    # (http://docs.oasis-open.org/security/saml/v2.0/saml-core-2.0-os.pdf) 
    # for the list of allowed NameID Formats. 
    default "urn:oasis:names:tc:SAML:1.1:nameid-format:unspecified"; 
} 

map $host $saml_sp_relay_state { 
    # Relative or absolute URL the SP should redirect to 
    # after successful sign on. 
    default ""; 
} 

map $host $saml_sp_want_signed_response { 
    # Whether the SP wants the SAML Response from the IdP 
    # to be digitally signed. 
    default "false"; 
} 

map $host $saml_sp_want_signed_assertion { 
    # Whether the SP wants the SAML Assertion from the IdP 
    # to be digitally signed. 
    default "true"; 
} 

map $host $saml_sp_want_encrypted_assertion { 
    # Whether the SP wants the SAML Assertion from the IdP 
    # to be encrypted. 
    default "false"; 
} 

map $host $saml_idp_entity_id { 
    # Unique identifier that identifies the IdP to the SP. 
    # Must be URL or URN. 
    default "https://sts.windows.net/8807dced-9637-4205-a520-423077750c60/"; 
} 

map $host $saml_idp_sso_url { 
    # IdP endpoint that the SP will send the SAML AuthnRequest to initiate 
    # an authentication process. 
    default "https://login.microsoftonline.com/8807dced-9637-4205-a520-423077750c60/saml2"; 
} 

map $host $saml_idp_verification_certificate { 
    # Certificate file that will be used to verify the digital signature 
    # on the SAML Response, LogoutRequest or LogoutResponse received from IdP. 
    # Must be public key in PKCS#1 format. See documentation on how to convert 
    # X.509 PEM to DER format. 
    default "/etc/nginx/conf.d/demonginx.spki"; 
} 

######### Single Logout (SLO) ######### 

map $host $saml_sp_slo_url { 
    # SP endpoint that the IdP will send the SAML LogoutRequest to initiate 
    # a logout process or LogoutResponse to confirm the logout. 
    default "https://dev.sports.com/saml/sls"; 
} 

map $host $saml_sp_slo_binding { 
    # Refers to the method by which a LogoutRequest or LogoutResponse 
    # is sent from the SP to an IdP during the Single Logout (SLO) process. 
    # Only HTTP-POST or HTTP-Redirect methods are allowed. 
    default 'HTTP-POST'; 
} 

map $host $saml_sp_sign_slo { 
    # Whether the SP must sign the LogoutRequest or LogoutResponse 
    # sent to the IdP. 
    default "false"; 
} 

map $host $saml_idp_slo_url { 
    # IdP endpoint that the SP will send the LogoutRequest to initiate 
    # a logout process or LogoutResponse to confirm the logout. 
    # If not set, the SAML Single Logout (SLO) feature is DISABLED and 
    # requests to the 'logout' location will result in the termination 
    # of the user session and a redirect to the logout landing page. 
    default "https://login.microsoftonline.com/8807dced-9637-4205-a520-423077750c60/saml2"; 
} 

map $host $saml_sp_want_signed_slo { 
    # Whether the SP wants the SAML LogoutRequest or LogoutResponse from the IdP 
    # to be digitally signed. 
    default "true"; 
} 

map $host $saml_logout_landing_page { 
    # Where to redirect user after requesting /logout location. This can be 
    # replaced with a custom logout page, or complete URL. 
    default "/_logout"; # Built-in, simple logout page 
} 

map $proto $saml_cookie_flags { 
    http  "Path=/; SameSite=lax;"; # For HTTP/plaintext testing 
    https "Path=/; SameSite=lax; HttpOnly; Secure;"; # Production recommendation 
} 

map $http_x_forwarded_port $redirect_base { 
    ""      $proto://$host:$server_port; 
    default $proto://$host:$http_x_forwarded_port; 
} 

map $http_x_forwarded_proto $proto { 
    ""      $scheme; 
    default $http_x_forwarded_proto; 
} 
# ADVANCED CONFIGURATION BELOW THIS LINE 
# Additional advanced configuration (server context) in saml_sp.server_conf 

######### Shared memory zones that keep the SAML-related key-value databases 

# Zone for storing AuthnRequest and LogoutRequest message identifiers (ID) 
# to prevent replay attacks. (REQUIRED) 
# Timeout determines how long the SP waits for a response from the IDP, 
# i.e. how long the user authentication process can take. 
keyval_zone zone=saml_request_id:1M                 state=/var/lib/nginx/state/saml_request_id.json                  timeout=5m; 

# Zone for storing SAML Response message identifiers (ID) to prevent replay attacks. (REQUIRED) 
# Timeout determines how long the SP keeps IDs to prevent reuse. 
keyval_zone zone=saml_response_id:1M                state=/var/lib/nginx/state/saml_response_id.json                 timeout=1h; 

# Zone for storing SAML session access information. (REQUIRED) 
# Timeout determines how long the SP keeps session access decision (the session lifetime). 
keyval_zone zone=saml_session_access:1M             state=/var/lib/nginx/state/saml_session_access.json              timeout=1h; 

# Zone for storing SAML NameID values. (REQUIRED) 
# Timeout determines how long the SP keeps NameID values. Must be equal to session lifetime. 
keyval_zone zone=saml_name_id:1M                    state=/var/lib/nginx/state/saml_name_id.json                     timeout=1h; 

# Zone for storing SAML NameID format values. (REQUIRED) 
# Timeout determines how long the SP keeps NameID format values. Must be equal to session lifetime. 
keyval_zone zone=saml_name_id_format:1M             state=/var/lib/nginx/state/saml_name_id_format.json              timeout=1h; 

# Zone for storing SAML SessionIndex values. (REQUIRED) 
# Timeout determines how long the SP keeps SessionIndex values. Must be equal to session lifetime. 
keyval_zone zone=saml_session_index:1M              state=/var/lib/nginx/state/saml_session_index.json               timeout=1h; 
  
# Zone for storing SAML AuthnContextClassRef values. (REQUIRED) 
# Timeout determines how long the SP keeps AuthnContextClassRef values. Must be equal to session lifetime. 
keyval_zone zone=saml_authn_context_class_ref:1M    state=/var/lib/nginx/state/saml_authn_context_class_ref.json     timeout=1h; 

# Zones for storing SAML attributes values. (OPTIONAL) 
# Timeout determines how long the SP keeps attributes values. Must be equal to session lifetime. 
keyval_zone zone=saml_attrib_uid:1M                 state=/var/lib/nginx/state/saml_attrib_uid.json                  timeout=1h; 
keyval_zone zone=saml_attrib_name:1M                state=/var/lib/nginx/state/saml_attrib_name.json                 timeout=1h; 
keyval_zone zone=saml_attrib_memberOf:1M            state=/var/lib/nginx/state/saml_attrib_memberOf.json             timeout=1h; 

######### SAML-related variables whose value is looked up by the key (session cookie) in the key-value database. 

# Required: 
keyval $saml_request_id     $saml_request_redeemed          zone=saml_request_id;               # SAML Request ID 
keyval $saml_response_id    $saml_response_redeemed         zone=saml_response_id;              # SAML Response ID 
keyval $cookie_auth_token   $saml_access_granted            zone=saml_session_access;           # SAML Access decision 
keyval $cookie_auth_token   $saml_name_id                   zone=saml_name_id;                  # SAML NameID 
keyval $cookie_auth_token   $saml_name_id_format            zone=saml_name_id_format;           # SAML NameIDFormat 
keyval $cookie_auth_token   $saml_session_index             zone=saml_session_index;            # SAML SessionIndex 
keyval $cookie_auth_token   $saml_authn_context_class_ref   zone=saml_authn_context_class_ref;  # SAML AuthnContextClassRef 

# Optional: 
keyval $cookie_auth_token   $saml_attrib_uid                zone=saml_attrib_uid; 
keyval $cookie_auth_token   $saml_attrib_name               zone=saml_attrib_name; 
keyval $cookie_auth_token   $saml_attrib_memberOf           zone=saml_attrib_memberOf; 
 

keyval_zone    zone=saml_attrib_mail:1M                state=/var/lib/nginx/state/saml_attrib_mail.json   timeout=1h; 
keyval         $cookie_auth_token $saml_attrib_mail    zone=saml_attrib_mail; 
  
keyval $cookie_auth_token   $saml_attrib_objectid           zone=saml_attrib_objectid; 
keyval_zone zone=saml_attrib_objectid:1M            state=/var/lib/nginx/state/saml_attrib_objectid.json             timeout=1h; 
  

######### Imports a module that implements SAML SSO and SLO functionality 
js_import samlsp from conf.d/saml_sp.js; 

Step 3: Testing the Configuration

Two parts are required to test the configuration:

  1. Verifying the SAML flow
  2. Testing the SP-initiated logout functionality

Verifying the SAML Flow

After configuring the SAML SP using NGINX Plus and the IdP using Microsoft Entra ID, it is crucial to validate the SAML flow. This validation process ensures that user authentication through the IdP is successful and that access to SP-protected resources is granted.

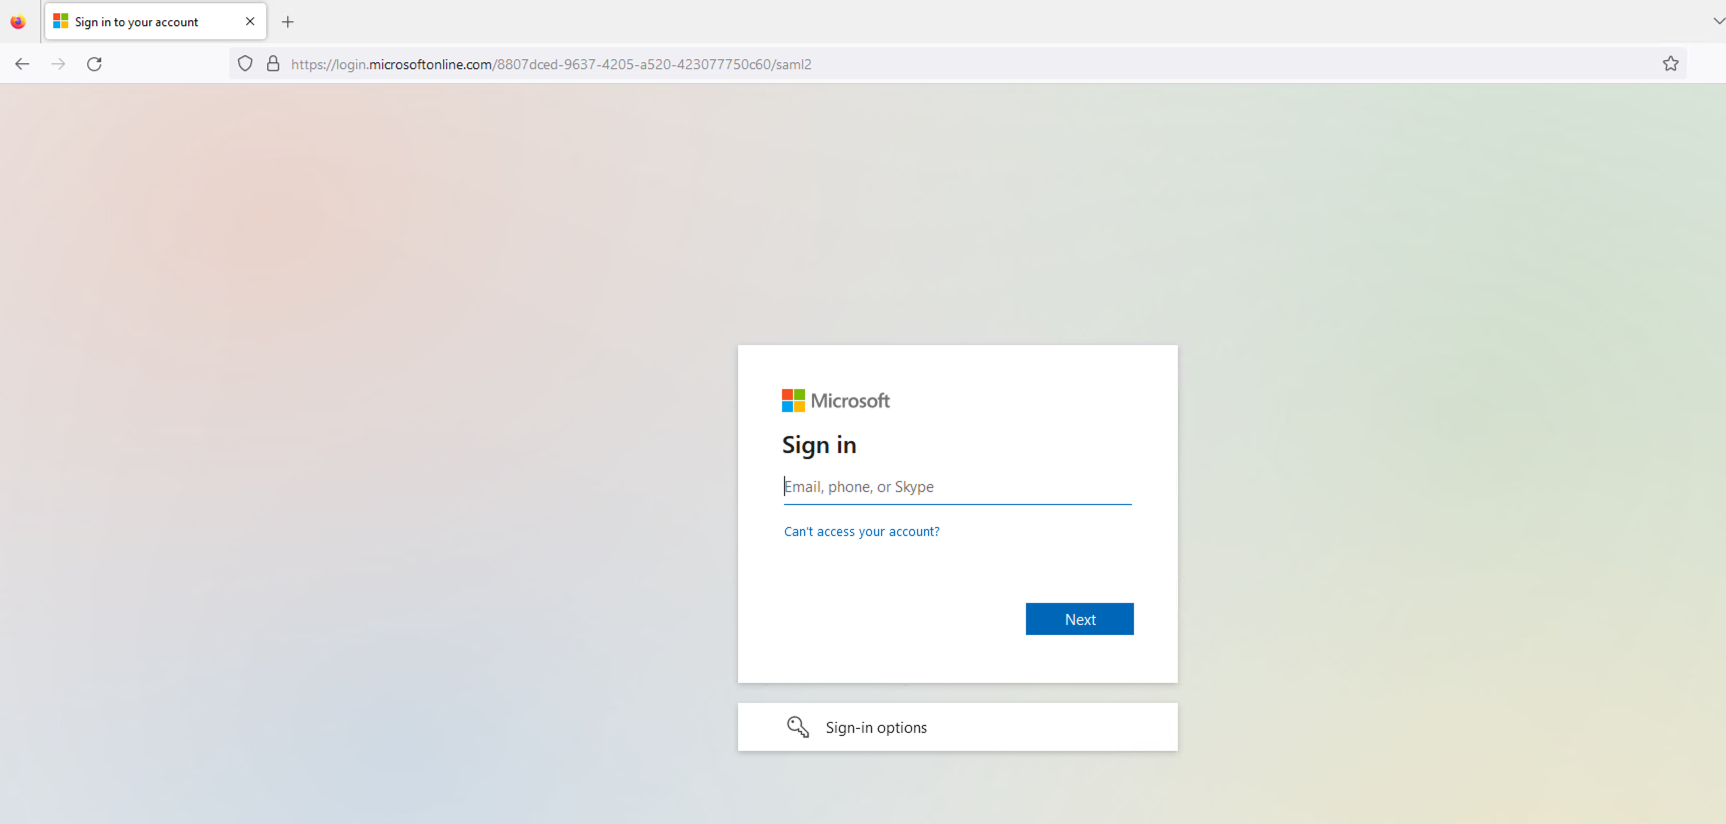
To verify the SP-initiated SAML flow, open your preferred browser and type https://dev.sports.com in the address bar. This directs you to the IdP login page.

Figure 8: The IdP login page

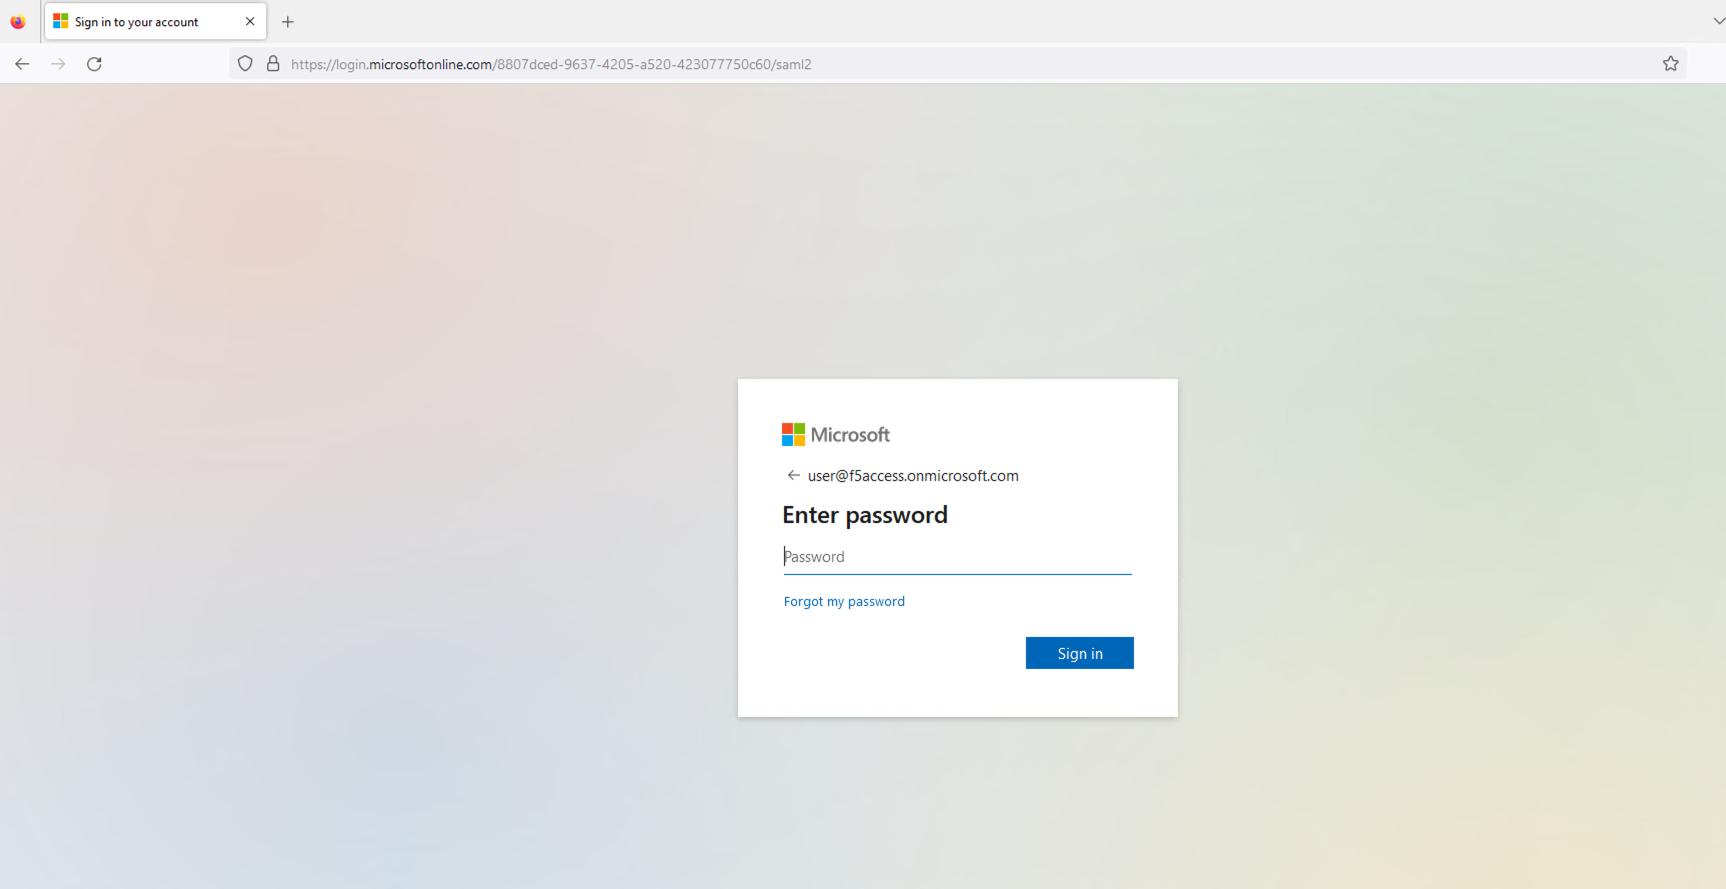
Enter the credentials of a user who is configured in the IdP’s login page. The IdP will authenticate the user upon submitting.

Figure 9: Entering the configured user’s credentials

The user will be granted access to the previously requested protected resource upon successfully establishing a session. Subsequently, that resource will be displayed in the user’s browser.

Figure 10: The successfully loaded application page

Valuable information about the SAML flow can be obtained by checking the SP and IdP logs. On the SP side (NGINX Plus), ensure the auth_token cookies are set correctly. On the IdP side (Microsoft Entra ID), ensure that the authentication process completes without errors and that the SAML assertion is sent to the SP.

The NGINX access.log should look like this:


127.0.0.1 - - [14/Aug/2023:21:25:49 +0000] "GET / HTTP/1.0" 200 127 "https://login.microsoftonline.com/" "Mozilla/5.0 (Macintosh; Intel Mac OS X 10_15_7) AppleWebKit/605.1.15 (KHTML, like Gecko) Version/16.1 Safari/605.1.15" "-" 

99.187.244.63 - Akash Ananthanarayanan [14/Aug/2023:21:25:49 +0000] "GET / HTTP/1.1" "dev.sports.com" 200 127 "https://login.microsoftonline.com/" "Mozilla/5.0 (Macintosh; Intel Mac OS X 10_15_7) AppleWebKit/605.1.15 (KHTML, like Gecko) Version/16.1 Safari/605.1.15" "- 

While the NGINX debug.log looks like this:


2023/08/14 21:25:49 [info] 27513#27513: *399 js: SAML SP success, creating session _d4db9b93c415ee7b4e057a4bb195df6cd0be7e4d 

Testing the SP-initiated Logout Functionality

SAML Single Logout (SLO) lets users log out of all involved IdPs and SPs with one action. NGINX Plus supports SP-initiated and IdP-initiated logout scenarios, enhancing security and user experience in SSO environments. In this example, we use an SP-initiated logout scenario.

Figure 11: SAML SP-Initiated SLO with POST/redirect bindings for LogoutRequest and LogoutResponse

After authenticating your session, log out by accessing the logout URL configured in your SP. For example, if you have set up https://dev.sports.com/logout as the logout URL in NGINX Plus, enter that URL in your browser’s address bar.

Figure 12: Successfully logging out of the session

To ensure a secure logout, the SP must initiate a SAML request that is then verified and processed by the IdP. This action effectively terminates the user’s session, and the IdP will then send a SAML response to redirect the user’s browser back to the SP.

Conclusion

Congratulations! NGINX Plus can now serve as a SAML SP, providing another layer of security and convenience to the authentication process. This new capability is a significant step forward for NGINX Plus, making it a more robust and versatile solution for organizations prioritizing security and efficiency. 

Learn More About Using SAML with NGINX Plus

You can begin using SAML with NGINX Plus today by starting a 30-day free trial of NGINX Plus. We hope you find it useful and welcome your feedback.

More information about NGINX Plus with SAML is available in the resources below.

Why We Decided to Start Fresh with Our NGINX Gateway Fabric

In the world of Kubernetes Ingress controllers, NGINX has had a very successful run. NGINX Ingress Controller is widely deployed for commercial Kubernetes production use cases while also being developed and maintained as an open source version. So, you might think that when a big improvement came to Kubernetes networking – the Gateway API – we’d keep a good thing going and implement it in our existing Ingress products.

Instead, we chose a different path. Looking at the new Gateway API’s amazing possibilities and our chance to completely reimagine how to handle connectivity in Kubernetes, we realized that shoehorning a Gateway API implementation into our existing Ingress products would limit this boundless future.

This is why we decided to launch our own Gateway API project – NGINX Gateway Fabric. The project is open source and will be operated transparently and collaboratively. We’re excited to work with outside contributors and to share this journey with others, as we hope to create something that is special and unique.

How We Arrived at Our Gateway API Decision

While the decision to create an entirely new project around the Gateway API comes from optimism and excitement, it’s grounded in sound business and product strategy logic.

Longtime Kubernetes followers likely already know about NGINX Ingress Controller’s open source and commercial versions. Both deploy the same battle-tested NGINX data plane that runs in the NGINX Plus and NGINX Open Source reverse proxies. Before Kubernetes, NGINX’s data plane already worked great for load balancing and reverse proxying. In Kubernetes, our Ingress controllers achieve the same types of critical request routing and application delivery tasks.

NGINX prides itself on building commercial products that are lightweight, high-performance, well-tested, and ready for demanding environments. So, the product strategy for Kubernetes Ingress control mirrored our product strategy for reverse proxies – make a robust open source product for simpler use cases and a commercial product with additional features and capabilities for production Ingress control in business-critical application environments. That strategy worked in the world of Ingress control, partially because Ingress control lacked standardization and required significant custom resource definitions (CRDs) to deliver advanced capabilities like load balancing and reverse proxy, which developers and architects enjoyed in networking products outside of Kubernetes.

Our customers rely on and trust NGINX Ingress Controller, and the commercial version already has many of the key advanced capabilities that the Gateway API was designed to address. Additionally, NGINX has been participating in the Gateway API project since early on, and we recognized that it was going to take a few years for the Gateway API ecosystem to fully mature. (In fact, many of the Gateway API’s specifications continue to evolve, such as the GAMMA specification to make it better able to integrate with service meshes.)

But we decided that shoehorning in beta-level Gateway API specifications to NGINX Ingress Controller would inject unnecessary uncertainty and complexity into a mature, enterprise-class Ingress controller. Anything we sell commercially must be stable, reliable, and 100% production ready. Gateway API solutions will get there too, but the process is still only at its beginning.

Our Goals with NGINX Gateway Fabric

With NGINX Gateway Fabric, our primary goal is to create a product that stands the test of time, in the way that NGINX Plus and NGINX Open Source have. To reach the point where we felt comfortable labeling our Gateway API project “future-proof,” we realized we’d need to experiment with architectural choices for its data and control planes. For example, we might need to look at different ways to manage Layer 4 and Layer 7 connectivity or minimize external dependencies. Such experimentation is best performed on a blank slate, free of historical precedents and requirements. While we’re using the tried and tested NGINX data plane as a foundational component of the NGINX Gateway Fabric, we’re open to new ideas beyond that.

We also wanted to deliver comprehensive, vendor-agnostic configuration interoperability for Gateway API resources. One of the Gateway API’s biggest improvements over the existing Kubernetes Ingress paradigm is that it standardizes many elements of service networking. This standardization should, in theory, lead to a better future where many Gateway API resources can easily interact and connect.

However, a key to building this future is to leave behind the world of vendor-specific CRDs (which can result in vendor lock-in). That can get very challenging in blended products that must support CRDs designed for the world of Ingress control. And it’s easier in an open source project that focuses on interoperability as a first-order concern. To ditch the tightly linked CRDs, we needed to build something that solely focuses on the new surfaces exposed by the Gateway API and its constituent APIs.

Join Us on the Gateway API Journey

We’re still in the very early days. Only a handful of projects and products have implemented the Gateway API specification, and most of them have elected to embed it within existing projects and products.

That means it’s a time of great opportunity – the best time to start a new project. We’re running the NGINX Gateway Fabric project completely in the open, with transparent decision-making and project governance. Because the project is written in Go, we invite the massive Gopher community to make suggestions, start filing PRs, and or reach out to us with ideas.

It’s possible the Gateway API will shift the whole Kubernetes landscape. Entire classes of products may no longer be necessary, and new products might pop up. The Gateway API offers such a rich set of possibilities that we honestly don’t know where this will end up – but we’re really looking forward to the ride. Come along for the journey, it’s going to be fun!

You can start by:

  • Joining the project as a contributor
  • Trying the implementation in your lab
  • Testing and providing feedback

To join the project, visit NGINX Gateway Fabric on GitHub.

If you want to chat live with our experts on this and other NGINX projects, stop by the NGINX booth at KubeCon North America 2023! NGINX, a part of F5, is proud to be a Platinum sponsor of KubeCon NA this year, and we hope to see you there!

5 Reasons to Try the Kubernetes Gateway API

Since its early days, Kubernetes has included an API – the built-in Ingress resource – for configuring request routing of external HTTP traffic to Services. While it has been widely adopted by users and supported by many implementations (e.g., Ingress controllers), the Ingress resource limits its users in three major ways:

  • Insufficient features – Reduces the number of supported use cases.
  • Poor extensibility model – Limits access to advanced features available in many data planes like NGINX.
  • Lack of different user roles – Inhibits the safe sharing of data plane infrastructure among multiple teams within a cluster.

In response to these limitations, the Kubernetes community designed the Gateway API, a new project that provides a better alternative to the Ingress resource. In this blog post, we cover five reasons to try the Gateway API and discuss how it compares with the Ingress resource. We also introduce NGINX Gateway Fabric, our open source project that enables you to start using the Gateway API in your Kubernetes cluster while leveraging NGINX as a data plane.

Also, don’t miss a chance to chat with our engineers working on the NGINX Gateway Fabric project! NGINX, a part of F5, is proud to be a Platinum Sponsor of KubeCon North America 2023, and we hope to see you there! Come meet us at the NGINX booth to discuss how we can help enhance the security, scalability, and observability of your Kubernetes platform.

Note: The Gateway API supports multiple use cases related to Service networking, including the experimental service mesh. That said, this blog post focuses on the Gateway API’s primary use case of routing external traffic to Services in a cluster. Additionally, while the API supports multiple protocols, we limit our discussion to the most common protocol, HTTP.

Gateway API Overview

The Gateway API is a collection of custom resources that provisions and configures a data plane to model Service networking traffic to Services in your cluster.

These are the primary Gateway API resources: 

  • GatewayClass – Defines a template for any data planes yet to be provisioned.
  • Gateway – Provisions a data plane from a template (GatewayClass) and configures the entry points (ports) on it for accepting external traffic.
  • HTTPRoute – Configures HTTP request routing rules of external traffic to Services in the cluster and attaches those rules to the entry points defined by a Gateway.

Another critical part of the Gateway API is a Gateway implementation, which is a Kubernetes controller that actually provisions and configures your data plane according to the Gateway API resources.

To learn more about the API, visit the Gateway API project website or watch a video introduction.

What Are the Reasons to Try the Gateway API?

These are five key reasons to try the new Gateway API:

  1. Number of supported features
  2. Powerful extensibility model
  3. Role separation
  4. Portability
  5. Community

Let’s look at each reason in detail.

Reason 1: Number of Supported Features

The Gateway API offers a multitude of features that, in turn, unlock numerous new use cases, some of which may not be fully supported by the Ingress resource.

These use cases include:

  • Canary releases
  • A/B testing
  • Request and response manipulation
  • Request redirects
  • Traffic mirroring
  • Cross-namespace traffic routing

For example, below is a request routing rule from an HTTPRoute that splits the traffic between two Kubernetes Services using weights. This enables the canary releases use case.


- matches: 
  - path: 
      type: PathPrefix 
      value: / 
  backendRefs: 
  - name: my-app-old 
    port: 80 
    weight: 95 
  - name: my-app-new 
    port: 80 
    weight: 5 

As a result, the data plane will route 95% of the requests to the Service my-app-old and the remaining 5% to my-app-new.

Next is an example featuring two rules. One of these rules leverages the Gateway API advanced routing capabilities, using headers and query parameters for routing.


- matches: # rule 1 
  - path: 
      type: PathPrefix 
      value: /coffee 
  backendRefs: 
  - name: coffee-v1-svc 
    port: 80 
- matches: # rule 2 
  - path: 
      type: PathPrefix 
      value: /coffee 
    headers: 
    - name: version 
      value: v2 
  - path: 
      type: PathPrefix 
      value: /coffee 
    queryParams: 
    - name: TEST 
      value: v2 
  backendRefs: 
  - name: coffee-v2-svc 
    port: 80 

As a result, the data plane routes requests that have the URI beginning with /coffee to the Service coffee-v2-svc under two conditions: if the header version is equal to v2 or if the query parameter TEST is equal to v2 (like /coffee?TEST=v2 in rule 2). At the same time, the data plane will route all requests for /coffee to coffee-v1-svc (as seen in rule 1).

You can read the HTTPRoute documentation to learn about all of the supported features.

Reason 2: Powerful Extensibility Model

The Gateway API comes with a powerful extensibility model that allows an implementation to expose advanced data plane features that are not inherently supported by the API itself. While Ingress controllers work around some of the Ingress resource’s limitations by supporting custom extensions through applied annotations, the Gateway API extensibility model is also superior to the Ingress extensibility model.

For example, below is an example of a resource extended with annotations of NGINX Ingress Controller to enable some advanced NGINX features (an explanation of each feature is added as a comment next to the annotation):


apiVersion: networking.k8s.io/v1 
kind: Ingress 
metadata: 
  name: webapp  
 annotations: 
    nginx.org/lb-method: "ip_hash" # choose the ip_hash load-balancing method 
    nginx.org/ssl-services: "webapp" # enable TLS to the backend 
    nginx.org/proxy-connect-timeout: "10s" # configure timeouts to the backend 
    nginx.org/proxy-read-timeout: "10s" 
    nginx.org/proxy-send-timeout: "10s" 
    nginx.org/rewrites: "serviceName=webapp rewrite=/v1" # rewrite request URI 
    nginx.com/jwt-key: "webapp-jwk" # enable JWT authentication of requests 
    nginx.com/jwt-realm: "Webb App" 
    nginx.com/jwt-token: "$cookie_auth_token" 
    nginx.com/jwt-login-url: "https://login.example.com" 
spec: 
  rules: 
  - host: webapp.example.com 
  . . . 

Annotations were never meant for expressing such a large amount of configuration – they are simple key-value string pairs that lack structure, validation, and granularity. (By lack of granularity, we mean annotations are applied per whole resource, not per part[s] of a resource like an individual routing rule in an Ingress resource.)

The Gateway API includes a powerful annotation-less extensibility model with several extension points, custom filters, policy attachments, and destinations. This model enables Gateway API implementations to offer advanced data plane features via custom resources that provide structure and validation. Additionally, users can apply an extension per part of a resource like a routing rule, which further adds granularity.

For example, this is how a custom filter of an imaginary Gateway API implementation enhances a routing rule in an HTTPRoute by applying a rate limit granularly for the /coffee rule:


rules: 
- matches: 
  - path: 
      type: PathPrefix 
      value: /coffee 
  filters: 
  - type: ExtensionRef 
    extensionRef: 
      group: someproxy.example.com 
      kind: RateLimit 
      name: coffee-limit 
  backendRefs: 
  - name: coffee 
    port: 80 

The Gateway API implementation consequently applies a filter configured in the coffee-limit custom resource to the /coffee rule, where the rate limit specification can look like this:


rateLimit: 
  rate: 10r/s 
  key: ${binary_remote_addr} 

Note: We showed you a possible extension rather than a concrete one because the NGINX Gateway Fabric project hasn’t yet taken the advantage of the Gateway API extensibility model. However, this will change in the future, as the project will support many extensions to enable users to access advanced NGINX features that are not available through the Gateway API.

Reason 3: Role Separation

The Ingress resource only supports a single user role (application developer), which gets full control over how traffic gets to an application in a Kubernetes cluster. However, that level of control is often not required, and it could even inhibit safely sharing the data plane infrastructure among multiple developer teams.

The Gateway API divides responsibility over provisioning and configuring infrastructure among three roles: infrastructure provider, cluster operator, and application developer. These roles are summarized in the table below.

Role Owner of the Gateway API Resources Responsibilities
Infrastructure provider GatewayClass Manage cluster-related infrastructure**
Cluster operator Gateway, GatewayClass* Manage a cluster for application developers
Application developer HTTPRoute Manage applications

*If the cluster operator installs and manages a Gateway API implementation rather than using the one from the infrastructure provider, they will own the GatewayClass resource.

**Similar to a cloud provider offering managed Kubernetes clusters.

The above roles enable RBAC-enforced separation of responsibilities. This split works well for organizations in a common situation where a platform team (cluster operator) owns the data plane infrastructure and wants to share it safely among multiple developer teams in a cluster (application developers).

Reason 4: Portability

Two aspects of the Gateway API make it extremely portable:

  • Features – As mentioned in Reason 1, a large number of features reduces the need to rely on Gateway API implementation-specific extension APIs, which means users will be less tied to those APIs. In contrast, Ingress users rely heavily on extensions specific to their Ingress controller.
  • Conformance tests – The Gateway API comes with tests to ensure consistency in how the API features are supported by implementations. For an implementation to be conformant, it needs to pass the conformance tests. As an example, see the test results of NGINX Gateway Fabric.

Because of this portability, users can switch from one Gateway API implementation to another with significantly less effort than it takes to switch an Ingress controller.

Reason 5: Community

The Gateway API is a community-driven project. It is also a young project that’s far from being finished. If you’d like to participate in its evolution – whether through proposing a new feature or sharing your feedback – check out the project’s contributing page.

How to Try the Gateway API

Two steps are needed to try the Gateway API:

  1. Install the Gateway API into a Kubernetes cluster.
  2. Install a Gateway API implementation.

NGINX has created a Gateway API implementation – NGINX Gateway Fabric. This implementation uses NGINX as a data plane. To try it out, follow the installation instructions of its latest release. You can also check out our contributing guide if you’d like to ask questions or contribute to the project.

Our documentation includes multiple guides and examples that showcase different use cases enabled by the Gateway API. For additional support, check out the guides on the Kubernetes Gateway API project page.

Note: NGINX Gateway Fabric is a new project that has not reached the level of maturity compared to our similar NGINX Ingress Controller project. Additionally, while NGINX Gateway Fabric supports all core features of the Gateway API (see Reason 1), it doesn’t yet offer Gateway API extensions for popular NGINX features (see Reason 2). In the meantime, those features are available in NGINX Ingress Controller.

Summary

The Kubernetes Gateway API is a new community project that addresses the limitations of the Ingress resource. We discussed the top five reasons to try this new API and briefly introduced NGINX Gateway Fabric, an NGINX-based Gateway API implementation.

With NGINX Gateway Fabric, we are focused on a native NGINX implementation of the Gateway API. We encourage you to join us in shaping the future of Kubernetes app connectivity!
Ways you can get involved in NGINX Gateway Fabric include:

  • Join the project as a contributor
  • Try the implementation in your lab
  • Test and provide feedback

To join the project, visit NGINX Gateway Fabric on GitHub.

Improve Azure App Performance and Security with NGINX

NGINXaaS for Azure enables enterprises to securely deliver high-performance applications in the cloud. Powered by NGINX Plus, it is a fully managed service that became generally available in January 2023. Since its release and into the future, we continue to enhance NGINXaaS for Azure by adding new features.

In this blog, we highlight some of the latest performance and security capabilities that let you enjoy more NGINX Plus benefits without having to deploy, maintain, and update your own NGINX Plus instances. For general information on NGINXaaS for Azure and its overarching capabilities, read Simplify and Accelerate Cloud Migrations with F5 NGINXaaS for Azure.

A diagram depicting the NGINXaaS for Azure architecture. NGINX Plus and Edge Routing are in a SaaS portion of the environment, while the customer's compute, key storage, monitoring, and other services are in the customer's Azure subscription.
Figure 1: Overview of NGINXaaS for Azure

Securing Upstream Traffic with mTLS

While reverse proxies require SSL/TLS for encrypting client-side traffic on the public internet, mutual TLS (mTLS) becomes essential to authenticate and ensure confidentiality on the server side. With the shift to Zero Trust, it’s also necessary to verify that upstream server traffic hasn’t been altered or intercepted.

A diagram of server-side TLS authentication. Both the client side and server side connections are encrypted, and both the NGINXaaS instance and app service are mutually authenticated.
Figure 2: mTLS with NGINXaaS

NGINXaaS for Azure now supports NGINX directives to secure upstream traffic with SSL/TLS certificates. With these directives, not only can you keep upstream traffic encrypted via mTLS, you can also verify that the upstream servers are presenting a valid certificate from a trusted certificate authority.

Certificate Rotation

A key part (pun intended) of using TLS certificates with NGINXaaS for Azure is securely managing those certificates through the use of Azure Key Vault (AKV). AKV keeps sensitive, cryptographic material secure and allows NGINXaaS for Azure to use those certificates while preventing accidental or intentional disclosure of the key material through the Azure portal.

Animation of certificate rotation with NGINXaas and Azure Key Vault. A new version of an existing certificate is loaded into Azure Key Vault, and then the new certificate is automatically rotated into the NGINXaaS instance.
Figure 3: Certificate rotation with Azure Key Vault

NGINXaaS for Azure can now automatically rotate certificates through your NGINX deployments whenever they are updated in AKV. New versions of certificates are rotated into your deployments within four hours.

HTTP/2 Proxy (and Additional Protocol Options)

Close your eyes and think back to the year 1997. We were Tubthumping along with Chumbawamba, wearing our JNCO jeans (or Modrobes for any fellow Canadians out there), and HTTP/1.1 was released. At that time, most end users accessed the Internet over a dial-up modem, web pages only contained a few dozen elements, and when it came to user experience, bandwidth was a much greater concern than latency.

Twenty-five years later, a sizeable portion of web applications still use HTTP/1.1 to deliver content. This can be a problem. While HTTP/1.1 still works, it only allows delivery of one resource per-connection at a time. Meanwhile, modern web apps may make hundreds of requests to update a user interface.

While most users have considerably more bandwidth at their disposal, the speed of data transmission (constrained by the fundamental speed of light) hasn’t advanced as quickly. Therefore, the cumulative latency of all those requests can have a significant impact on the perceived performance of your application. Modern browsers open multiple TCP connections to the same server, but each request on those connections is still sequential, meaning one slow resource can delay all the other resources behind it.

Take a look at F5’s homepage when it loads using only HTTP/1.1:
Timeline of f5.com accessed via HTTP/1.1. The total time approaches 2.5 seconds, and several requests are proceeded by grey bars indicating queueing delays.
Figure 4: F5.com accessed via HTTP/1.1

See all those grey bars? That’s valuable time the browser is wasting as it waits for session establishment, blocks a single slow resource, or looks for a new TCP connection to become available.

Let’s enable HTTP/2 and try again:
Timeline of f5.com accessed via HTTP/2. The total time is under 2 seconds, and and much less time is wasted on queueing-related delays.
Figure 5: The same request, but using HTTP/2

Much better. There are still a few slow resources, but they aren’t holding up other requests and significantly less time is being spent waiting for queueing-related delays. HTTP/2 keeps the same semantics that web browsers and servers are familiar with from HTTP/1.1 while adding new capabilities to address some reasons for poorly perceived application performance (e.g., request prioritization, header compression, and request multiplexing).

Given such a clear difference, NGINXaaS for Azure now supports serving client requests over HTTP/2. Client-side connections are more likely to be impacted by longer roundtrip times, so you can deliver that traffic with the latencyreducing benefits of HTTP/2 while leaving your upstream servers unchanged.

Despite what some in the web application business might want to believe, we do recognize that there are additional protocol options beyond HTTP available to you. This is why the NGINX gRPC module is also now available in NGINXaaS for Azure. It provides several configuration directives for working with gRPC traffic, including error interception, header manipulation, and more.

For nonHTTP/gRPC traffic, the stream module is now available in NGINXaaS for Azure. This module supports proxying and load balancing TCP and UDP traffic.

Support for Layer 4 and Layer 7 Load Balancing

NGINXaaS for Azure can now function as both a Layer 4 TCP/UDP and Layer 7 HTTP/HTTP cloud-native load balancer. Why is this important? Instead of deploying two different services or load balancers, NGINXaaS for Azure enables you to deploy a single load balancer and configure it to function on both layers at the same time, easing your cloud architecture and lowering your cost.

You can learn about the configuration here.

Higher Capacity (Up to 160 NCUs)

NGINXaaS for Azure is a consumption-based service that is metered hourly and billed monthly in NGINX Capacity Units (NCUs). We recently doubled that deployment capacity from 80 NCUs to 160 NCUs. Customers can deploy a smaller system of 20 NCUs and, if workload increases, can scale up to 160 NCUs. Further, customers also have an option to deploy up to 160 NCUs at the start.

Addition of NGINX Plus Directives

To provide an easy lift-and-shift configuration experience from an on-premises to fully managed cloud offering, we added many NGINX Plus directives. Please refer to all the NGINX Plus directives we support in NGINXaaS for Azure here.

Get Started Today

We’re always improving and expanding the ways you can use NGINX and F5 technology to secure, deliver, and optimize every app and API – everywhere. With the aforementioned and other new capabilities added to NGINXaaS for Azure, more Azure users can solve numerous app and API problems with the power of NGINX Plus, without the overhead of managing an additional VM or container infrastructure.

If you want to learn more about NGINXaaS for Azure, we encourage you to look through the product documentation. If you are ready to give NGINXaaS for Azure a try, please visit the Azure Marketplace or contact us to discuss your use cases.

Extending NGINX with Rust (an Alternative to C)

Over its relatively short history, the programming language Rust has garnered exceptional accolades along with a rich and mature ecosystem. Both Rust and Cargo (its build system, toolchain interface, and package manager) are admired and desired technologies in the landscape, with Rust holding a stable position in the top 20 languages of RedMonk’s programming language rankings. Furthermore, projects that adopt Rust often show improvement in stability and security-related programming errors (as an example, Android developers tell a compelling story of punctuated improvement).

F5 has been watching these developments around Rust and its community of Rustaceans with excitement for some time. We’ve taken notice with active advocacy for the language, its toolchain, and adoption moving forward.

At NGINX, we’re now putting some skin in the game to satisfy developer wants and needs in an increasingly digital and security-conscious world. We’re excited to announce the ngx-rust project – a new way to write NGINX modules with the Rust language. Rustaceans, this one’s for you!

A Quick History of NGINX and Rust

Close followers of NGINX and our GitHub might realize this isn’t our first incarnation of Rust-based modules. In the initial years of Kubernetes and early days of service mesh, some work manifested around Rust, creating the groundwork for the ngx-rust project.

Originally, ngx-rust acted as a way to accelerate the development of an Istio-compatible service mesh product with NGINX. After development of the initial prototype, this project was left unchanged for many years. During that time, many community members forked the repository or created projects inspired by the original Rust bindings examples provided in ngx-rust.

Fast forward and our F5 Distributed Cloud Bot Defense team needed to integrate NGINX proxies into its protection services. This required building a new module.

We also wanted to keep expanding our Rust portfolio while improving the developer experience and satisfying customers’ evolving needs. So, we leveraged our internal innovation sponsorships and worked with the original ngx-rust author to develop a new and improved Rust bindings project. After a long hiatus, we restarted the publishing of ngx-rust crates with enhanced documentation and improvements to build ergonomics for community use.

What Does This Mean for NGINX?

Modules are the core building blocks of NGINX, implementing most of its functionality. Modules are also the most powerful way NGINX users can customize that functionality and build support for specific use cases.

NGINX has traditionally only supported modules written in C (as a project written in C, supporting module bindings in the host language was a clear and easy choice). However, advancements in computer science and programming language theory have improved on past paradigms, especially with respect to memory safety and correctness. This has paved the way for languages like Rust, which can now be made available for NGINX module development.

How to Get Started with ngx-rust

Now with some of the history of NGINX and Rust covered, let’s start building a module. You’re free to build from source and develop your module locally, pull ngx-rust source and help build better bindings, or simply pull the crate from crates.io.

The ngx-rust README covers contributing guidelines and local build requirements to get started. It’s still early and in its initial development, but we aim to improve quality and features with community support. In this tutorial, we focus on the creation of a simple independent module. You can also look at the ngx-rust examples for more complex lessons.

The bindings are organized into two crates:

  • nginx-sys is a crate that generates bindings from NGINX source code. The file downloads NGINX source code, dependencies, and uses bindgen code automation to create the foreign function interface (FFI) bindings.
  • ngx is the main crate that implements Rust glue code, APIs, and re-exports nginx-sys. Module writers import and interact with NGINX through these symbols while the re-export of nginx-sys removes the need to import it explicitly.

The instructions below will initialize a skeleton workspace. Begin by creating a working directory and initialize the Rust project:


cd $YOUR_DEV_ARENA 
mkdir ngx-rust-howto 
cd ngx-rust-howto 
cargo init --lib

Next, open the Cargo.toml file and add the following section:


[lib] 
crate-type = ["cdylib"] 

[dependencies] 
ngx = "0.3.0-beta"

Alternatively, if you want to see the completed module while reading along, it can be cloned from Git:


cd $YOUR_DEV_ARENA 
git clone git@github.com:f5yacobucci/ngx-rust-howto.git

And with that, you’re ready to start developing your first NGINX Rust module. The structure, semantics, and general approach to constructing a module won’t look very different from what’s necessary when using C. For now, we’ve set out to offer NGINX bindings in an iterative approach to get the bindings generated, usable, and in developers’ hands to create their inventive offerings. In the future, we’ll work to build a better and more idiomatic Rust experience.

This means your first step is to construct your module in tandem with any directives, context, and other aspects required to install and run in NGINX. Your module will be a simple handler that can accept or deny a request based on HTTP method, and it will create a new directive that accepts a single argument. We’ll discuss this in steps, but you can refer to the complete code at the ngx-rust-howto repo on GitHub.

Note: This blog focuses on outlining the Rust specifics, rather than how to build NGINX modules in general. If you’re interested in building other NGINX modules, please refer to the many superb discussions out in the community. These discussions will also give you a more fundamental explanation of how to extend NGINX (see more in the Resources section below).

Module Registration

You can create your Rust module by implementing the HTTPModule trait, which defines all the NGINX entry points (postconfiguration, preconfiguration, create_main_conf, etc.). A module writer only needs to implement the functions necessary for its task. This module will implement the postconfiguration method to install its request handler.

Note: If you haven’t cloned the ngx-rust-howto repo, you can begin editing the src/lib.rs file created by cargo init.


struct Module; 

impl http::HTTPModule for Module { 
    type MainConf = (); 
    type SrvConf = (); 
    type LocConf = ModuleConfig; 

    unsafe extern "C" fn postconfiguration(cf: *mut ngx_conf_t) -> ngx_int_t { 
        let htcf = http::ngx_http_conf_get_module_main_conf(cf, &ngx_http_core_module); 

        let h = ngx_array_push( 
            &mut (*htcf).phases[ngx_http_phases_NGX_HTTP_ACCESS_PHASE as usize].handlers, 
        ) as *mut ngx_http_handler_pt; 
        if h.is_null() { 
            return core::Status::NGX_ERROR.into(); 
        } 

        // set an Access phase handler 
        *h = Some(howto_access_handler); 
        core::Status::NGX_OK.into() 
    } 
} 

The Rust module only needs a postconfiguration hook at the access phase NGX_HTTP_ACCESS_PHASE. Modules can register handlers for various phases of the HTTP request. For more information on this, see the details in the development guide.

You’ll see the phase handler howto_access_handler added just before the function returns. We’ll come back to this later. For now, just note that it’s the function that will perform the handling logic during the request chain.

Depending on your module type and its needs, these are the available registration hooks:

  • preconfiguration
  • postconfiguration
  • create_main_conf
  • init_main_conf
  • create_srv_conf
  • merge_srv_conf
  • create_loc_conf
  • merge_loc_conf

Configuration State

Now it’s time to create storage for your module. This data includes any configuration parameters required or the internal state used to process requests or alter behavior. Essentially, whatever information the module needs to persist can be put in structures and saved. This Rust module uses a ModuleConfig structure at the location config level. The configuration storage must implement the Merge and Default traits.

When defining your module in the step above, you can set the types for your main, server, and location configurations. The Rust module you’re developing here only supports locations, so only the LocConf type is set.

To create state and configuration storage for your module, define a structure and implement the Merge trait:


#[derive(Debug, Default)] 
struct ModuleConfig { 
    enabled: bool, 
    method: String, 
} 

impl http::Merge for ModuleConfig { 
    fn merge(&mut self, prev: &ModuleConfig) -> Result<(), MergeConfigError> { 
        if prev.enabled { 
            self.enabled = true; 
        } 

        if self.method.is_empty() { 
            self.method = String::from(if !prev.method.is_empty() { 
                &prev.method 
            } else { 
                "" 
            }); 
        } 

        if self.enabled && self.method.is_empty() { 
            return Err(MergeConfigError::NoValue); 
        } 
        Ok(()) 
    } 
} 

ModuleConfig stores an on/off state in the enabled field, along with an HTTP request method. The handler will check against this method and either allow or forbid requests.

Once storage is defined, your module can create directives and configuration rules for users to set themselves. NGINX uses the ngx_command_t type and an array to register module-defined directives to the core system.

Through the FFI bindings, Rust module writers have access to the ngx_command_t type and can register directives as they would in C. The ngx-rust-howto module defines a howto directive that accepts a string value. For this case, we define one command, implement a setter function, and then (in the next section) hook those commands into the core system. Remember to terminate your command array with the provided ngx_command_null! macro.

Here is how to create a simple directive using NGINX commands:


#[no_mangle] 
static mut ngx_http_howto_commands: [ngx_command_t; 2] = [ 
    ngx_command_t { 
        name: ngx_string!("howto"), 
        type_: (NGX_HTTP_LOC_CONF | NGX_CONF_TAKE1) as ngx_uint_t, 
        set: Some(ngx_http_howto_commands_set_method), 
        conf: NGX_RS_HTTP_LOC_CONF_OFFSET, 
        offset: 0, 
        post: std::ptr::null_mut(), 
    }, 
    ngx_null_command!(), 
]; 

#[no_mangle] 
extern "C" fn ngx_http_howto_commands_set_method( 
    cf: *mut ngx_conf_t, 
    _cmd: *mut ngx_command_t, 
    conf: *mut c_void, 
) -> *mut c_char { 
    unsafe { 
        let conf = &mut *(conf as *mut ModuleConfig); 
        let args = (*(*cf).args).elts as *mut ngx_str_t; 
        conf.enabled = true; 
        conf.method = (*args.add(1)).to_string(); 
    }; 

    std::ptr::null_mut() 
} 

Hooking in the Module

Now that you have a registration function, phase handler, and commands for configuration, you can hook everything together and expose the functions to the core system. Create a static ngx_module_t structure with references to your registration function(s), phase handlers, and directive commands. Every module must contain a global variable of type ngx_module_t.

Then create a context and static module type, and expose them with the ngx_modules! macro. In the example below, you can see how commands are set in the commands field and the context referencing the modules registration functions is set in the ctx field. For this module, all other fields are effectively defaults.


#[no_mangle] 
static ngx_http_howto_module_ctx: ngx_http_module_t = ngx_http_module_t { 
    preconfiguration: Some(Module::preconfiguration), 
    postconfiguration: Some(Module::postconfiguration), 
    create_main_conf: Some(Module::create_main_conf), 
    init_main_conf: Some(Module::init_main_conf), 
    create_srv_conf: Some(Module::create_srv_conf), 
    merge_srv_conf: Some(Module::merge_srv_conf), 
    create_loc_conf: Some(Module::create_loc_conf), 
    merge_loc_conf: Some(Module::merge_loc_conf), 
}; 

ngx_modules!(ngx_http_howto_module); 

#[no_mangle] 
pub static mut ngx_http_howto_module: ngx_module_t = ngx_module_t { 
    ctx_index: ngx_uint_t::max_value(), 
    index: ngx_uint_t::max_value(), 
    name: std::ptr::null_mut(), 
    spare0: 0, 
    spare1: 0, 
    version: nginx_version as ngx_uint_t, 
    signature: NGX_RS_MODULE_SIGNATURE.as_ptr() as *const c_char, 

    ctx: &ngx_http_howto_module_ctx as *const _ as *mut _, 
    commands: unsafe { &ngx_http_howto_commands[0] as *const _ as *mut _ }, 
    type_: NGX_HTTP_MODULE as ngx_uint_t, 

    init_master: None, 
    init_module: None, 
    init_process: None, 
    init_thread: None, 
    exit_thread: None, 
    exit_process: None, 
    exit_master: None, 

    spare_hook0: 0, 
    spare_hook1: 0, 
    spare_hook2: 0, 
    spare_hook3: 0, 
    spare_hook4: 0, 
    spare_hook5: 0, 
    spare_hook6: 0, 
    spare_hook7: 0, 
}; 

After this, you’ve practically completed the steps necessary to set up and register a new Rust module. That said, you still need to implement the phase handler (howto_access_handler) that was set in the postconfiguration hook.

Handlers

Handlers are called for each incoming request and perform most of the work of your module. Request handlers have been the ngx-rust team’s focus and are where the majority of initial ergonomic improvements have been made. While the previous setup steps require writing Rust in a C-like style, ngx-rust provides more convenience and utilities for request handlers.

As seen in the example below, ngx-rust provides the macro http_request_handler! to accept a Rust closure called with a Request instance. It also provides utilities to get configuration and variables, set those variables, and to access memory, other NGINX primitives, and APIs.

To initiate a handler procedure, invoke the macro and provide your business logic as a Rust closure. For the ngx-rust-howto module, check the request’s method to allow the request to continue processing.


http_request_handler!(howto_access_handler, |request: &mut http::Request| { 
    let co = unsafe { request.get_module_loc_conf::(&ngx_http_howto_module) }; 
    let co = co.expect("module config is none"); 

    ngx_log_debug_http!(request, "howto module enabled called"); 
    match co.enabled { 
        true => { 
            let method = request.method(); 
            if method.as_str() == co.method { 
                return core::Status::NGX_OK; 
            } 
            http::HTTPStatus::FORBIDDEN.into() 
        } 
        false => core::Status::NGX_OK, 
    } 
}); 

With that, you’ve completed your first Rust module!

The ngx-rust-howto repo on GitHub contains an NGINX configuration file in the conf directory. You can also build (with cargo build), add the module binary to the load_module directive in a local nginx.conf, and run it using an instance of NGINX. In writing this tutorial, we used NGINX v1.23.3, the default NGINX_VERSION supported by ngx-rust. When building and running dynamic modules, be sure to use the same NGINX_VERSION for ngx-rust builds as the NGINX instance you’re running on your machine.

Conclusion

NGINX is a mature software system with years of features and use cases built into it. It is a capable proxy, load balancer, and a world-class web server. Its presence in the market is certain for years to come, which feeds our motivation to build on its capabilities and give our users new methods to interact with it. With Rust’s popularity among developers and its improved safety constraints, we’re excited to provide the option to use Rust alongside the best web server in the world.

However, NGINX’s maturity and feature-rich ecosystem both create a large API surface area and ngx-rust has only scratched the surface. The project aims to improve and expand through adding more idiomatic Rust interfaces, building additional reference modules, and advancing the ergonomics of writing modules.

This is where you come in! The ngx-rust project is open to all and available on GitHub. We’re eager to work with the NGINX community to keep improving the module’s capabilities and ease of use. Check it out and experiment with the bindings yourself! And please reach out, file issues or PRs, and engage with us on the NGINX Community Slack channel.

Resources

HTTP/2 Rapid Reset Attack Impacting F5 NGINX Products

This blog post centers on a vulnerability that was recently discovered related to the HTTP/2 protocol. Under certain conditions, this vulnerability can be exploited to execute a denial-of-service attack on NGINX Open Source, NGINX Plus, and related products that implement the server-side portion of the HTTP/2 specification. To protect your systems from this attack, we’re recommending an immediate update to your NGINX configuration.

The Problem with HTTP/2 Stream Resets

After establishing a connection with a server, the HTTP/2 protocol allows clients to initiate concurrent streams for data exchange. Unlike previous iterations of the protocol, if an end user decides to navigate away from the page or halt data exchange for any other reason, HTTP/2 provides a method for canceling the stream. It does this by issuing an RST_STREAM frame to the server, saving it from executing work needlessly.

The vulnerability is exploited by initiating and rapidly canceling a large number of HTTP/2 streams over an established connection, thereby circumventing the server’s concurrent stream maximum. This happens because incoming streams are reset faster than subsequent streams arrive, allowing the client to overload the server without ever reaching its configured threshold.

Impact on NGINX

For performance and resource consumption reasons, NGINX limits the number of concurrent streams to a default of 128 (see http2_max_concurrent_streams). In addition, to optimally balance network and server performance, NGINX allows the client to persist HTTP connections for up to 1000 requests by default using an HTTP keepalive (see keepalive_requests).

By relying on the default keepalive limit, NGINX prevents this type of attack. Creating additional connections to circumvent this limit exposes bad actors via standard layer 4 monitoring and alerting tools.

However, if NGINX is configured with a keepalive that is substantially higher than the default and recommended setting, the attack may deplete system resources. When a stream reset occurs, the HTTP/2 protocol requires that no subsequent data is returned to the client on that stream. Typically, the reset results in negligible server overhead in the form of tasks that gracefully handle the cancellation. However, circumventing NGINX’s stream threshold enables a client to take advantage of this overhead and amplify it by rapidly initiating thousands of streams. This forces the server CPU to spike, denying service to legitimate clients.

DoS Attack via HTTP2 Streams
Denial-of-service by establishing HTTP/2 streams, followed by stream cancellations under abnormally high keepalive limits.

Steps for Mitigating Attack Exposure

As a fully featured server and proxy, NGINX provides administrators with powerful tools for mitigating denial-of-service attacks. To take advantage of these features, it is essential that the following updates are made to NGINX configuration files, minimizing the server’s attack surface:

We also recommend that these safety measures are added as a best practice:

  • limit_conn enforces a limit on the number of connections allowed from a single client. This directive should be added with a reasonable setting balancing application performance and security.
  • limit_req enforces a limit on the number of requests that will be processed within a given amount of time from a single client. This directive should be added with a reasonable setting balancing application performance and security.

How We’re Responding

We experimented with multiple mitigation strategies that helped us gain an understanding into how this attack could impact our wide range of customers and users. While this research confirmed that NGINX is already equipped with all the necessary tools to avoid the attack, we wanted to take additional steps to ensure that users who do need to configure NGINX beyond recommended specifications are able to do so.

Our investigation yielded a method for improving server resiliency under various forms of flood attacks that are theoretically possible over the HTTP/2 protocol. As a result, we’ve issued a patch that increases system stability under these conditions. To protect against such threats, we recommend that NGINX Open Source users rebuild binaries from the latest codebase and NGINX Plus customers update to the latest packages (R29p1 or R30p1) immediately.

How the Patch Works

To ensure the early detection of flood attacks on NGINX, the patch imposes a limit on the number of new streams that can be introduced within one event loop. This limit is set to twice the value configured using the http2_max_concurrent_streams directive. The limit will be applied even if the maximum threshold is never reached, like when streams are reset right after sending the request (as in the case of this attack).

Affected Products

This vulnerability impacts the NGINX HTTP/2 module (ngx_http_v2_module). For information about your specific NGINX or F5 product that might be affected, please visit: https://my.f5.com/manage/s/article/K000137106.

For more information on CVE-2023-44487 – HTTP/2 Rapid Reset Attack, please see: https://www.cve.org/CVERecord?id=CVE-2023-44487

Acknowledgements

We would like to recognize Cloudflare, Amazon, and Google for their part in the discovery and collaboration in identifying and mitigating this vulnerability.

SSL/TLS Certificate Rotation Without Restarts in NGINX Open Source

In the world of high-performance web servers, NGINX is a popular choice because its lightweight and efficient architecture enables it to handle large loads of traffic. With the introduction of the shared dictionary function as part of the NGINX JavaScript module (njs), NGINX’s performance capabilities reach the next level.

In this blog post, we explore the njs shared dictionary’s functionality and benefits, and show how to set up NGINX Open Source without the need to restart when rotating SSL/TLS certificates.

Shared Dictionary Basics and Benefits

The new js_shared_dict_zone directive allows NGINX Open Source users to enable shared memory zones for efficient data exchange between worker processes. These shared memory zones act as key-value dictionaries, storing dynamic configuration settings that can be accessed and modified in real-time.

Key benefits of the shared dictionary include:

  • Minimal Overhead and Easy to Use – Built directly into njs, it’s easy to provision and utilize with an intuitive API and straightforward implementation. It also helps you simplify the process of managing and sharing data between worker processes.
  • Lightweight and Efficient – Integrates seamlessly with NGINX, leveraging its event-driven, non-blocking I/O model. This approach reduces memory usage, and improves concurrency, enabling NGINX to handle many concurrent connections efficiently.
  • Scalability – Leverages NGINX’s ability to scale horizontally across multiple worker processes so you can share and synchronize data across those processes without needing complex inter-process communication mechanisms. The time-to-live (TTL) setting allows you to manage records in shared dictionary entries by removing them from the zone due to inactivity. The evict parameter removes the oldest key-value pair to make space for new entries.

SSL Rotation with the Shared Dictionary

One of the most impactful use cases for the shared dictionary is SSL/TLS rotation. When using js_shared_dict_zone, there’s no need to restart NGINX in the event of an SSL/TLS certificate or key update. Additionally, it gives you a REST-like API to manage certificates on NGINX.

Below is an example of the NGINX configuration file that sets up the HTTPS server with the js_set and ssl_certificate directives. The JavaScript handlers use js_set to read the SSL/TLS certificate or key from a file.

This configuration snippet uses the shared dictionary to store certificates and keys in shared memory as a cache. If the key is not present, then it reads the certificate or key from the disk and puts it into the cache.

You can also expose a location that clears the cache. Once files on the disk are updated (e.g., the certificates and keys are renewed), the shared dictionary enforces reading from the disk. This adjustment allows rotating certificates/keys without the need to restart the NGINX process.

http {
     ...
    js_shared_dict_zone zone=kv:1m;
   
  server {   …    # Sets an njs function for the variable. Returns a value of cert/key     js_set $dynamic_ssl_cert main.js_cert;     js_set $dynamic_ssl_key main.js_key;  
    # use variable's data     ssl_certificate data:$dynamic_ssl_cert;     ssl_certificate_key data:$dynamic_ssl_key;    
   # a location to clear cache  location = /clear {     js_content main.clear_cache;     # allow 127.0.0.1;     # deny all;   }
  ... }

And here is the JavaScript implementation for rotation of SSL/TLS certificates and keys using js_shared_dict_zone:

function js_cert(r) {
  if (r.variables['ssl_server_name']) {
    return read_cert_or_key(r, '.cert.pem');
  } else {
    return '';
  }
}

function js_key(r) {
  if (r.variables['ssl_server_name']) {
    return read_cert_or_key(r, '.key.pem');
  } else {
    return '';
  }
}
/** 
   * Retrieves the key/cert value from Shared memory or fallback to disk
   */
  function read_cert_or_key(r, fileExtension) {
    let data = '';
    let path = '';
    const zone = 'kv';
    let certName = r.variables.ssl_server_name;
    let prefix =  '/etc/nginx/certs/';
    path = prefix + certName + fileExtension;
    r.log('Resolving ${path}');
    const key = ['certs', path].join(':');
    const cache = zone && ngx.shared && ngx.shared[zone];
   
  if (cache) { data = cache.get(key) || ''; if (data) { r.log(`Read ${key} from cache`); return data; } } try { data = fs.readFileSync(path, 'utf8'); r.log('Read from cache'); } catch (e) { data = ''; r.log(`Error reading from file:${path}. Error=${e}`); } if (cache && data) { try { cache.set(key, data); r.log('Persisted in cache'); } catch (e) { const errMsg = `Error writing to shared dict zone: ${zone}. Error=${e}`; r.log(errMsg); } } return data }

By sending the /clear request, the cache is invalidated and NGINX loads the SSL/TLS certificate or key from the disk on the next SSL/TLS handshake. Additionally, you can implement a js_content that takes an SSL/TLS certificate or key from the request while persisting and updating the cache too.

The full code of this example can be found in the njs GitHub repo.

Get Started Today

The shared dictionary function is a powerful tool for your application’s programmability that brings significant advantages in streamlining and scalability. By harnessing the capabilities of js_shared_dict_zone, you can unlock new opportunities for growth and efficiently handle increasing traffic demands.

Ready to supercharge your NGINX deployment with js_shared_dict_zone? You can upgrade your NGINX deployment with js_shared_dict_zone to unlock new use cases and learn more about this feature in our documentation. In addition, you can see a complete example of a shared dictionary function in the recently introduced njs-acme project, which enables the njs module runtime to work with ACME providers.

If you’re interested in getting started with NGINX Open Source and have questions, join NGINX Community Slack – introduce yourself and get to know this community of NGINX users!

QUIC+HTTP/3 Support for OpenSSL with NGINX

Developers usually want to build applications and infrastructure using released, official, and supported libraries. Even with HTTP/3, there is a strong need for a convenient library that supports QUIC and doesn’t increase the maintenance costs or operational complexity in the production infrastructure.

For many QUIC+HTTP/3 users, that default cryptographic library is OpenSSL. Installed on most Linux-based operating systems by default, OpenSSL is the number one Transport Layer Security (TLS) library and is used by the majority of network applications.

The Problem: Incompatibility Between OpenSSL and QUIC+HTTP/3

Even with such wide usage, OpenSSL does not provide the TLS API required for QUIC support. Instead, the OpenSSL Management Committee decided to implement a complete QUIC stack on their own. This endeavor is a considerable effort planned for OpenSSL v3.4 but, according to the OpenSSL roadmap, that won’t likely happen before the end of 2024. Furthermore, the initial Minimum Viable Product of the OpenSSL implementation won’t contain the QUIC API implementation, so there is no clear path for users to get HTTP/3 support with OpenSSL.

Options for QUIC TLS Support

In this situation, there are two options for users looking for QUIC TLS support for their HTTP/3 needs:

  • OpenSSL QUIC implementation – As mentioned above, OpenSSL is currently working on implementing a complete QUIC stack on its own. This development will encapsulate all QUIC functionality within the implementation, making it much easier for HTTP/3 users to use the OpenSSL TLS API without worrying about QUIC-specific functionality.
  • Libraries supporting the BoringSSL QUIC API – Various SSL libraries like BoringSSL, quicTLS, and LibreSSL (all of which started as forks of OpenSSL) now provide QUIC TLS functionality by implementing BoringSSL QUIC API. However, these libraries aren’t as widely adopted as OpenSSL. This option also requires building the SSL library from source and installing it on every server that needs QUIC+HTTP/3 support, which might not be a feasible option for everyone. That said, this is currently the only option for users wanting to use HTTP/3 because the OpenSSL QUIC TLS implementation is not ready yet.

A New Solution: The OpenSSL Compatibility Layer

At NGINX, we felt inspired by these challenges and created the OpenSSL Compatibility Layer to simplify QUIC+HTTP/3 deployments that use OpenSSL and help avoid complexities associated with maintaining a separate SSL library in production environments.

Available with NGINX Open Source mainline since version 1.25.0 and NGINX Plus R30, the OpenSSL Compatibility Layer allows NGINX to run QUIC+HTTP/3 on top of OpenSSL without needing to patch or rebuild it. This removes the dependency of compiling and deploying third-party TLS libraries to get QUIC support. Since users don’t need to use third-party libraries, it also alleviates the dependency on schedules and roadmaps of those libraries, making it a comparatively easier solution to deploy in production.

How the OpenSSL Compatibility Layer Works

The OpenSSL Compatibility Layer implements these steps:

  • Converts a QUIC handshake to a TLS 1.3 handshake that is supported by OpenSSL.
  • Passes the TLS handshake messages in and out of OpenSSL.
  • Gets the encryption keys for handshake and application encryption levels out of OpenSSL.
  • Passes the QUIC transport parameters in and out of OpenSSL.

Based on the amount of OpenSSL adoption today and knowing its status with official QUIC+HTTP/3 support, we believe an easy and scalable option to enable QUIC is a step in the right direction. It will also promote HTTP/3 adoption and allow for valuable feedback. Most importantly, we trust that the OpenSSL Compatibility Layer will help us provide a more robust and scalable solution for our enterprise users and the entire NGINX community.

Note: While we are making sure NGINX users have an easy and scalable option with the availability of the OpenSSL Compatibility Layer, users still have options to use third-party libraries like BoringSSL, quicTLS, or LibreSSL with NGINX. To decide which one is the right path for you, consider what approach best meets your requirements and how comfortable you are with compiling and managing libraries as dependencies.

A Note on 0-RTT

0-RTT is a feature in QUIC that allows a client to send application data before the TLS handshake is complete. 0-RTT functionality is made possible by reusing negotiated parameters from a previous connection. It is enabled by the client remembering critical parameters and providing the server with a TLS session ticket that allows the server to recover the same information.

While this feature is an important part of QUIC, it is not yet supported in the OpenSSL Compatibility Layer. If you have specific use cases that need 0-RTT, we welcome your feedback to inform our roadmap.

Learn More about NGINX with QUIC+HTTP/3 and OpenSSL

You can begin using NGINX’s OpenSSL Compatibility Layer today with NGINX Open Source or by starting a 30-day free trial of NGINX Plus. We hope you find it useful and welcome your feedback.

More information about NGINX with QUIC+HTTP/3 and OpenSSL is available in the resources below.

Server-Side WebAssembly with NGINX Unit

WebAssembly (abbreviated to Wasm) has a lot to offer the world of web applications. In the browser, it provides a secure, sandboxed execution environment that enables frontend developers to work in a variety of high-level languages (not just JavaScript!) without compromising on performance. And at the backend (server-side), WebAssembly’s cross-platform support and multi-architecture portability promise to make development, deployment, and scalability easier than ever.

At NGINX, we envision a world where you can create a server-side WebAssembly module and run it anywhere – without modification and without multiple build pipelines. Instead, your WebAssembly module would start at local development and run all the way to mission-critical, multi-cloud environments.

With the release of NGINX Unit 1.31, we’re excited to deliver on this vision. NGINX Unit is a universal web app server where application code is executed alongside the other essential attributes of TLS, static files, and request routing. Moreover, NGINX Unit does all of this while providing a consistent developer experience for seven programming language runtimes, and now also WebAssembly.

Adding WebAssembly to NGINX Unit makes sense on many levels:

  • HTTP’s request-response pattern is a natural fit with the WebAssembly sandbox’s input/output (I/O) byte stream.
  • Developers can enjoy high-level language productivity without compromising on runtime performance.
  • NGINX Unit’s request router can facilitate construction of complex applications from multiple WebAssembly modules.
  • WebAssembly’s fast startup time makes it equally suitable for deploying single microservices and functions, or even full-featured applications.
  • Universal portability and cross-platform compatibility enables local development without complex build pipelines.
  • NGINX Unit already provides per-application isolation and the WebAssembly sandbox makes it even safer to run untrusted code.

Note: At the time of this writing, WebAssembly module is a Technology Preview – more details below.

How Does the NGINX Unit WebAssembly Module Work?

NGINX Unit’s architecture decouples networking protocols from the application runtime. The unitd: router process handles the incoming HTTP request, taking care of the TLS layer as required. After deciding what to do with this request, the “HTTP context” (URI, headers, and body) is then passed to the application runtime.

Many programming languages have a precise specification for how the HTTP context is made available to the application code, and how a developer can access URI, headers, and body. NGINX Unit provides several language modules that implement an interface layer between NGINX Unit’s router and the application runtime.

The WebAssembly language module for NGINX Unit provides a similar interface layer between the WebAssembly runtime and the router process. The WebAssembly sandbox’s linear memory is initialized with the HTTP context of the current request and the finalized response is sent back to the router for transmission to the client.

The sandboxed execution environment is provided by the Wasmtime runtime. The diagram below illustrates the flow of an HTTP request from client, through the router, to the WebAssembly module executed by Wasmtime.

Diagram of the flow of an HTTP request from client, through the router, to the WebAssembly module executed by Wasmtime.

Running WebAssembly Modules on NGINX Unit

Configuring NGINX Unit to execute a WebAssembly module is as straightforward as for any other language. In the configuration snippet below, there is an application called helloworld with these attributes:

  • type defines the language module to be loaded for this application
  • module points to a compiled WebAssembly bytecode
  • access is a feature of the Wasmtime runtime that enables the application to access resources outside of the sandbox
  • request_handler, malloc_handler, and free_handler relate to the SDK functions that transfer the HTTP context to Wasmtime (more on that in the next section)
{
   "applications":{
      "helloworld":{
         "type":"wasm",
         "module":"/path/to/wasm_module.wasm",
         "access":{
            "filesystem":[
               "/tmp",
               "/var/tmp"
            ]
         },
         "request_handler":"luw_request_handler",
         "malloc_handler":"luw_malloc_handler",
         "free_handler":"luw_free_handler"
      }
   }
}

Finding HTTP Context Inside the WebAssembly Sandbox

As mentioned above, NGINX Unit’s WebAssembly language module initializes the WebAssembly execution sandbox with the HTTP context of the current request. Where many programming language runtimes would provide native, direct access to the HTTP metadata, no such standard exists for WebAssembly.

We expect the WASI-HTTP standard to ultimately satisfy this need but, in the meantime, we provide a software development kit (SDK) for Rust and C. The Unit-Wasm SDK makes it easy to write web applications and APIs that compile to WebAssembly and run on NGINX Unit. In our how-to guide for WebAssembly, you can explore the development environment and build steps.

Despite our vision and desire to realize WebAssembly’s potential as a universal runtime, applications built with this SDK will only run on NGINX Unit. This is why we introduce WebAssembly support as a Technology Preview – we expect to replace it with WASI-HTTP support as soon as that is possible.

Try the Technology Preview

The Technology Preview is here to showcase the potential for server-side WebAssembly while providing a lightweight server for running web applications. Please approach it with a “kick the tires” mindset – experiment with it and provide us with feedback. We’d love to hear from you on the NGINX Community Slack or through the NGINX Unit GitHub repo.

To get started, install NGINX Unit and jump to the how-to guide for WebAssembly