About two years ago Microsoft® announced .NET Core, a framework that allows you to develop and run .NET applications natively on Linux and Mac systems. ASP.NET Core includes Kestrel, an internal web server library.
As indicated in the documentation for Kestrel on the Microsoft website and the GitHub repository, you typically run Kestrel behind a production web server such as IIS or NGINX. In this tutorial, we’ll describe how to implement Kestrel behind NGINX and NGINX Plus.
In this tutorial you’ll learn how to:
- Install .NET Core, NGINX, and NGINX Plus
- Build a very simple web application
- Start Kestrel as the web server
- Install and configure NGINX as a frontend
- Enable advanced NGINX Plus features
When the installation and configuration are complete:
-
.NET Core and Kestrel:
- Run the dynamic application code
- Listen on a local IP address and respond to HTTP requests
-
NGINX or NGINX Plus, acting as a reverse proxy:
- Accepts HTTP/2 traffic over IPv6 and IPv4
- Provides SSL offload for the .NET application
- Provides static file serving
- Provides access logs
- Adds caching
-
NGINX Plus:
- Provides live activity monitoring and metrics
- Ensures the app is working by means of active health checks
The .NET Core application deployment architecture is similar to the deployment architecture of Node.js or Go applications. NGINX provides .NET apps with traffic management features that simplify production deployment and scalability of the apps. You can run multiple .NET applications on the same or different machines, and NGINX or NGINX Plus performs load balancing and intelligent traffic routing between them.
Instructions
The following instructions explain how to quickly build a “Hello World” app using .NET Core, run it on Linux, and deploy it behind an NGINX or NGINX Plus reverse proxy with advanced traffic‑management functionality.
- Install .NET Core, NGINX, and NGINX Plus
- Run the “Hello World” App
- Run the Kestrel HTTP Server
- Configure NGINX or NGINX Plus to Reverse Proxy the .NET Application
- Configure NGINX Plus Live Activity Monitoring and Active Health Checks
Install .NET Core, NGINX, and NGINX Plus
-
Install .NET Core using the instructions on the Microsoft website.
In our example we’re using Ubuntu 16.04. The following commands were correct at the time of writing, but are subject to change because Kestrel is still under development. Consult the .NET Core documentation as necessary.
$ sudo apt-get install apt-transport-https $ sudo sh -c 'echo "deb [arch=amd64] https://apt-mo.trafficmanager.net/repos/dotnet-release/ xenial main" > /etc/apt/sources.list.d/dotnetdev.list' $ sudo apt-key adv --keyserver apt-mo.trafficmanager.net --recv-keys 417A0893 $ sudo apt-get update $ sudo apt-get install dotnet-dev-1.0.0-preview2-003131 -
Install NGINX:
$ sudo apt-get install nginx -
Install NGINX Plus if you want live activity monitoring, active health checks, or both. See the instructions in the NGINX Plus Admin Guide.
-
Edit the ./project.json file to add Kestrel as a dependency to the project.
{ "version": "1.0.0-*", "buildOptions": { "debugType": "portable", "emitEntryPoint": true }, "dependencies": {}, "frameworks": { "netcoreapp1.0": { "dependencies": { "Microsoft.NETCore.App": { "type": "platform", "version": "1.0.1" }, "Microsoft.AspNetCore.Server.Kestrel": "1.0.0" }, "imports": "dnxcore50" } } } -
Copy this code for a simple app to a new file called Program.cs. It returns the current date and time, running Kestrel on port 5000 on localhost.
using System; using Microsoft.AspNetCore.Builder; using Microsoft.AspNetCore.Hosting; using Microsoft.AspNetCore.Http; namespace ConsoleApplication { public class Program { public static void Main(string[] args) { var host = new WebHostBuilder() .UseKestrel() .Configure(app => { app.Run(async (context) => await context.Response.WriteAsync("Current date: " + DateTime.Now + "n")); }) .Build(); host.Run(); } } } -
Run the
dotnetruncommand to start the .NET Core server:$ dotnet run Project app (.NETCoreApp,Version=v1.0) will be compiled because inputs were modified Compiling app for .NETCoreApp,Version=v1.0 Compilation succeeded. 0 Warning(s) 0 Error(s) Time elapsed 00:00:01.9047678 Hello World! Hosting environment: Production Content root path: /app/bin/Debug/netcoreapp1.0 Now listening on: http://localhost:5000 Application started. Press Ctrl+C to shut down. -
Run the
curlcommand to test connectivity and HTTP:$ curl -v localhost:5000 * Rebuilt URL to: localhost:5000/ * Trying ::1... * Connected to localhost (::1) port 5000 (#0) > GET / HTTP/1.1 > Host: localhost:5000 > User-Agent: curl/7.47.0 > Accept: */* > < HTTP/1.1 200 OK < Date: Tue, 14 Feb 2017 19:50:59 GMT < Transfer-Encoding: chunked < Server: Kestrel < Current date: 02/14/17 12:50:59 PM * Connection #0 to host localhost left intact -
Install an SSL certificate. There are several ways to obtain one:
- Buy it from a well‑known certificate authority (CA)
- Have your corporate IT group or CA generate it
- Export it from an existing IIS server
- Use a free CA like Let’s Encrypt
- Generate a self‑signed certificate directly
For the purposes of quickly spinning up a sample .NET Core app with SSL, we’re generating a self‑signed certificate and associated key with this
opensslcommand. We’re installing the certificate and key in the standard location for NGINX, /etc/nginx, but you can choose a different location.$ openssl req -x509 -subj /CN=localhost -days 365 -set_serial 2 -newkey rsa:4096 -keyout /etc/nginx/cert.key -nodes -out /etc/nginx/cert.pem Generating a 4096 bit RSA private key .........++ ............................++ writing new private key to '/etc/nginx/cert.key' ----- -
Configure reverse proxy in the default NGINX and NGINX Plus configuration file for HTTP virtual servers.
The main NGINX and NGINX Plus configuration file is /etc/nginx/nginx.conf. However, several NGINX distributions (as well as NGINX Plus) follow the convention that you do not place much actual configuration in the main file, but instead create smaller, function‑specific files in a subdirectory of /etc/nginx:
- For NGINX Open Source builds provided by nginx.org, and for NGINX Plus, the directory is /etc/nginx/conf.d, and the default file for HTTP virtual servers is default.conf.
- For NGINX Open Source builds distributed with Ubuntu, the directory is /etc/nginx/sites-enabled, and the default file for HTTP virtual servers is default.
The content of the function‑specific files in these directories is then read into the main (nginx.conf) file with an
includedirective, for example:include /etc/nginx/conf.d/*.conf; include /etc/nginx/sites-enabled/*;If you are not sure which is the default configuration file for HTTP virtual servers on your system, find the relevant
includedirective in /etc/nginx/nginx.conf.To configure NGINX or NGINX Plus as a reverse proxy, add the following three configuration blocks to the default configuration file for HTTP virtual servers:
-
The first
serverblock accepts HTTP requests on port 80 and redirects them to the virtual server for HTTPS requests. -
The second
serverblock accepts HTTPS requests on port 443 and proxies them to a group of one or more upstream (backend) servers, here called dotnet. (If in Step 1 you installed your self‑signed SSL certificate in a directory other than /etc/nginx, substitute the correct path in thessl_certificateandssl_certificate_keydirectives.) -
The
upstreamblock defines the dotnet group of backend servers.In Run the Kestrel HTTP Server, we configured Kestrel on
localhost:5000, meaning that it listens for both IPv4 and IPv6 traffic on that port. (Configuring Kestrel for just one protocol can cause instability and potentially502errors.) Similarly, NGINX and NGINX Plus resolvelocalhostto both its IPv4 and its IPv6 address (127.0.0.1 and ::1). For the sake of simplicity, here we identify the upstream server as127.0.0.1instead oflocalhost, so it listens for IPv4 traffic only. You can uselocalhostif you are comfortable with a more advanced configuration that includes IPv6.
server { listen 80 default_server; listen [::]:80 default_server; return 301 https://$host$request_uri; } server { listen 443 ssl http2 default_server; listen [::]:443 ssl http2 default_server; ssl_certificate /etc/nginx/cert.pem; ssl_certificate_key /etc/nginx/cert.key; location / { proxy_pass http://dotnet; proxy_set_header Host $host; } } upstream dotnet { zone dotnet 64k; server 127.0.0.1:5000; } -
Run this
curlcommand to test connectivity to the .NET Core app via HTTPS. (You can also point your browser at your Linux server instead.)$ curl -kv https://localhost * Rebuilt URL to: https://localhost/ * Trying ::1... * Connected to localhost (::1) port 443 (#0) ...[SKIPPED]... < HTTP/1.1 200 OK < Server: nginx/1.10.0 (Ubuntu) < Date: Tue, 14 Feb 2017 20:22:07 GMT < Transfer-Encoding: chunked < Connection: keep-alive < Current date: 02/14/17 1:22:07 PMNote: If you see
502BadGatewayerrors, it means that NGINX or NGINX Plus cannot connect to your .NET application. Make sure it’s running and serving responses on port 5000.If you have installed the
nghttp2package, you can also run the followingnghttpcommand to test connectivity over HTTP/2. Look for the line highlighted in orange in the following example, near the beginning of the rather lengthy output.$ nghttp -v https://localhost [ 0.000] Connected The negotiated protocol: h2 [ 0.009] send SETTINGS frame - The response code is
200OK - The app server is Kestrel and not some other software
- The body of the response includes the words “Current date”
- The app responds within a 1‑second timeout period
Run the “Hello World” App
Install and initialize a “Hello World” app in the parent directory of your choice:
$ cd parent-dir-for-apps
$ mkdir app
$ cd app
$ dotnet restore
To check that the app is working, run the dotnet run command.
Run the Kestrel HTTP Server
At this point .NET Core is running on Linux and serving dynamic data using Kestrel as the HTTP server.
Configure NGINX or NGINX Plus to Reverse Proxy the .NET Application
With NGINX or NGINX Plus as a reverse proxy for the .NET application, you can easily configure security with SSL/TLS, HTTP/2 support, and many other features for fast application delivery on the same machine where the .NET Core application is running. The following instructions assume that NGINX and NGINX Plus are already installed on your system; if not, see Install .NET Core, NGINX, and NGINX Plus.
Configure NGINX Plus Live Activity Monitoring and Active Health Checks
At this point we’ve finished the basic configuration of NGINX or NGINX Plus with .NET Core. NGINX or NGINX Plus is providing HTTP handling, passive health checks, security with SSL/TLS, and HTTP/2 connectivity for our .NET Core app.
If you have installed NGINX Plus, you can configure two additional capabilities: live activity monitoring and active health checks.
Configure Live Activity Monitoring
[Editor – This section has been updated to refer to the NGINX Plus API, which replaces and deprecates the separate extended Status module originally discussed here.]
Add the following server block to the default NGINX configuration file for HTTP virtual servers. We strongly recommend that you restrict access to the statistics and metrics. Here we allow access only to users on localhost and a local network.
For more information on live activity monitoring, see Live Activity Monitoring of NGINX Plus in 3 Simple Steps on our blog and the NGINX Plus Admin Guide.
server {
    listen 8080;
    allow 127.0.0.1;   # Allow localhost to access the statistics
    allow 10.3.3.0/24; # Allow local network to access the statistics
    deny all;          # Prevent access from anywhere else

    root /usr/share/nginx/html;

    location / {
        return 302 /dashboard.html;
    }

    location /api {
        api write=on;
    }

    location = /dashboard.html {
        root /usr/share/nginx/html;
    }

    # Redirect requests made to the old dashboard
    location = /status.html {
        return 301 /dashboard.html;
    }
}
Configure Active Health Checks
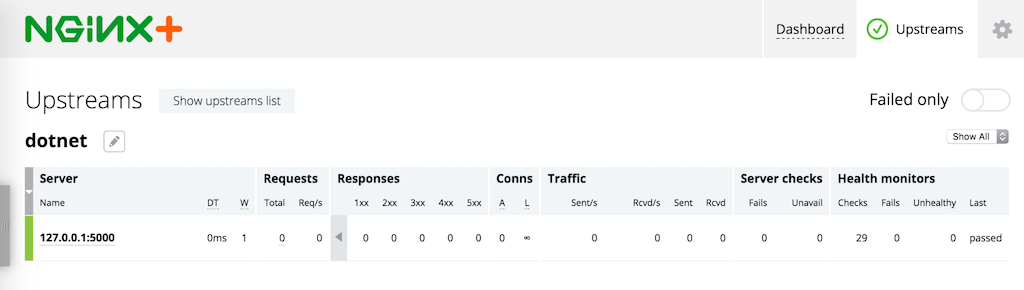
Active health checks guarantee that NGINX Plus sends traffic only to applications that are working correctly. You define the HTTP requests that NGINX Plus periodically sends to the app, and the type of response that the app must return to be considered healthy.
Here we require that the response from the app meets the following conditions:
In the default configuration file for HTTP virtual servers, add the following location block to the main server block (the block for HTTPS traffic defined in Step 2 of Configure NGINX or NGINX Plus to Reverse Proxy the .NET Application):
location @healthcheck {
    proxy_pass http://dotnet;
    proxy_set_header Host localhost;
    health_check match=currentdate;
    proxy_connect_timeout 1s;
    proxy_read_timeout 1s;
}
Also add the following match block at the same level in the hierarchy as the server and upstream blocks:
match currentdate {
    status 200;
    header Server = Kestrel;
    body ~ "Current date";
}
You can verify that your backend app is healthy on the Upstreams tab of the built‑in live activity monitoring dashboard (point your browser at //http://nginx-plus-server-address:8080/):
For more NGINX configuration options, see the Microsoft documentation.
Conclusion
For production‑ready deployments of the apps you develop with ASP.NET, NGINX and NGINX Plus provide the traffic‑management features you need in a reverse proxy. NGINX and NGINX Plus provide security, scalability, authentication, traffic limiting, and intelligent routing of your HTTP requests to .NET Core applications.
To try NGINX Plus for yourself, start your free 30-day trial today or contact us to discuss your use cases.