
In his famous speech at the University of Texas in 2014, Admiral William H. McRaven said that if you want to change the world, start off by making your bed. Sometimes small things can have a big impact – whether it’s making your bed in the morning or making few changes to your website’s HTTP server configuration.
Does that seem like an overstatement? The first months of 2020 have flushed down the drain all definitions of what’s normal and reasonable in our world. With almost half of the Earth’s population locked down in their homes due to the COVID‑19 pandemic, the Internet has become their only mode of communication, entertainment, buying food, working, and education. And each week the Internet is seeing higher network traffic and server load than ever before. According to a report published by BroadbandNow on March 25, “Eighty eight (44%) of the 200 cities we analyzed have experienced some degree of network degradation over the past week compared to the 10 weeks prior”.
Major media platforms like Netflix and YouTube are limiting the quality of their transmissions in order to protect network links, making more bandwidth available for people to work, communicate with their families, or attend virtual lessons at their school. But still this is not enough, as network quality gradually worsens and many servers become overloaded.
You Can Help by Optimizing Your Website
If you own a website and can manage its HTTP server configuration, you can help. A few small changes can reduce the network bandwidth generated by your users and the load on servers. It’s a win‑win situation: if your site is currently under heavy load, you can reduce it, enabling you to serve more users and possibly lowering your costs. If it’s not under high load, faster loading improves your users’ experience (and sometimes positively affects your position in Google search results).
It doesn’t really matter if you have an application with millions of users each month or a small blog with baking recipes – every kilobyte of network traffic you eliminate frees capacity for someone who desperately needs to check medical testing results online or create a parcel label to send something important to relatives.
In this blog we present a few simple but powerful changes you can make to your NGINX configuration. As a real‑world example, we use the e‑commerce site of our friends at Rogalove, an ecological cosmetics manufacturer here in Poland where I live. The site is a fairly standard WooCommerce installation running NGINX 1.15.9 as its web server. For the sake of our calculations, we assume the site gets 100 unique users per day, 30% of users are recurring visitors, and each user accesses an average of 4 pages during a session.
These tips are simple steps you can take right away to improve performance and reduce network bandwidth. If you’re handling large volumes of traffic, you probably need to implement more complex changes to make a significant impact, for example tuning the operating system and NGINX, provisioning the right hardware capacity, and – most importantly – enabling and tuning caching. Check out these blog posts for details:
- Tuning NGINX for Performance
- Performance Tuning – Tips & Tricks
- 10 Tips for 10x Application Performance
- Sizing Guide for Deploying NGINX Plus on Bare Metal Servers
- A Guide to Caching with NGINX and NGINX Plus
- The Benefits of Microcaching with NGINX
Enabling Gzip Compression for HTML, CSS, and JavaScript Files
As you may know, the HTML, CSS, and JavaScript files used to build pages on modern websites can be really huge. In most situations, web servers can compress these and other text files on the fly to conserve network bandwidth.
One way to see if a web server is compressing files is with the browser’s developer tools. For many browsers, you access the tools with the F12 key and the relevant information is on the Network tab. Here’s an example:
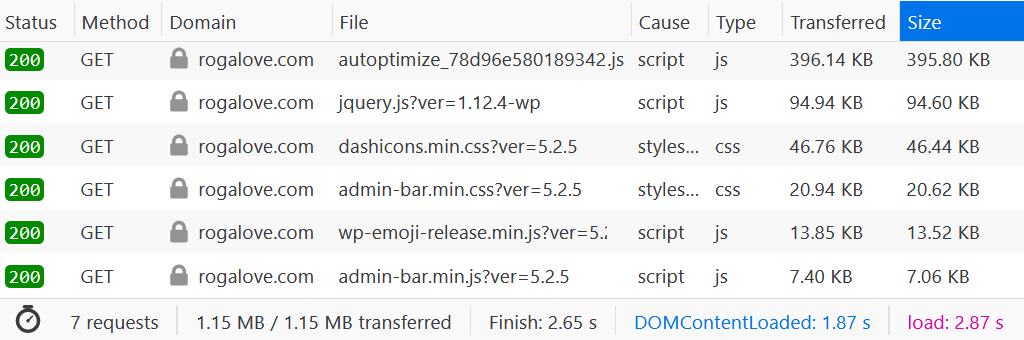
As you see at the bottom left, there is no compression: the text files are 1.15 MB in size and that much data was transferred.
By default, compression is disabled in NGINX but depending on your installation or Linux distribution, some settings might be enabled in the default nginx.conf file. Here we enable gzip compression in the NGINX configuration file:
gzip on;
gzip_types application/xml application/json text/css text/javascript application/javascript;
gzip_vary on;
gzip_comp_level 6;
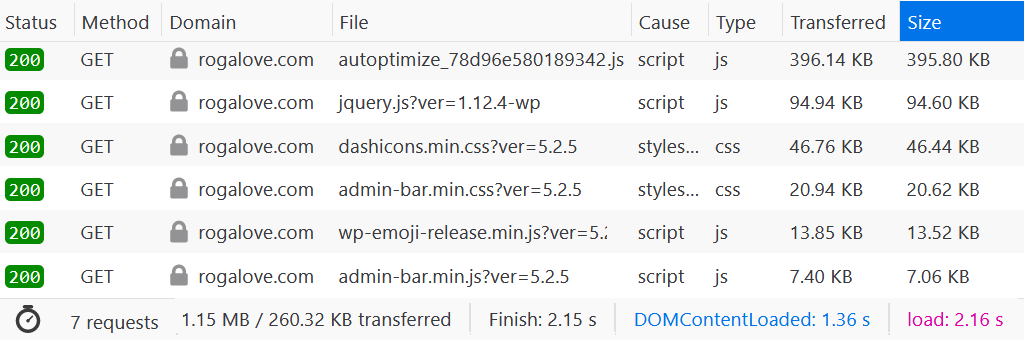
gzip_min_length 500;As you see in the following screenshot, with compression the data transfer goes down to only 260 KB – a reduction of about 80%! For each new user on your page, you save about 917 KB of data transfer. For our WooCommerce installation that’s 62 MB a day, or 1860 MB a month.
Setting Cache Headers
When a browser retrieves a file for a web page, it keeps a copy in a local on‑disk cache so that it doesn’t have to refetch the file from the server when you visit the page again. Each browser uses its own logic to decide when to use a local copy of a file and when to fetch it again in case it has changed on the server. But as the website owner, you can set cache control and expiration headers in the HTTP responses you send, to make the browser’s caching behavior more efficient. In the long term you get many fewer unnecessary HTTP requests.
For a good start, you can set a long cache expiration time for fonts and images, which probably do not change often (and even if they change, they usually get a new file name). In the following example we instruct the client browser to keep fonts and images in the local cache for a month:
location ~* \.(?:jpg|jpeg|gif|png|ico|woff2)$ {
    expires 1M;
    add_header Cache-Control "public";
}
Enabling HTTP/2 Protocol Support
HTTP/2 is a next‑generation protocol for serving web pages, designed for better network and host‑server utilization. According to the Google documentation, it enables much faster page loading:
The resulting protocol is more friendly to the network, because fewer TCP connections are used in comparison to HTTP/1.x. This means less competition with other flows, and longer‑lived connections, which in turn leads to better utilization of available network capacity.
NGINX 1.9.5 and later (and NGINX Plus R7 and later) supports the HTTP/2 protocol, and all you need to do is to enable it 😀. To do so, include the http2 parameter on the listen directives in your NGINX configuration files:
listen 443 ssl http2;Note that in most cases, you also need to enable TLS to use HTTP/2.
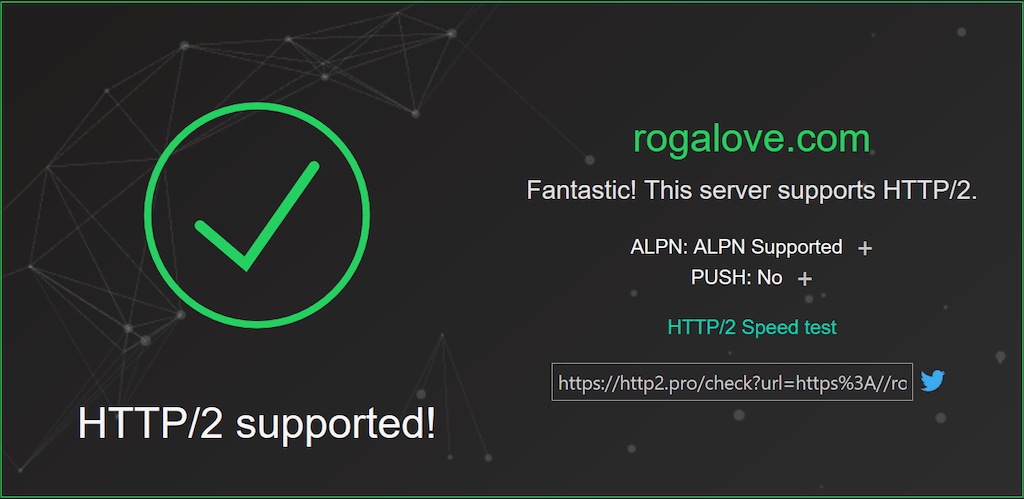
You can verify that your (or any) site supports HTTP/2 with the HTTP2.Pro service:
Optimizing Logging
Make yourself a cup of your favorite beverage, sit comfortably, and think: when was the last time you looked at your access log file? Last week, last month, never? Even if you use it for day-to-day monitoring of your site, you probably focus only on errors (400 and 500 status codes, and so on), not successful requests.
By reducing or eliminating unnecessary logging, you save disk storage, CPU, and I/O operations on your server. This not only makes your server a little faster – if you’re deployed in a cloud environment, the freed‑up I/O throughput and CPU cycles might be a life saver for another virtual machine or application residing on the same physical machine.
There are several different ways to reduce and optimize logging. Here we highlight three.
Method 1: Disable Logging of Requests for Page Resources
This is a quick and easy solution if you don’t need to log requests that retrieve ordinary page resources such as images, JavaScript files, and CSS files. All you need to do is to create a new location block that matches those file types, and disable logging inside it. (You can also add this access_log directive to the location block above where we set the Cache-Control header .)
location ~* \.(?:jpg|jpeg|gif|png|ico|woff2|js|css)$ {
    access_log off;
}
Method 2: Disable Logging of Successful Requests
This is a more powerful method because it discards queries with a 2xx or 3xx response code, logging only errors. It is slightly more complicated than Method 1 because it depends on how your NGINX logging is configured. In our example we use the standard nginx.conf included in Ubuntu Server distributions, so that regardless of the virtual host all requests are logged to /var/log/nginx/access.log.
Using an example from the official NGINX documentation let’s turn on conditional logging. Create a variable $loggable and set it to 0 for requests with 2xx and 3xx response codes, and otherwise to 1. Then reference this variable as a condition in the access_log directive.
Here’s the original directive in the http context in /etc/nginx/nginx.conf:
access_log /var/log/nginx/access.log;Add a map block and reference it from the access_log directive:
map $status $loggable {
    ~^[23] 0;
    default 1;
}

access_log /var/log/nginx/access.log combined if=$loggable;
Note that although combined is the default log format, you need to specify it explicitly when including the if parameter.
Method 3: Minimizing I/O Operations with Buffering
Even if you want to log all requests you can minimize I/O operations by turning on access log buffering. With this directive NGINX waits to write log data to disk until a 512-KB buffer is filled or 1 minute has passed since the last flush, whichever occurs first.
access_log /var/log/nginx/access.log combined buffer=512k flush=1m;Limiting Bandwidth for Particular URLs
If your server provides larger files (or smaller but extremely popular files, like forms or reports), it can be useful to set the maximum speed at which clients can download them. If your site is already experiencing a high network load, limiting download speed leaves more bandwidth to keep critical parts of your application responsive. This is a very popular solution used by hardware manufacturers – you may wait longer to download a 3-GB driver for your printer, but with thousands of other people downloading at the same time you’ll still able to get your download. 😉
Use the limit_rate directive to limit bandwidth for a particular URL. Here we’re limiting the transfer rate for each file under /download to 50 KB per second.
location /download/ {
    limit_rate 50k;
}
You might also want to rate‑limit only larger files, which you can do with the limit_rate_after directive. In this example the first 500 KB of every file (from any directory) is transferred without speed restrictions, with everything after that capped at 50 KB/s. This enables faster delivery of critical parts of the website while slowing down others.
location / {
    limit_rate_after 500k;
    limit_rate 50k;
}
Note that rate limits apply to individual HTTP connections between a browser and NGINX, and so don’t prevent users from getting around rate limits by using download managers.
Lastly, you can also limit the number of concurrent connections to your server or the rate of request. For details, see our documentation.
Summary
We hope that those five tips help optimize your site’s performance. Speed and bandwidth gains vary by website. Even if tuning your NGINX configuration doesn’t seem to significantly free up bandwidth or improve speed, the overall impact of thousands of websites individually tweaking their NGINX configuration adds up. Our global network is used more efficiently, meaning that the most critical services are delivered when needed.
If you’re having any issues with NGINX at your site, we’re here to help! During the COVID‑19 pandemic, NGINX employees and the community are monitoring the NGINX channel on Stack Overflow1 and responding to questions and requests as quickly as possible.
If you work for an organization on the frontlines of the pandemic and have advanced needs, you may qualify for up to five free NGINX Plus licenses as well as a higher tier of F5 DNS Load Balancer Cloud Service. See Free Resources for Websites Impacted by COVID‑19 for details.
Also check out that blog for a rundown of other easy ways to improve website performance with free resources from NGINX and F5.
1Stack Overflow is a third‑party website and is not affiliated with F5. Inc. F5 and its affiliates disclaim any liability for content (including general information and proposed solutions to questions) posted on Stack Overflow or any other third‑party website.