
Author’s note – This blog post is the sixth in a series:
- Introducing the Microservices Reference Architecture from NGINX
- MRA, Part 2: The Proxy Model
- MRA, Part 3: The Router Mesh Model
- MRA, Part 4: The Fabric Model
- MRA, Part 5: Adapting the Twelve‑Factor App for Microservices
- MRA, Part 6: Implementing the Circuit Breaker Pattern with NGINX Plus (this post)
All six blogs, plus a blog about web frontends for microservices applications, have been collected into a free ebook.
Also check out these other NGINX resources about microservices:
- A very useful and popular series by Chris Richardson about microservices application design
- The Chris Richardson articles collected into a free ebook, with additional tips on implementing microservices with NGINX and NGINX Plus
- Other microservices blog posts
- Microservices webinars
Microservices application design has wrought a wholesale change in the way that applications function. In a microservices architecture, an “application” is now a collection of services that rely on each other to perform tasks and to provide functionality. In complex applications, the service graph can be quite deep and have multiple interdependencies between the various services.
For example, a user service may be integral to many other services that rely on the data provided by the service. In this scenario, a failure of the user service might cause a cascade of failures throughout the application.
The Circuit Breaker pattern – a term popularized by Martin Fowler – has been gaining currency among microservices architects as an application design pattern for avoiding cascading service failure. The idea of the Circuit Breaker pattern is to monitor your application services and the traffic flowing among them in order to prevent failures – and, when failures do happen, to minimize the impact of those failures on your applications.
For microservices, the Circuit Breaker pattern is especially valuable, providing bottom‑up resilience. If implemented correctly, it can help avoid cascading failures by providing continuity of service even when services are unavailable. The Circuit Breaker pattern has been most famously embraced by Netflix as a critical component in their application design philosophy.
Don’t Avoid Failure, Embrace It
A key tenet of modern application design is that failure will occur. The layered cake that modern applications rely on – from cloud‑hosted virtual machines to containers to application libraries to dynamic networking – means that the moving parts in any application are legion. You need to assume that one or more parts of your application will fail in some manner at some point. Expecting failure and building in mechanisms to mitigate its effects goes a long way toward making your application more resilient.
One of the most critical goals of the circuit breaker pattern is attempting to prevent failure in the first place. For some types of error conditions, say running out of memory, it is possible to recognize that failure is imminent and take measures to prevent it. This is typically accomplished by the service signaling that it is unhealthy, and the circuit breaker then giving the service a chance to recover by throttling back the number of requests or rerouting them completely. Once the service has recovered, it is also prudent for the circuit breaker to slowly ramp up requests to the service so as not to immediately overwhelm it and risk its going unhealthy again.
In the NGINX Microservices Reference Architecture, we have a service called the resizer. When a large photo is uploaded to the system, the resizer decompresses it, corrects its rotation, shrinks it, then shrinks it again, saving the corrected original image and the two resized images to an object store. The nature of these processes makes the resizer the most processor‑intensive and memory‑intensive part of the application.
When many images are being resized simultaneously, the resizer can run out of memory and, in some scenarios, fail completely. To avoid problems, we put a circuit breaker between instances of the resizer service and the uploader service that feeds images to them. The uploader regularly queries the resizer instances for their health status. The query triggers the resizer to evaluate whether it has used more than 80% of available memory, among other health checks, and responds to the uploader with its health status.
If a resizer instance indicates that it is unhealthy, the uploader routes requests to other instances – as shown in Figure 1 – but keeps checking to see whether that resizer instance has recovered. When the resizer instance indicates it is healthy again, it is put back into the load‑balanced pool and the uploader slowly ramps traffic up to the instance’s full capacity. This design prevents instances of the resizer from failing completely, prevents work from being begun but not completed, prevents excessive waiting for users whose processes would otherwise have failed, and helps the system deal most effectively with the request stream sent to it.

The Circuit Breaker Pattern Improves Consistency
One of the benefits of implementing the circuit breaker at the NGINX level is that it creates a universal, consistent, and highly flexible layer for managing circuit breakers across your microservices application. This universality and consistency means that you don’t have to manage and build around the nuances and inconsistencies of the circuit breaker libraries for each language.
You gain many advantages by keeping most of the circuit breaker functionality out of the code of each service, and implementing it in NGINX Plus instead:
- The circuit breaker for a service written in, for instance, Java, is the same as for a service written in PHP – and the circuit breaker itself can be written in yet another language, as needed
- You avoid having to re‑implement the circuit breaker functionality across the mix of languages and support libraries used by each of your services
- Each service that does not need to include the circuit breaker code is thereby simplified; it runs faster and is easier to write, debug, run, and maintain
- The support code for each service is simplified; the mix of libraries and systems used can reflect the core functionality of the service only
- The circuit breaker code is simplified; existing in only one place, it can be stripped down to its essentials, without the need to accommodate local contexts
- The circuit breaker code can take advantage of NGINX Plus capabilities such as caching, making it far more powerful
- You can fine‑tune your NGINX Plus‑level circuit breaker code, then re‑use it in other applications and across deployment platforms – such as on‑premises, on different cloud platforms, and in blended environments
It is important to note, however, that circuit breakers cannot be implemented in NGINX Plus alone. A true circuit breaker requires the service to provide an introspective, active health check at a designated URI (typically /health). The health check must be appropriate to the needs of that specific service.
In developing the health check, you need to understand the failure profile of the service and the kinds of conditions that can cause failure, such as a database connection failure, an out‑of‑memory condition, running out of disk space, or an overloaded CPU. These conditions are evaluated in the health check process, which then provides a binary status of healthy or unhealthy.
The Circuit Breaker Pattern Provides Flexibility
When you implement the circuit breaker pattern at the NGINX level, as described here, it’s up to NGINX Plus to deal with the situation when a service instance communicates that it is unhealthy. There are a number of options.
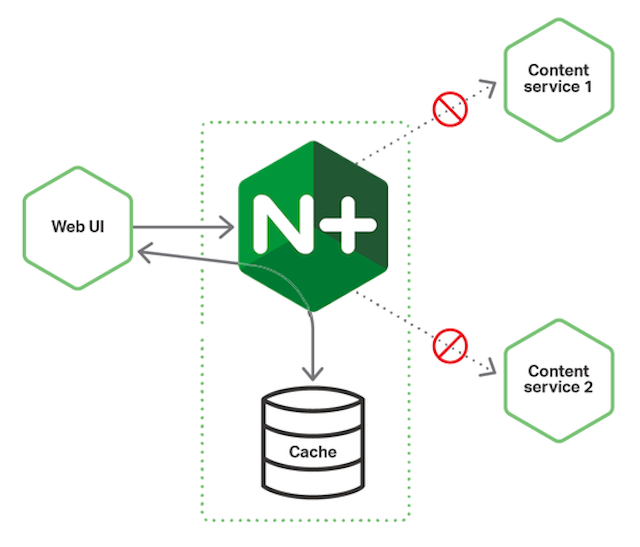
The first option is to redirect requests to other, healthy instances and keep querying the unhealthy instance to see if it recovers. The second option is to provide cached responses to clients that request the service, maintaining stability even if the service is unavailable. This solution works well with read‑oriented services, such as a content service.
Another option is to provide alternative data sources. For example, a customer of ours has a personalized ad server that uses profile data to serve targeted ads for its users. If the personalized ad server is down, the user request is redirected to a backup server that provides a generic set of ads appropriate for everyone. This alternative data source approach can be quite powerful.
Finally, if you have a very clear understanding of the failure profile of a service, you can mitigate failure by adding rate limiting to the circuit breaker. Requests are allowed through to the service only at the rate it can handle. This creates a buffer within the circuit breaker so that it can absorb spikes in traffic.
Rate limiting can be particularly powerful in a centralized load‑balancing scenario like the Router Mesh Model, where application traffic is routed through a limited number of load balancers which can have a good understanding of the total traffic usage across the site.
Implementing the Circuit Breaker Pattern in NGINX Plus
As we’ve described above, the circuit breaker pattern can prevent failure before it happens by reducing traffic to an unhealthy service or routing requests away from it. This requires an active health check connected to an introspective health monitor on each service. Unfortunately, a passive health‑check does not do the trick, as it only checks for failure – at which point, it is already too late to take preventative action. It is for this reason that NGINX Open Source cannot implement the circuit breaker pattern – it only supports passive health checks.
NGINX Plus, however, has a robust active health‑check system with many options for checking and responding to health issues. Looking at the implementation of some of the service types for the Microservices Reference Architecture provides good examples of the options and use cases for implementing the circuit breaker.
Let’s start with the uploader service that connects to the resizer. The uploader puts images into an object store, then tells the resizer to open an image, correct it, and resize it. This is a compute‑intensive and memory‑intensive operation.The uploader needs to monitor the health of the resizer and avoid overloading it, as the resizer can literally kill the host that it is running on.
The first thing to do is create a location block specifically for the resizer health check. This block is an internal location, meaning that it cannot be accessed with a request to the server’s standard URL ( http://example.com/health-check-resizer). Instead, it acts as a placeholder for the health‑check information. The health_check directive sends a health check to the /health URI every three seconds and uses the tests defined in the match block called conditions to check the health of the service instance. A service instance is marked as unhealthy when it misses a single check. The proxy_* directives send the health check to the resizer upstream group, using TLS 1.2 over HTTP 1.1 with the indicated HTTP headers set to null.
location /health-check-resizer {
    internal;
    health_check uri=/health match=conditions fails=1 interval=3s;


    proxy_pass                        https://resizer;
    proxy_ssl_session_reuse           on;
    proxy_ssl_protocols               TLSv1.2;
    proxy_http_version                1.1;
    proxy_set_header Connection       "";
    proxy_set_header Accept-Encoding  "";
}
The next step is to create the conditions match block to specify the responses that represent healthy and unhealthy conditions. The first check is of the response status code: if it is in the range from 200 through 399, testing proceeds to the next evaluation statement. The second check is that the Content-Type is application/json. Finally, the third check is a regular expression match against the value of the deadlocks, Disk, and Memory metrics. If they are all healthy, then the service is determined to be healthy.
match conditions {
    status 200-399;
    header Content-Type ~ "application/json";
    body ~ '{
        "deadlocks":{"healthy":true},
        "Disk":{"healthy":true},
        "Memory":{"healthy":true}
    }';
}
The NGINX Plus circuit‑breaker/health‑check system also has a slow‑start feature.The slow_start parameter to the server directive for the resizer service in the upstream block tells NGINX Plus to moderate the flow of traffic when a resizer instance first returns from an unhealthy state. Rather than just slamming the service with the same number of requests sent to healthy services, traffic to the recovering service is slowly ramped up to the normal rate over the period indicated by the slow_start parameter – in this case, 30 seconds. The slow start improves the chances that the service will return to full capability while reducing the impact if that does not happen.
upstream resizer {
    server        resizer slow_start=30s;
    zone backend  64k;
    least_time    last_byte;
    keepalive     300;
}
Request limiting manages and moderates the flow of requests to the service. If you understand the failure profile of the application well enough to know the number of requests that it can handle at any given time, then implementing request limiting can be a real boon to the process. However, this feature works only if NGINX Plus has full awareness of the total number of connections being passed into the service. Because of this, it is most useful to implement the request‑limiting circuit breaker on an NGINX Plus instance running in a container with the service itself, as in the Fabric Model, or in a centralized load balancer that is tasked with managing all traffic in a cluster.
The following configuration code snippet defines a rate limit on requests to be applied to the resizer service instances in their containers. The limit_req_zone directive defines the rate limit at 100 requests per second. The $server_addr variable is used as the key, meaning that all requests into the resizer container are counted against the limit. The zone’s name is moderateReqs and the timeframe for keeping the request count is 1 minute. The limit_req directive enables NGINX Plus to buffer bursts up to 150 requests. When that number is exceeded, clients receive the 503 error code as specified by the limit_req_status directive, indicating that the service is unavailable.
http {
    # Moderated delivery
    limit_req_zone $server_addr zone=moderateReqs:1m rate=100r/s;
    # ...
    server {
        # ...
        limit_req zone=moderateReqs burst=150;
        limit_req_status 503;
        # ...
    }
}
Another powerful benefit of running the circuit breaker within NGINX Plus is the ability to incorporate caching and maintain cached data centrally, for use across the system. This is particularly valuable for read‑oriented services like content servers where the data being read from the backend is not changing frequently.
proxy_cache_path /app/cache levels=1:2 keys_zone=oauth_cache:10m max_size=10m inactive=15s use_temp_path=off;

upstream user-manager {
    server        user-manager;
    zone backend  64k;
    least_time    last_byte;
    keepalive     300;
}

server {
    listen 443 ssl;
    location /v1/users {
        proxy_pass http://user-manager;
        proxy_cache            oauth_cache;
        proxy_cache_valid      200  30s;
        proxy_cache_use_stale  error timeout invalid_header updating
                               http_500 http_502 http_503 http_504;
    }
}
As shown in Figure 2, caching data means that many customer data requests never reach the microservice instances, freeing up capacity for requests that haven’t been received previously.
However, with a service where data can change, for example a user‑manager service, a cache needs to be managed judiciously. Otherwise you can end up with a scenario where a user makes a change to his or her profile, but sees old data in some contexts because the data is cached. A reasonable timeout and accepting the principle of high availability with eventual consistency can resolve this conundrum.
One of the nice features of the NGINX cache is that it can continue serving cached data even if the service is completely unavailable – in the snippet above, if the service is responding with one of the four most common 500‑series error codes.
Caching is not the only option for responding to clients even though a server is down. As we mentioned in The Circuit Breaker Pattern Provides Flexibility, one of our customers needed a resilient solution in case their personalized ad server went down, and cached responses were not a good solution. Instead, they wanted a generic ad server to provide generalized ads until the personalized server came back online. This is easily achieved using the backup parameter to the server directive. The following snippet specifies that when all servers defined for the personal-ad-server domain are unavailable, the servers defined for the generic-ad-server domain are used instead.
upstream personal-ad-server {
    server        personal-ad-server;
    server        generic-ad-server backup;
    zone backend  64k;
    least_time    last_byte;
    keepalive     300;
}
And finally, it is possible to have NGINX evaluate the response codes from a service and deal with those individually. In the following snippet, if a service returns a 503 error, NGINX Plus sends the request on to an alternative service. For example, if the resizer has this feature, and the local instance is overloaded or stops functioning, requests are then sent to another instance of the resizer.
location / {
    error_page 503 = @fallback;
}

location @fallback {
    proxy_pass http://alternative-backend;
}
Conclusion
The circuit breaker pattern is a powerful tool to provide resiliency and control in your microservices application. NGINX Plus provides many features and options to implement the circuit breaker into your environment. The key to implementing the circuit breaker pattern is to understand the failure profile of the service you are protecting, then choose the options that best prevent failure, where possible, and that best mitigate the effects of failure when it does happen.
To try NGINX Plus, start your free 30-day trial today or contact us to discuss your use cases.