
JSON Web Tokens (JWTs, pronounced “jots”) are a compact and highly portable means of exchanging identity information. The JWT specification has been an important underpinning of OpenID Connect, providing a single sign‑on token for the OAuth 2.0 ecosystem. JWTs can also be used as authentication credentials in their own right and are a better way to control access to web‑based APIs than traditional API keys.
NGINX Plus R10 and later can validate JWTs directly. In this blog post we describe how to use NGINX Plus as an API gateway, providing a frontend to an API endpoint and using JWTs to authenticate client applications.
Native JWT support is available only in NGINX Plus, not NGINX Open Source.
Editor – This blog post was updated in December 2021 to use the auth_jwt_require directive introduced in NGINX Plus R25. For a detailed discussion of the directive, see Custom JWT Validation Rules in the blog announcing NGINX Plus R25.
NGINX Plus R15 and later can also control the “Authorization Code Flow” in OpenID Connect 1.0, which enables integration with most major identity providers. For details, see Announcing NGINX Plus R15.
Anatomy of a JWT
JWTs have three parts: a header, a payload, and a signature. In transmission they look like the following. We’ve added line breaks for readability (the actual JWT is a single string) and color coding to distinguish the three parts:
eyJhbGciOiJIUzI1NiIsInR5cCI6IkpXVCJ9.ewogICAgInN1YiI6ICJsYzEiLAogICAgImVtYWlsIjo
gImxpYW0uY3JpbGx5QG5naW54LmNvbSIsCn0=.VGYHWPterIaLjRi0LywgN3jnDUQbSsFptUw99g2slfc
As shown, a period ( . ) separates the header, payload, and signature. The header and payload are Base64‑encoded JSON objects. The signature is encrypted using the algorithm specified by the alg header, which we can see when we decode our sample JWT:
| Encoded | Decoded | |
|---|---|---|
| Header | eyJhbGciOiJIUzI1NiIsInR5cCI6Ik |
{
|
| Payload | ewogICAgInN1YiI6ICJsYzEiLAogICAgImVtYWlsIjogImxpYW0uY3JpbGx5QG5naW54LmNvbSIsCn0= |
{ |
The JWT standard defines several signature algorithms. The value HS256 in our example refers to HMAC SHA‑256, which we’re using for all sample JWTs in this blog post. NGINX Plus supports the HSxxx, RSxxx, and ESxxx signature algorithms that are defined in the standard. The ability to cryptographically sign JWTs makes them ideal for use as authentication credentials.
JWT as an API Key
A common way to authenticate an API client (the remote software client requesting API resources) is through a shared secret, generally referred to as an API key. A traditional API key is essentially a long and complex password that the client sends as an additional HTTP header on each and every request. The API endpoint grants access to the requested resource if the supplied API key is in the list of valid keys. Generally, the API endpoint does not validate API keys itself; instead an API gateway handles the authentication process and routes each request to the appropriate endpoint. Besides computational offloading, this provides the benefits that come with a reverse proxy, such as high availability and load balancing to a number of API endpoints.
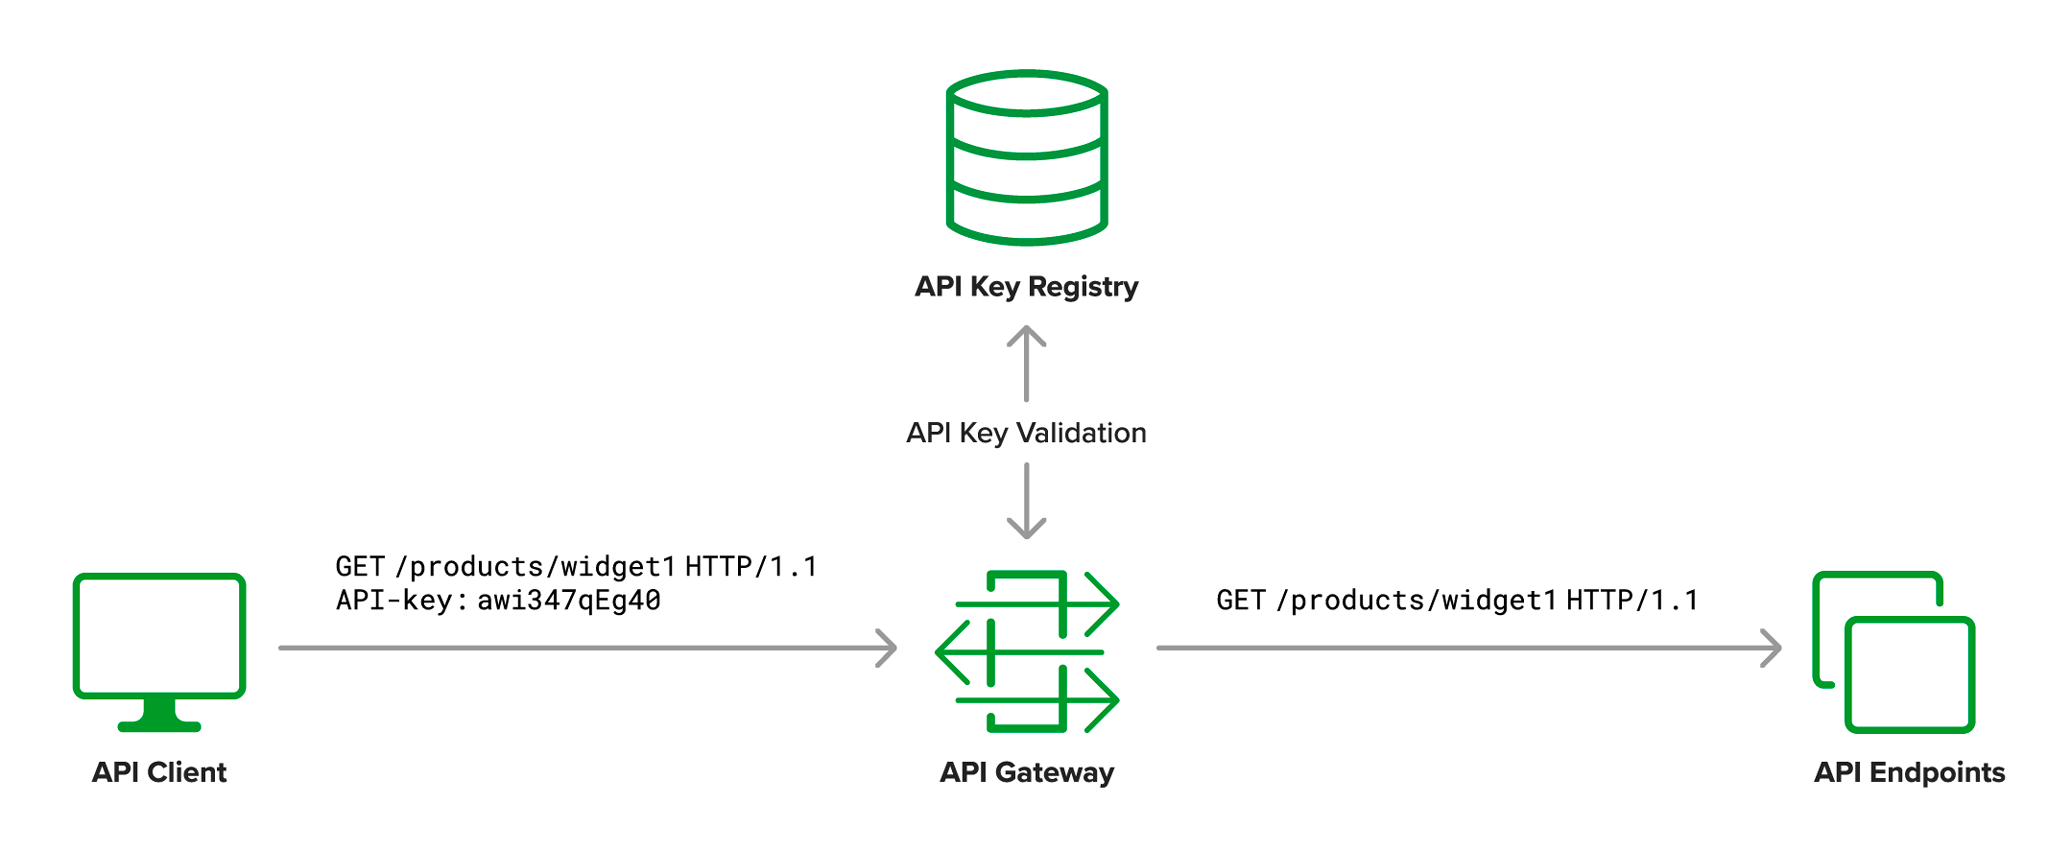
to the API endpoint
It is common to apply different access controls and policies to different API clients. With traditional API keys, this requires a lookup to match the API key with a set of attributes. Performing this lookup on each and every request has an understandable impact on the overall latency of the system. With JWT, these attributes are embedded, negating the need for a separate lookup.
Using JWT as the API key provides a high‑performance alternative to traditional API keys, combining best‑practice authentication technology with a standards‑based schema for exchanging identity attributes.

Configuring NGINX Plus as an Authenticating API Gateway
The NGINX Plus configuration for validating JWTs is very simple.
upstream api_server {
    server 10.0.0.1;
    server 10.0.0.2;
}

server {
    listen 80;

    location /products/ {
        auth_jwt "Products API";
        auth_jwt_key_file conf/api_secret.jwk;
        proxy_pass http://api_server;
    }
}
The first thing we do is specify the addresses of the servers that host the API endpoint, in the upstream block. The location block specifies that any requests to URLs beginning with /products/ must be authenticated. The auth_jwt directive defines the authentication realm that will be returned (along with a 401 status code) if authentication is unsuccessful.
The auth_jwt_key_file directive tells NGINX Plus how to validate the signature element of the JWT. In this example we’re using the HMAC SHA‑256 algorithm to sign JWTs and so we need to create a JSON Web Key in conf/api_secret.jwk to contain the symmetric key used for signing. The file must follow the format described by the JSON Web Key specification; our example looks like this:
{"keys":
    [{
        "k":"ZmFudGFzdGljand0",
        "kty":"oct",
        "kid":"0001"
    }]
}
The symmetric key is defined in the k field and here is the Base64URL‑encoded value of the plaintext character string fantasticjwt. We obtained the encoded value by running this command:
$ echo -n fantasticjwt | base64 | tr '+/' '-_' | tr -d '='The kty field defines the key type as a symmetric key (octet sequence). Finally, the kid (Key ID) field defines a serial number for this JSON Web Key, here 0001, which allows us to support multiple keys in the same file (named by the auth_jwt_key_file directive) and manage the lifecycle of those keys and the JWTs signed with them.
Now we are ready to issue JWTs to our API clients.
Issuing a JWT to API Clients
As a sample API client, we’ll use a “quotation system” application and create a JWT for the API client. First we define the JWT header:
{
  "typ":"JWT",
  "alg":"HS256",
  "kid":"0001"
}
The typ field defines the type as JSON Web Token, the alg field specifies that the JWT is signed with the HMAC SHA256 algorithm, and the kid field specifies that the JWT is signed with the JSON Web Key with that serial number.
Next we define the JWT payload:
{
  "name":"Quotation System",
  "sub":"quotes",
  "iss":"My API Gateway"
}
The sub (subject) field is our unique identifier for the full value in the name field. The iss field describes the issuer of the JWT, which is useful if your API gateway also accepts JWTs from third‑party issuers or a centralized identity management system.
Now that we have everything we need to create the JWT, we follow these steps to correctly encode and sign it. Commands and encoded values appear on multiple lines only for readability; each one is actually typed as or appears on a single line.
-
Separately flatten and Base64URL‑encode the header and payload.
$ echo -n '{"typ":"JWT","alg":"HS256","kid":"0001"}' | base64 | tr '+/' '-_' | tr -d '=' eyJ0eXAiOiJKV1QiLCJhbGciOiJIUzI1NiIsImtpZCI6IjAwMDEifQ $ echo -n '{"name":"Quotation System","sub":"quotes","iss":"My API Gateway"}' | base64 | tr '+/' '-_' | tr -d '=' eyJuYW1lIjoiUXVvdGF0aW9uIFN5c3RlbSIsInN1YiI6InF1b3RlcyIsImlzcyI6Ik 15IEFQSSBHYXRld2F5In0 -
Concatenate the encoded header and payload with a period (.) and assign the result to the
HEADER_PAYLOADvariable.$ HEADER_PAYLOAD=eyJ0eXAiOiJKV1QiLCJhbGciOiJIUzI1NiIsImtpZCI6IjAw MDEifQ.eyJuYW1lIjoiUXVvdGF0aW9uIFN5c3RlbSIsInN1YiI6InF1b3RlcyIsIm lzcyI6Ik15IEFQSSBHYXRld2F5In0 -
Sign the header and payload with our symmetric key and Base64URL‑encode the signature.
$ echo -n $HEADER_PAYLOAD | openssl dgst -binary -sha256 -hmac fantasticjwt | base64 | tr '+/' '-_' | tr -d '=' ggVOHYnVFB8GVPE-VOIo3jD71gTkLffAY0hQOGXPL2I -
Append the encoded signature to the header and payload.
$ echo $HEADER_PAYLOAD.ggVOHYnVFB8GVPE-VOIo3jD71gTkLffAY0hQOGXPL2I > quotes.jwt -
Test by making an authenticated request to the API gateway (in this example, the gateway is running on localhost).
$ curl -H "Authorization: Bearer `cat quotes.jwt`" http://localhost/products/widget1
The curl command in Step 5 sends the JWT to NGINX Plus in the form of a Bearer Token, which is what NGINX Plus expects by default. NGINX Plus can also obtain the JWT from a cookie or query string parameter; to configure this, include the token= parameter to the auth_jwt directive. For example, with the following configuration NGINX Plus can validate the JWT sent with this curl command:
$ curl http://localhost/products/widget1?apijwt=`cat quotes.jwt`server {
listen 80;
location /products/ {
auth_jwt "Products API" token=$arg_apijwt;
auth_jwt_key_file conf/api_secret.jwk;
proxy_pass http://api_server;
}
}Once you’ve configured NGINX Plus, and generated and verified a JWT as shown above, you’re ready to send the JWT to the API client developer and agree on the mechanism that will be used to submit the JWT with each API request.
Leveraging JWT Claims for Logging and Rate Limiting
One of the primary advantages of JWTs as authentication credentials is that they convey “claims”, which represent entities associated with the JWT and its payload (its issuer, the user to whom it was issued, and the intended recipient, for example). After validating the JWT, NGINX Plus has access to all of the fields present in the header and the payload as variables. These are accessed by prefixing $jwt_header_ or $jwt_claim_ to the desired field (for example, $jwt_claim_sub for the sub claim). This means that we can very easily proxy the information contained within the JWT to the API endpoint without needing to implement JWT processing in the API itself.
This configuration example shows some of the advanced capabilities.
log_format jwt '$remote_addr - $remote_user [$time_local] "$request" '
               '$status $body_bytes_sent "$http_referer" "$http_user_agent" '
               '$jwt_header_alg $jwt_claim_sub';

limit_req_zone $jwt_claim_sub zone=10rps_per_client:1m rate=10r/s;

server {
    listen 80;

    location /products/ {
        auth_jwt "Products API";
        auth_jwt_key_file conf/api_secret.jwk;

        limit_req zone=10rps_per_client;

        proxy_pass http://api_server;
        proxy_set_header API-Client $jwt_claim_sub;

        access_log /var/log/nginx/access_jwt.log jwt;
    }
}
The log_format directive defines a new format called jwt which extends the common log format with two additional fields, $jwt_header_alg and $jwt_claim_sub. Within the location block, we use the access_log directive to write logs with the values obtained from the validated JWT.
In this example, we’re also using claim-based variables to provide API rate limiting per API client, instead of per IP address. This is particularly useful when multiple API clients are embedded in a single portal and cannot be differentiated by IP address. The limit_req_zone directive uses the JWT sub claim as the key for calculating rate limits, which are then applied to the location block by including the limit_req directive.
Finally, we provide the JWT subject as a new HTTP header when the request is proxied to the API endpoint. The proxy_set_header directive adds an HTTP header called API‑Client which the API endpoint can easily consume. Therefore the API endpoint does not need to implement any JWT processing logic. This becomes increasingly valuable as the number of API endpoints increases.
Revoking JWTs
From time to time it may be necessary to revoke or re‑issue an API client’s JWT. By combining a simple map block with the auth_jwt_require directive, we can deny access to an API client by marking its JWT as invalid until such time as the JWT’s expiration date (represented in the exp claim) is reached, at which point the map entry for that JWT can be safely removed.
In this example, we are setting the $jwt_status variable to 0 or 1 according to the value of the sub claim in the token (as captured in the $jwt_claim_sub variable). We then use the auth_jwt_require directive in the location block to additionally validate (or reject) the token. To be valid, the $jwt_status variable must not be empty, and not equal to 0 (zero).
map $jwt_claim_sub $jwt_status {
    "quotes" 0;
    "test"   0;
    default  1;
}

server {
    listen 80;

    location /products/ {
        auth_jwt "Products API";
        auth_jwt_key_file conf/api_secret.jwk;
        auth_jwt_require $jwt_status;

        proxy_pass http://api_server;
    }
}
Summary
JSON Web Tokens are well suited to providing authenticated access to APIs. For the API client developer they are just as easy to handle as traditional API keys, and they provide the API gateway with identity information that otherwise requires a database lookup. NGINX Plus provides support for JWT authentication and sophisticated configuration solutions based on the information contained within the JWT itself. Combined with other API gateway capabilities, NGINX Plus enables you to deliver API‑based services with speed, reliability, scalability, and security.
To try JWT with NGINX Plus for yourself, start your free 30-day trial today or contact us to discuss your use cases.