Like most of you, my earliest experiences as a developer included diving deep into thick books with beautifully designed woodcut illustrations of animals on the cover. The O’Reilly guides to our favorite software tools are as much a part of coming up in technology as caffeine‑fueled nights and the euphoric rush of finally solving a tough technical challenge. For anyone who writes software, having O’Reilly publish a book about your creation is a true milestone. We are incredibly proud to announce that NGINX is officially joining those elite ranks with the release of O’Reilly’s NGINX: A Practical Guide to High Performance.
When Igor Sysoev created NGINX a decade ago, he did not set out to create a software project that would be used worldwide. Back then, the problem of making applications fast and reliable was keeping developers and site owners up late at night, just as it still does for many today. While working at Rambler (a Russian search engine and web portal) in 2002, Igor worked to crack the C10K problem: reaching 10,000 simultaneous connections to a single web server. NGINX was the first web server software to make that possible, and it’s no surprise that rapid adoption followed after NGINX was open sourced in 2004.
Fast‑forward 10 years and the world‑wide adoption of NGINX is remarkable. We now power 24% of all web servers and nearly half of the world’s busiest sites. Some of the most innovative developers are using our software to invent the digital future, and we now have hundreds of customers deploying thousands of instances of NGINX Plus for load balancing and application delivery.
Helping you bring your applications to the world with performance, security, and scale is what drives us. We sincerely hope that the release of this book makes deploying and using NGINX even easier, and that millions more developers will learn how to deliver the kind of user experience their applications deserve.
NGINX will be at OSCON in Portland, OR, July 22–24. Join us and learn from the industry’s sharpest experts how to successfully incorporate open source into your workflow and projects.
The most innovative developers choose NGINX and NGINX Plus to deliver their apps to the world. At OSCON, you can meet the NGINX team and learn why NGINX is the secret heart of the modern web.
Attend Nick Shadrin’s talk on Thursday, July 23 @ 4:10 PM in room 255, Connecting and deploying microservices at scale with NGINX. Learn more about modern web architecture, how to scale and manage your deployment from initial start up to handling millions of users, and much more.
Check out Maxim Dounin and Roman Arutyunyan’s BoF session on Wednesday, July 22 @ 7:00 PM in room E142, NGINX tuning and roadmap. Get a chance to meet face to face with NGINX’s core developers, discuss your concepts and projects, and learn how NGINX can help you build a stronger infrastructure.
Visit the NGINX team at Booth #718 for some awesome giveaways. The winner of our OSCON Brain Teaser will take home the world’s fastest remote‑control car, the NGINX Race Supercar. This car goes from 0 to 100 mph in under 5 seconds! While you’re at the booth ask us about our NGINX+ pint glasses or how you can get your hands on our special limited‑edition NGINX Portland t-shirt. This t‑shirt is exclusively printed and limited, so don’t miss out.
Register for OSCON today with discount code Nginx25 and get 25% off the purchase of any regular OSCON passes.
When you configure client certificate verification or validation of upstream server certificates in NGINX, it uses the certificate verification process in OpenSSL. During the process, a client or server certificate is matched against a set of trusted root certificates you provide. If the process is subverted, a certificate might pass the test even if it’s not signed by a trusted root certificate. The implication is that an attacker might potentially impersonate another user or an upstream server.
Does This Vulnerability Affect Me?
If you have configured certificate verification in NGINX and are using a vulnerable version of OpenSSL, you need to upgrade your OpenSSL installation.
To check the version of OpenSSL used by NGINX, run the nginx‑V command:
$ nginx -V
nginx version: nginx/1.9.3
built by clang 3.4.1 (tags/RELEASE_34/dot1-final 208032) 20140512
built with OpenSSL 1.0.2a 19 Mar 2015 (running with OpenSSL 1.0.2c 12 Jun 2015)
If the runningwithOpenSSL statement specifies a vulnerable version (1.0.2c, 1.0.2b, 1.0.1n, or 1.0.1o), you need to upgrade. In versions of NGINX prior to 1.9.0, nginx‑V doesn’t report the OpenSSL version, so you can use the instructions in this article.
Upgrading OpenSSL
NGINX typically uses the version of OpenSSL shipped with your operating system. Because the vulnerability was introduced very recently (June 2015), most released operating system versions are not affected. Follow your OS vendor’s instructions to update if required:
CentOS – Not affected because based on upstream Red Hat versions
After upgrading the operating system OpenSSL library, restart your NGINX software.
If you have compiled NGINX yourself, you might have linked statically against your own OpenSSL libraries, in which case updating the operating system libraries has no effect on the version NGINX is using.
The output from nginx‑V displays the compile‑time options you used, and the value in the runningwithOpenSSL field usually does not match the version of the library updated with the operating system (instead, it’s the one you linked against). In this case, you need to recompile NGINX and link against an updated version of OpenSSL to eliminate the vulnerability.
[column-group]
[column span=”2″]
We’re excited to bring NGINX Summit + Training to Raleigh, NC on Thursday, July 9! This event is for you if you want to learn more about how NGINX and NGINX Plus can boost the performance of your applications. Tickets are on sale now, and early‑bird pricing for training ends soon – reserve your spot today!
Get trained. The day kicks off with a half‑day, instructor‑led NGINX Fundamentals course, in which you’ll learn to install, configure, and maintain NGINX. This hands‑on workshop covers both NGINX Open Source and NGINX Plus, the extended and commercially supported product. Want to improve your NGINX skills? Then be sure to add this optional training to your registration.
[/column]
[column]
[/column]
[/column-group]
Learn from innovative technologists using NGINX. The second half of the day will feature an amazing lineup of guest speakers sharing tips and tricks for optimizing NGINX to maximize the performance and scale of your applications. We will have talks from:
Sarah Novotny (@sarahnovotny), NGINX Head of Developer Relations
Matt Yonkovit (@percona),VP of Professional Services at Percona
Paul Fleetwood (@PaceComm),DevOps Engineer at PACE
Nick Harvey (@NicksHarvey), Product Marketing Manager at OpenShift
Mark Imbriaco (@markimbriaco), Co‑founder & CEO of Operable, Inc.
Brian Gracely (@briangracely), Co‑Host of The Cloudcast
Enjoy face time with your peers and members of the NGINX team. Throughout the day (which wraps up with a social hour featuring free beer!), you’ll be able to network with other NGINX users, learning how they’re making the most of their applications with NGINX and NGINX Plus, and sharing your story. You’ll also get the chance to speak directly with members of the NGINX team and have your say about future features.
There are an amazing number of things that make NGINX special, and our community is the heart of them all. We hope to see you for the NGINX Summit + Training at The Stockroom in Raleigh on July 9!
A Distributed Denial‑of‑Service (DDoS) attack is an attempt to make a service, usually a website, unavailable by bombarding it with so much traffic from multiple machines that the server providing the service is no longer able to function correctly because of resource exhaustion.
Typically, the attacker tries to saturate a system with so many connections and requests that it is no longer able to accept new traffic, or becomes so slow that it is effectively unusable.
Application‑Layer DDoS Attack Characteristics
Application‑layer (Layer 7/HTTP) DDoS attacks are carried out by software programs (bots) that can be tailored to best exploit the vulnerabilities of specific systems. For example, for systems that don’t handle large numbers of concurrent connections well, merely opening a large number of connections and keeping them active by periodically sending a small amount of traffic can exhaust the system’s capacity for new connections. Other attacks can take the form of sending a large number of requests or very large requests. Because these attacks are carried out by bots rather than actual users, the attacker can easily open large numbers of connections and send large numbers of requests very rapidly.
Characteristics of DDoS attacks that can be used to help mitigate against them include the following (this is not meant to be an exhaustive list):
The traffic normally originates from a fixed set of IP addresses, belonging to the machines used to carry out the attack. As a result, each IP address is responsible for many more connections and requests than you would expect from a real user.
Note: It’s important not to assume that this traffic pattern always represents a DDoS attack. The use of forward proxies can also create this pattern, because the forward proxy server’s IP address is used as the client address for requests from all the real clients it serves. However, the number of connections and requests from a forward proxy is typically much lower than in a DDoS attack.
Because the traffic is generated by bots and is meant to overwhelm the server, the rate of traffic is much higher than a human user can generate.
The User-Agent header is sometimes set to a non‑standard value.
The Referer header is sometimes set to a value you can associate with the attack.
Using NGINX and NGINX Plus to Fight DDoS Attacks
NGINX and NGINX Plus have a number of features that – in conjunction with the characteristics of a DDoS attack mentioned above – can make them a valuable part of a DDoS attack mitigation solution. These features address a DDoS attack both by regulating the incoming traffic and by controlling the traffic as it is proxied to backend servers.
Inherent Protection of the NGINX Event‑Driven Architecture
NGINX is designed to be a “shock absorber” for your site or application. It has a non‑blocking, event‑driven architecture that copes with huge amounts of requests without a noticeable increase in resource utilization.
New requests from the network do not interrupt NGINX from processing ongoing requests, which means that NGINX has capacity available to apply the techniques described below which protect your site or application from attack.
You can limit the rate at which NGINX and NGINX Plus accept incoming requests to a value typical for real users. For example, you might decide that a real user accessing a login page can only make a request every 2 seconds. You can configure NGINX and NGINX Plus to allow a single client IP address to attempt to login only every 2 seconds (equivalent to 30 requests per minute):
The limit_req_zone directive configures a shared memory zone called one to store the state of requests for the specified key, in this case the client IP address ($binary_remote_addr). The limit_req directive in the location block for /login.html references the shared memory zone.
You can limit the number of connections that can be opened by a single client IP address, again to a value appropriate for real users. For example, you can allow each client IP address to open no more than 10 connections to the /store area of your website:
The limit_conn_zone directive configures a shared memory zone called addr to store requests for the specified key, in this case (as in the previous example) the client IP address, $binary_remote_addr. The limit_conn directive in the location block for /store references the shared memory zone and sets a maximum of 10 connections from each client IP address.
Closing Slow Connections
You can close connections that are writing data too infrequently, which can represent an attempt to keep connections open as long as possible (thus reducing the server’s ability to accept new connections). Slowloris is an example of this type of attack. The client_body_timeout directive controls how long NGINX waits between writes of the client body, and the client_header_timeout directive controls how long NGINX waits between writes of client headers. The default for both directives is 60 seconds. This example configures NGINX to wait no more than 5 seconds between writes from the client for either headers or body:
server {
    client_body_timeout 5s;
    client_header_timeout 5s;
    # ...
}
Denylisting IP Addresses
If you can identify the client IP addresses being used for an attack, you can denylist them with the deny directive so that NGINX and NGINX Plus do not accept their connections or requests. For example, if you have determined that the attacks are coming from the address range 123.123.123.1 through 123.123.123.16:
location / {
    deny 123.123.123.0/28;
    # ...
}
Or if you have determined that an attack is coming from client IP addresses 123.123.123.3, 123.123.123.5, and 123.123.123.7:
If access to your website or application is allowed only from one or more specific sets or ranges of client IP addresses, you can use the allow and deny directives together to allow only those addresses to access the site or application. For example, you can restrict access to only addresses in a specific local network:
Here, the deny all directive blocks all client IP addresses that are not in the range specified by the allow directive.
Using Caching to Smooth Traffic Spikes
You can configure NGINX and NGINX Plus to absorb much of the traffic spike that results from an attack, by enabling caching and setting certain caching parameters to offload requests from the backend. Some of the helpful settings are:
The updating parameter to the proxy_cache_use_stale directive tells NGINX that when it needs to fetch an update of a stale cached object, it should send just one request for the update, and continue to serve the stale object to clients who request it during the time it takes to receive the update from the backend server. When repeated requests for a certain file are part of an attack, this dramatically reduces the number of requests to the backend servers.
The key defined by the proxy_cache_key directive usually consists of embedded variables (the default key, $scheme$proxy_host$request_uri, has three variables). If the value includes the $query_string variable, then an attack that sends random query strings can cause excessive caching. We recommend that you don’t include the $query_string variable in the key unless you have a particular reason to do so.
Blocking Requests
You can configure NGINX or NGINX Plus to block several kinds of requests:
Requests to a specific URL that seems to be targeted
Requests in which the User-Agent header is set to a value that does not correspond to normal client traffic
Requests in which the Referer header is set to a value that can be associated with an attack
Requests in which other headers have values that can be associated with an attack
For example, if you determine that a DDoS attack is targeting the URL /foo.php you can block all requests for the page:
location /foo.php {
    deny all;
}
Or if you discover that DDoS attack requests have a User-Agent header value of foo or bar, you can block those requests.
The http_name variable references a request header, in the above example the User-Agent header. A similar approach can be used with other headers that have values that can be used to identify an attack.
Limiting the Connections to Backend Servers
An NGINX or NGINX Plus instance can usually handle many more simultaneous connections than the backend servers it is load balancing. With NGINX Plus, you can limit the number of connections to each backend server. For example, if you want to limit NGINX Plus to establishing no more than 200 connections to each of the two backend servers in the website upstream group:
upstream website {
    server 192.168.100.1:80 max_conns=200;
    server 192.168.100.2:80 max_conns=200;
    queue 10 timeout=30s;
}
The max_conns parameter applied to each server specifies the maximum number of connections that NGINX Plus opens to it. The queue directive limits the number of requests queued when all the servers in the upstream group have reached their connection limit, and the timeout parameter specifies how long to retain a request in the queue.
Dealing with Range‑Based Attacks
One method of attack is to send a Range header with a very large value, which can cause a buffer overflow. For an discussion of how to use NGINX and NGINX Plus to mitigate this type of attack in a sample case, see Using NGINX and NGINX Plus to Protect Against CVE‑2015‑1635.
Handling High Loads
DDoS attacks usually result in a high traffic load. For tips on tuning NGINX or NGINX Plus and the operating system to allow the system to handle higher loads, see Tuning NGINX for Performance.
Identifying a DDoS Attack
So far we have focused on what you can use NGINX and NGINX Plus to help alleviate the effects of a DDoS attack. But how can NGINX or NGINX Plus help you spot a DDoS attack? The NGINX Plus Status module provides detailed metrics about the traffic that is being load balanced to backend servers, which you can use to spot unusual traffic patterns. NGINX Plus comes with a status dashboard web page that graphically depicts the current state of the NGINX Plus system (see the example at demo.nginx.com). The same metrics are also available through an API, which you can use to feed the metrics into custom or third‑party monitoring systems where you can do historical trend analysis to spot abnormal patterns and enable alerting.
Summary
NGINX and NGINX Plus can be used as a valuable part of a DDoS mitigation solution, and NGINX Plus provides additional features for protecting against DDoS attacks and helping to identify when they are occurring.
Customers frequently ask us how they can use NGINX Plus and NGINX to secure protected resources or applications by authenticating the users who request them. Today we’re announcing a reference implementation of such an authentication system, and making it available in the NGINX, Inc. repository on GitHub. In this post we describe how the implementation works, how to install it, and how to use it as a model for your own authentication system.
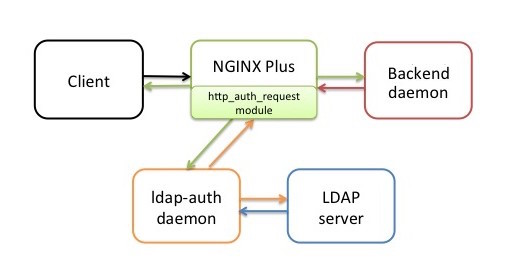
The solution takes advantage of the ngx_http_auth_request_module module in NGINX Plus and NGINX, which forwards authentication requests to an external service. In the reference implementation, that service is a daemon we call ldap‑auth. It’s written in Python and communicates with a Lightweight Directory Access Protocol (LDAP) authentication server – OpenLDAP by default, but we have tested the ldap‑auth daemon against default configurations of Microsoft® Windows® Server Active Directory as well (both the 2003 and 2012 versions).
The ldap‑auth daemon serves as a model for your own “connector” app, which you might write in other languages, deploy with different authentication systems, or both. The NGINX Professional Services team is available to assist with such adaptations.
Notes:
The reference implementation is not intended for production use, but only as a model for your own implementations.
For ease of reading, the rest of this article refers to NGINX Plus, but the reference implementation also works with NGINX Open Source. The prerequisite http_auth_request module is included in both NGINX Plus packages and prebuilt NGINX binaries.
How Authentication Works in the Reference Implementation
To perform authentication, the http_auth_request module makes an HTTP subrequest to the ldap‑auth daemon, which acts as intermediary and interprets the subrequest for the LDAP server – it uses HTTP for communication with NGINX Plus and the appropriate API for communication with the LDAP server.
We assume that if you’re interested in the reference implementation, you already have an application or other resources you want to protect by requiring authentication. To make it easier to test the reference implementation, however, we’re providing a sample backend daemon, also written in Python, which listens on port 9000. It can stand in for an actual HTTP application during testing, by prompting for user credentials and creating a cookie based on them.
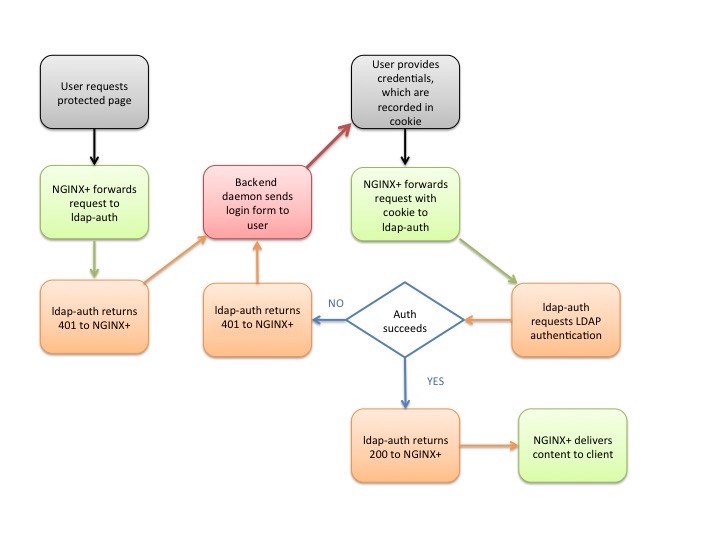
Here’s a step‑by‑step description of the authentication process in the reference implementation. The details are determined by settings in the nginx-ldap-auth.conf configuration file; see Configuring the Reference Implementation below. The flowchart below the steps summarizes the process.
A client sends an HTTP request for a protected resource hosted on a server for which NGINX Plus is acting as reverse proxy.
NGINX Plus (specifically, the http_auth_request module) forwards the request to the ldap‑auth daemon, which responds with HTTP code 401 because no credentials were provided.
NGINX Plus forwards the request to http://backend/login, which corresponds to the backend daemon. It writes the original request URI to the X-Target header of the forwarded request.
The backend daemon sends the client a login form (the form is defined in the Python code for the daemon). As configured by the error_page directive, NGINX sets the HTTP code on the login form to 200.
The user fills in the Username and Password fields on the form and clicks the Login button. Per the code in the form, the client generates an HTTP POST request directed to /login, which NGINX Plus forwards to the backend daemon.
The backend daemon constructs a string of the format username:password, applies Base64 encoding, generates a cookie called nginxauth with its value set to the encoded string, and sends the cookie to the client. It sets the httponly flag to prevent use of JavaScript to read or manipulate the cookie (protecting against the cross‑site scripting [XSS] vulnerability).
The client retransmits its original request (from Step 1), this time including the cookie in the Cookie field of the HTTP header. NGINX Plus forwards the request to the ldap‑auth daemon (as in Step 2).
The ldap‑auth daemon decodes the cookie, and sends the username and password to the LDAP server in an authentication request.
The next action depends on whether the LDAP server successfully authenticates the user:
If authentication succeeds, the ldap‑auth daemon sends HTTP code 200 to NGINX Plus. NGINX Plus requests the resource from the backend daemon. In the reference implementation, the backend daemon returns the following text:
Hello, world! Requested URL: URL
The nginx-ldap-auth.conf file includes directives for caching the results of the authentication attempt; to disable caching, see Caching below.
If authentication fails, the ldap‑auth daemon sends HTTP code 401 to NGINX Plus. NGINX Plus forwards the request to the backend daemon again (as in Step 3), and the process repeats.
Installing the Components
The NGINX Plus configuration file distributed with the reference implementation, nginx-ldap-auth.conf, configures all components other than the LDAP server (that is, NGINX Plus, the client, the ldap‑auth daemon, and the backend daemon) to run on the same host, which is adequate for testing purposes. The LDAP server can also run on that host during testing.
In an actual deployment, the backend application and authentication server typically each run on a separate host, with NGINX Plus on a third host. The ldap-auth daemon does not consume many resources in most situations, so it can run on the NGINX Plus host or another host of your choice.
If NGINX Plus is not already running, install it according to the instructions for your operating system.
If an LDAP server is not already running, install and configure one. By default the ldap‑auth daemon communicates with OpenLDAP, but Microsoft Windows Active Directory 2003 and 2012 are also supported.
Make note of the values you set for the Base DN, Bind DN, and Bind password. You will put them in the NGINX configuration file in Configuring the Reference Implementation.
On the host where the ldap‑auth daemon is to run, install the following additional software. We recommend using the versions that are distributed with the operating system, instead of downloading the software from an open source repository.
Python version 2. Version 3 is not supported.
The Python LDAP module, python‑ldap (created by the python-ldap.org open source project).
Copy the following files from your repository clone to the indicated hosts:
nginx-ldap-auth.conf – NGINX Plus configuration file that includes the minimal set of directives for testing the reference implementation. Install on the NGINX Plus host (in the /etc/nginx/conf.d directory if using the conventional configuration scheme). To avoid configuration conflicts, remember to move or rename any default configuration files installed with NGINX Plus.
nginx-ldap-auth-daemon.py – Python code for the ldap‑auth daemon. Install on the host of your choice.
nginx-ldap-auth-daemon-ctl.sh – Sample shell script for starting and stopping the daemon. Install on the same host as the ldap‑auth daemon.
backend-sample-app.py – Python code for the daemon that during testing stands in for a backend application server. Install on the host of your choice.
Modify the NGINX Plus configuration file as described in Configuring the Reference Implementation below. After making your changes, run the nginx-t command to verify that the file is syntactically valid.
root# nginx -t
nginx: the configuration file /etc/nginx/nginx.conf syntax is ok
nginx: configuration file /etc/nginx/nginx.conf test is successful
Start NGINX Plus. If NGINX Plus is already running, run the following command to reload the configuration file:
root# nginx -s reload
Run the following commands on the appropriate hosts to start the ldap‑auth daemon and the backend daemon.
Use a web browser to access http://nginx-server-address:8081. Verify that the browser presents the authentication form. After you fill out the form and submit it, verify that the server returns the expected response to valid credentials. As noted above, the backend daemon returns the following text:
Hello, world! Requested URL: URL
Configuring the Reference Implementation
Make the following changes in the nginx-ldap-auth.conf file. Some are required and some optional, as indicated.
LDAP Server Settings
As implemented in nginx-ldap-auth-daemon.py, the ldap‑auth daemon communicates with an OpenLDAP server, passing in parameters to specify which user account to authenticate. To eliminate the need to modify the Python code, the nginx-ldap-auth.conf file contains proxy_set_header directives that set values in the HTTP header that are then used to set the parameters. The following table maps the parameters and headers.
LDAP Parameter
HTTP Header
basedn
X-Ldap-BaseDN
binddn
X-Ldap-BindDN
bindpasswd
X-Ldap-BindPass
cookiename
X-CookieName
realm
X-Ldap-Realm
template
X-Ldap-Template
url
X-Ldap-URL
(Required) In the following directives, replace the values in bold with the correct values for your LDAP server deployment. Note in particular that the nginx-ldap-auth.conf file uses the well‑known port for LDAPS, 636. If you change the port to 389 (the well‑known port for LDAP) or another LDAP port, remember also to change the protocol name from ldaps to ldap.
# URL and port for connecting to the LDAP server
proxy_set_header X-Ldap-URL "ldaps://example.com:636";

# Base DN
proxy_set_header X-Ldap-BaseDN "cn=Users,dc=test,dc=local";

# Bind DN
proxy_set_header X-Ldap-BindDN "cn=root,dc=test,dc=local";

# Bind password
proxy_set_header X-Ldap-BindPass "secret";
(Required if using Active Directory instead of OpenLDAP) Uncomment the following directive as shown:
(Optional) The reference implementation uses cookie‑based authentication. If you are using HTTP basic authentication instead, comment out the following directives as shown:
(Optional) If you want to change the value for the template parameter that the ldap‑auth daemon passes to the OpenLDAP server by default, uncomment the following directive as shown, and change the value:
If the client is not running on the same host as NGINX Plus, change the IP address in this listen directive (or remove the address completely to accept traffic from any client). You can also change the port on which NGINX listens from 8081 if you wish:
server {
    listen 127.0.0.1:8081;
    # ...
 }
Caching
The nginx-ldap-auth.conf file enables caching of both data and credentials. Optionally, you can change the following settings:
The proxy_cache_path directive in the http configuration block creates a local disk directory called cache, and allocates 10 MB in shared memory for a zone called auth_cache, where metadata is stored.
proxy_cache_path cache/ keys_zone=auth_cache:10m;
If you change the name of the shared memory zone, you must also change it in the proxy_cache directive (in the location block that directs traffic to the ldap‑auth daemon).
The proxy_cache_valid directive (in the same location block as proxy_cache) specifies that cached responses marked with HTTP code 200 or 403 are valid for 10 minutes.
To disable caching, comment out these three directives plus the proxy_cache_key directive.
Customizing the Authentication System
As mentioned above, you can use the ldap‑auth daemon as a model for your own application that accepts requests from the http_auth_request module. If writing an app in Python to communicate with a different (non‑LDAP) type of authentication server, write a new authentication‑handler class to replace LDAPAuthHandler in the nginx-ldap-auth-daemon.py script.
A Note about Security
The backend daemon uses Base64 encoding on the username and password in the cookie. Base64 is a very weak form of scrambling, rendering the credentials vulnerable to extraction and misuse. For authentication to serve any real purpose, you need to use more sophisticated encryption in your backend application.
Since NGINX, Inc. was founded in 2011, our Professional Services team has helped some of the busiest websites in the world install, configure, and tune NGINX Plus. Now we’re introducing Professional Services packages that feature the types of service engagements our customers request most, so you can get the expert advice and assistance you need even faster.
And when we say expert, we mean it. The Professional Services team works directly with the developers who write and maintain NGINX and NGINX Plus. You get access to engineers who specialize in total application delivery, including load balancing, content caching, media streaming, and web serving.
The packages cover both new and existing deployments.
Quick Start Package
Designed for customers who are new to NGINX and NGINX Plus, this package includes expert assistance as you install, configure, and deploy NGINX Plus at your site for the first time. The Professional Services team reviews your requirements and works with you to develop an optimally tuned custom configuration.
Checkup Package
This package is for customers who want to fine tune an existing NGINX Plus environment or are upgrading from NGINX Open Source to NGINX Plus. The NGINX Professional Services team reviews your current configuration and operating system environment, and makes recommendations for optimizing your NGINX Plus configuration.
High Availability Package
This package is for customers who want to make their NGINX Plus environment highly available by deploying an active‑passive pair of NGINX fPlus instances using the solution (based on keepalived) that was introduced in NGINX Plus Release 6 (R6).
Getting Exactly the Help You Need
If the new packages don’t quite cover your situation, we are always happy to develop a custom service plan just for you. Either way, when you engage the NGINX Professional Services team you can be sure that your NGINX and NGINX Plus deployment is as good as it gets.
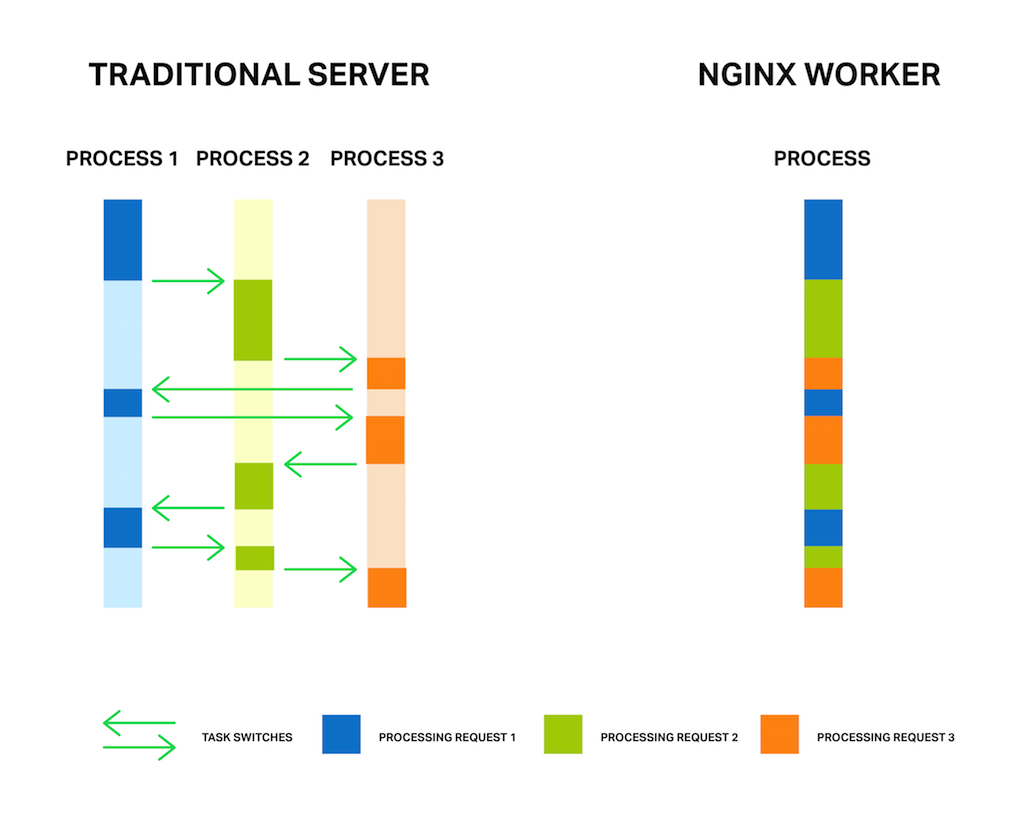
It’s well known that NGINX uses an asynchronous, event‑driven approach to handling connections. This means that instead of creating another dedicated process or thread for each request (like servers with a traditional architecture), it handles multiple connections and requests in one worker process. To achieve this, NGINX works with sockets in a non‑blocking mode and uses efficient methods such as epoll and kqueue.
Because the number of full‑weight processes is small (usually only one per CPU core) and constant, much less memory is consumed and CPU cycles aren’t wasted on task switching. The advantages of such an approach are well‑known through the example of NGINX itself. It successfully handles millions of simultaneous requests and scales very well.
Each process consumes additional memory, and each switch between them consumes CPU cycles and trashes L‑caches
But the asynchronous, event‑driven approach still has a problem. Or, as I like to think of it, an “enemy”. And the name of the enemy is: blocking. Unfortunately, many third‑party modules use blocking calls, and users (and sometimes even the developers of the modules) aren’t aware of the drawbacks. Blocking operations can ruin NGINX performance and must be avoided at all costs.
Even in the current official NGINX code it’s not possible to avoid blocking operations in every case, and to solve this problem the new “thread pools” mechanism was implemented in NGINX version 1.7.11 and NGINX Plus Release 7. What it is and how it supposed to be used, we will cover later. Now let’s meet face to face with our enemy.
First, for better understanding of the problem a few words about how NGINX works.
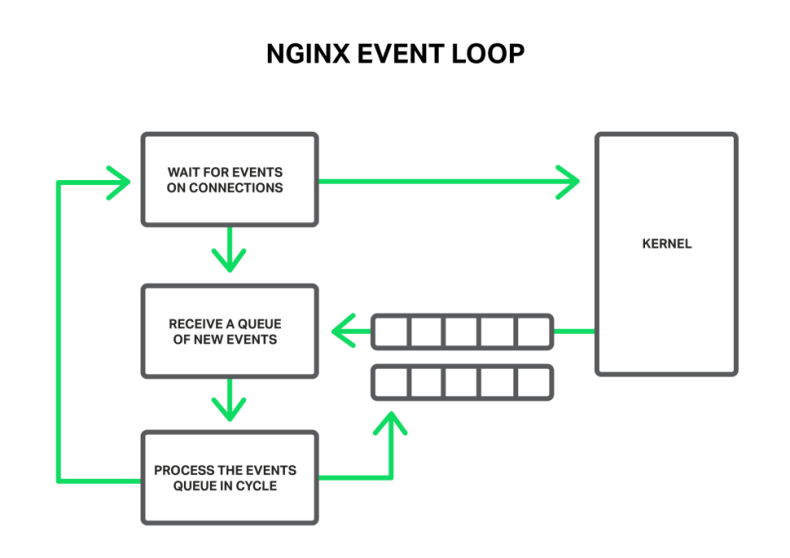
In general, NGINX is an event handler, a controller that receives information from the kernel about all events occurring on connections and then gives commands to the operating system about what to do. In fact, NGINX does all the hard work by orchestrating the operating system, while the operating system does the routine work of reading and sending bytes. So it’s very important for NGINX to respond fast and in a timely manner.
The worker process listens for and processes events from the kernel
The events can be timeouts, notifications about sockets ready to read or to write, or notifications about an error that occurred. NGINX receives a bunch of events and then processes them one by one, doing the necessary actions. Thus all the processing is done in a simple loop over a queue in one thread. NGINX dequeues an event from the queue and then reacts to it by, for example, writing or reading a socket. In most cases, this is extremely quick (perhaps just requiring a few CPU cycles to copy some data in memory) and NGINX proceeds through all of the events in the queue in an instant.
All processing is done in a simple loop by one thread
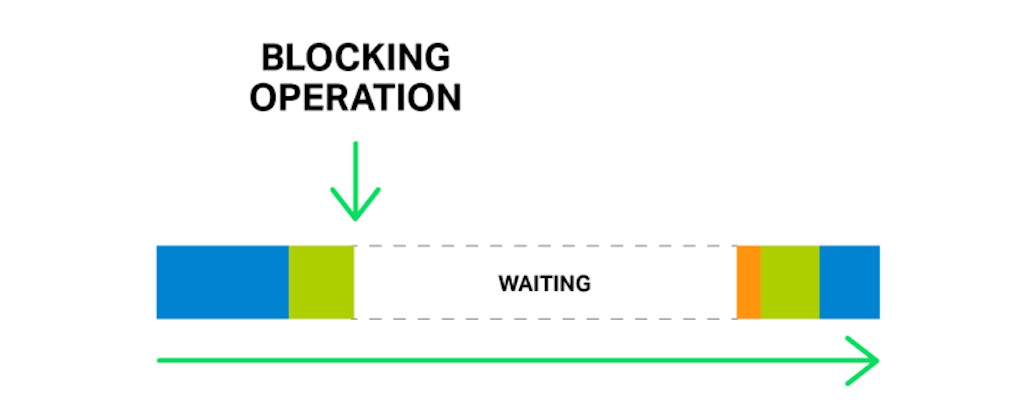
But what will happen if some long and heavy operation has occurred? The whole cycle of event processing will get stuck waiting for this operation to finish.
So, by saying “a blocking operation” we mean any operation that stops the cycle of handling events for a significant amount of time. Operations can be blocking for various reasons. For example, NGINX might be busy with lengthy, CPU‑intensive processing, or it might have to wait to access a resource (such as a hard drive, or a mutex or library function call that gets responses from a database in a synchronous manner, etc.). The key point is that while processing such operations, the worker process cannot do anything else and cannot handle other events, even if there are more system resources available and some events in the queue could utilize those resources.
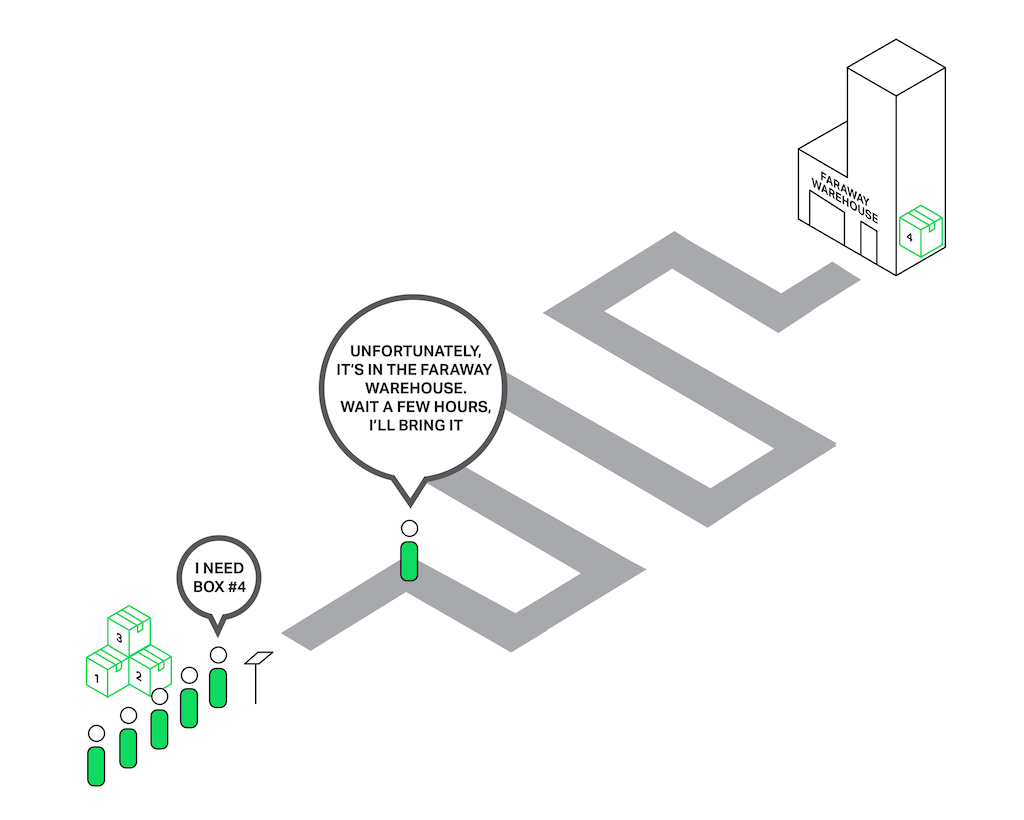
Imagine a salesperson in a store with a long queue in front of him. The first guy in the queue asks for something that is not in the store but is in the warehouse. The salesperson goes to the warehouse to deliver the goods. Now the entire queue must wait a couple of hours for this delivery and everyone in the queue is unhappy. Can you imagine the reaction of the people? The waiting time of every person in the queue is increased by these hours, but the items they intend to buy might be right there in the shop.
Everyone in the queue has to wait for the first person’s order
Nearly the same situation happens with NGINX when it asks to read a file that isn’t cached in memory, but needs to be read from disk. Hard drives are slow (especially the spinning ones), and while the other requests waiting in the queue might not need access to the drive, they are forced to wait anyway. As a result, latencies increase and system resources are not fully utilized.
Just one blocking operation can delay all following operations for a significant time
Some operating systems provide an asynchronous interface for reading and sending files and NGINX can use this interface (see the aio directive). A good example here is FreeBSD. Unfortunately, we can’t say the same about Linux. Although Linux provides a kind of asynchronous interface for reading files, it has a couple of significant drawbacks. One of them is alignment requirements for file access and buffers, but NGINX handles that well. But the second problem is worse. The asynchronous interface requires the O_DIRECT flag to be set on the file descriptor, which means that any access to the file will bypass the cache in memory and increase load on the hard disks. That definitely doesn’t make it optimal for many cases.
To solve this problem in particular, thread pools were introduced in NGINX 1.7.11 and NGINX Plus Release 7.
Now let’s dive into what thread pools are about and how they work.
Thread Pools
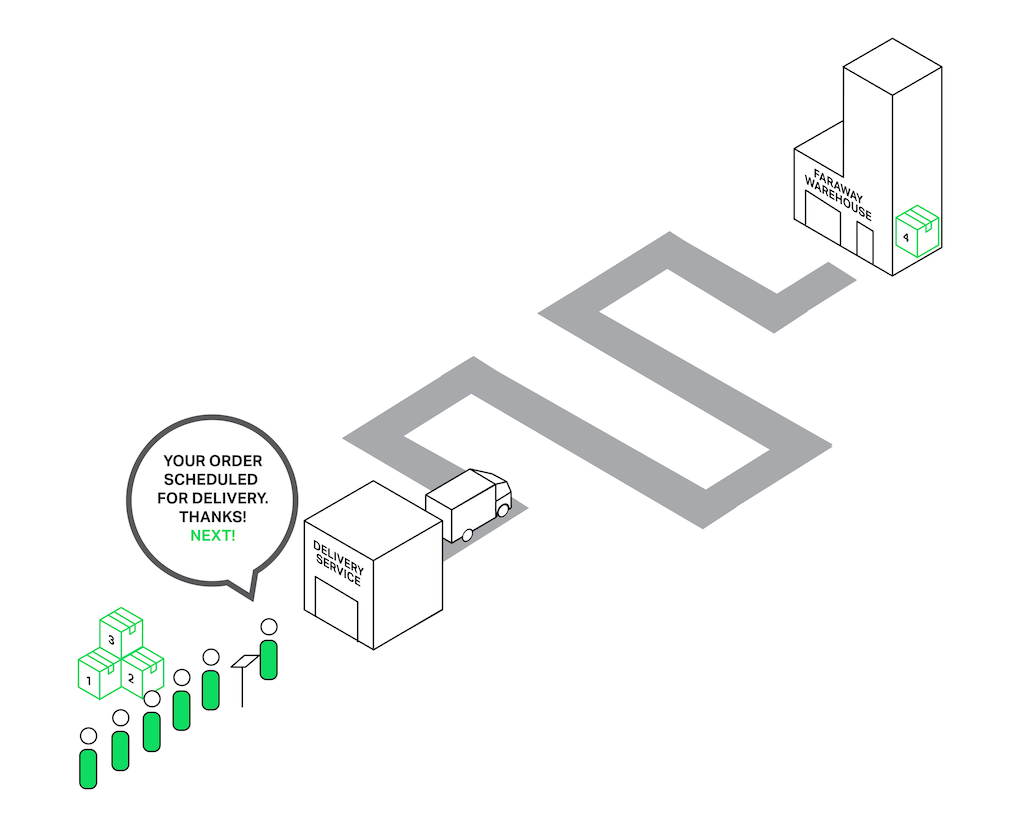
Let’s return to our poor sales assistant who delivers goods from a faraway warehouse. But he has become smarter (or maybe he became smarter after being beaten by the crowd of angry clients?) and hired a delivery service. Now when somebody asks for something from the faraway warehouse, instead of going to the warehouse himself, he just drops an order to a delivery service and they will handle the order while our sales assistant will continue serving other customers. Thus only those clients whose goods aren’t in the store are waiting for delivery, while others can be served immediately.
Passing an order to the delivery service unblocks the queue
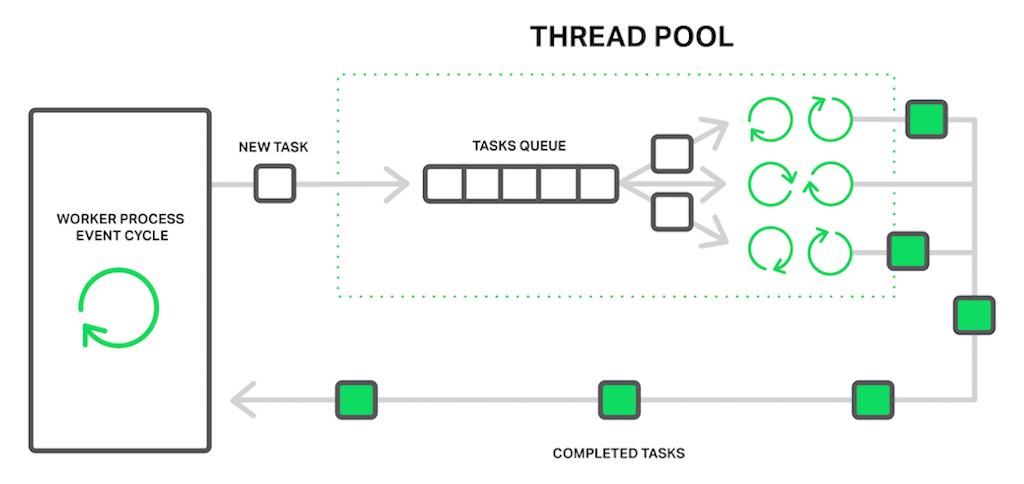
In terms of NGINX, the thread pool is performing the functions of the delivery service. It consists of a task queue and a number of threads that handle the queue. When a worker process needs to do a potentially long operation, instead of processing the operation by itself it puts a task in the pool’s queue, from which it can be taken and processed by any free thread.
The worker process offloads blocking operations to the thread pool
It seems then we have another queue. Right. But in this case the queue is limited by a specific resource. We can’t read from a drive faster than the drive is capable of producing data. Now at least the drive doesn’t delay processing of other events and only the requests that need to access files are waiting.
The “reading from disk” operation is often used as the most common example of a blocking operation, but actually the thread pools implementation in NGINX can be used for any tasks that aren’t appropriate to process in the main working cycle.
At the moment, offloading to thread pools is implemented only for three essential operations: the read() syscall on most operating systems, sendfile() on Linux, and aio_write() on Linux which is used when writing some temporary files such as those for the cache. We will continue to test and benchmark the implementation, and we may offload other operations to the thread pools in future releases if there’s a clear benefit.
It’s time to move from theory to practice. To demonstrate the effect of using thread pools we are going to perform a synthetic benchmark that simulates the worst mix of blocking and nonblocking operations.
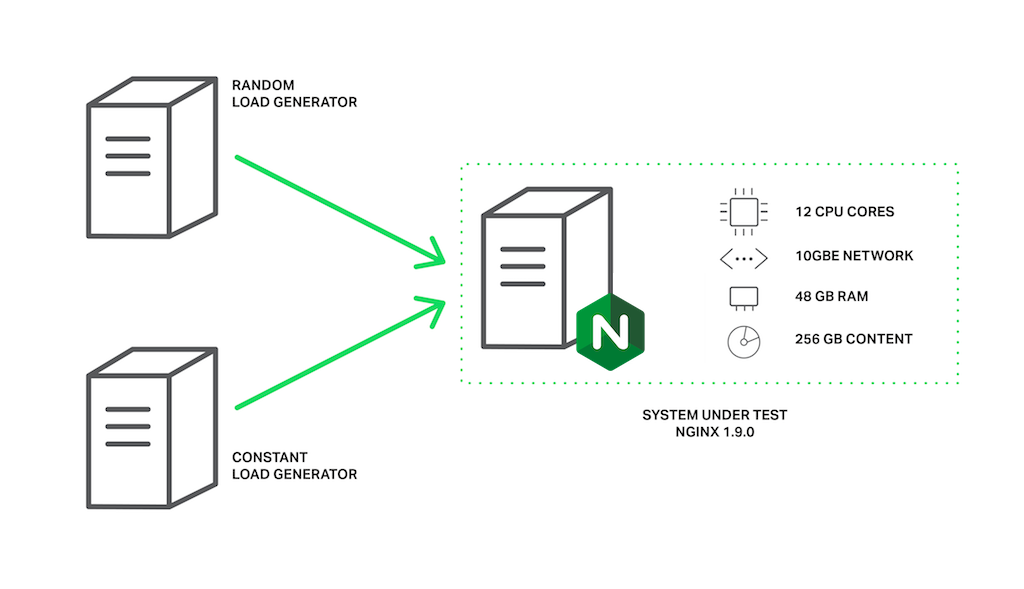
It requires a data set that is guaranteed not to fit in memory. On a machine with 48 GB of RAM, we have generated 256 GB of random data in 4‑MB files, and then have configured NGINX 1.9.0 to serve it.
As you can see, to achieve better performance some tuning was done: logging and accept_mutex were disabled, sendfile was enabled, and sendfile_max_chunk was set. The last directive can reduce the maximum time spent in blocking sendfile() calls, since NGINX won’t try to send the whole file at once, but will do it in 512‑KB chunks.
The machine has two Intel Xeon E5645 (12 cores, 24 HT‑threads in total) processors and a 10‑Gbps network interface. The disk subsystem is represented by four Western Digital WD1003FBYX hard drives arranged in a RAID10 array. All of this hardware is powered by Ubuntu Server 14.04.1 LTS.
Configuration of load generators and NGINX for the benchmark
The clients are represented by two machines with the same specifications. On one of these machines, wrk creates load using a Lua script. The script requests files from our server in a random order using 200 parallel connections, and each request is likely to result in a cache miss and a blocking read from disk. Let’s call this load the random load.
On the second client machine we will run another copy of wrk that will request the same file multiple times using 50 parallel connections. Since this file will be frequently accessed, it will remain in memory all the time. In normal circumstances, NGINX would serve these requests very quickly, but performance will fall if the worker processes are blocked by other requests. Let’s call this load the constant load.
The performance will be measured by monitoring throughput of the server machine using ifstat and by obtaining wrk results from the second client.
Now, the first run without thread pools does not give us very exciting results:
As you can see, with this configuration the server is able to produce about 1 Gbps of traffic in total. In the output from top, we can see that all of worker processes spend most of the time in blocking I/O (they are in a D state):
In this case the throughput is limited by the disk subsystem, while the CPU is idle most of the time. The results from wrk are also very low:
Running 1m test @ http://192.0.2.1:8000/1/1/1
  12 threads and 50 connections
  Thread Stats   Avg    Stdev     Max  +/- Stdev
    Latency     7.42s  5.31s   24.41s   74.73%
    Req/Sec     0.15    0.36     1.00    84.62%
  488 requests in 1.01m, 2.01GB read
Requests/sec:      8.08
Transfer/sec:     34.07MB
And remember, this is for the file that should be served from memory! The excessively large latencies are because all the worker processes are busy with reading files from the drives to serve the random load created by 200 connections from the first client, and cannot handle our requests in good time.
It’s time to put our thread pools in play. For this we just add the aiothreads directive to the location block:
Now our server produces 9.5 Gbps, compared to ~1 Gbps without thread pools!
It probably could produce even more, but it has already reached the practical maximum network capacity, so in this test NGINX is limited by the network interface. The worker processes spend most of the time just sleeping and waiting for new events (they are in S state in top):
Running 1m test @ http://192.0.2.1:8000/1/1/1
  12 threads and 50 connections
  Thread Stats   Avg      Stdev     Max  +/- Stdev
    Latency   226.32ms  392.76ms   1.72s   93.48%
    Req/Sec    20.02     10.84    59.00    65.91%
  15045 requests in 1.00m, 58.86GB read
Requests/sec:    250.57
Transfer/sec:      0.98GB
The average time to serve a 4‑MB file has been reduced from 7.42 seconds to 226.32 milliseconds (33 times less), and the number of requests per second has increased by 31 times (250 vs 8)!
The explanation is that our requests no longer wait in the events queue for processing while worker processes are blocked on reading, but are handled by free threads. As long as the disk subsystem is doing its job as best it can serving our random load from the first client machine, NGINX uses the rest of the CPU resources and network capacity to serve requests of the second client from memory.
Still Not a Silver Bullet
After all our fears about blocking operations and some exciting results, probably most of you already are going to configure thread pools on your servers. Don’t hurry.
The truth is that fortunately most read and send file operations do not deal with slow hard drives. If you have enough RAM to store the data set, then an operating system will be clever enough to cache frequently used files in a so‑called “page cache”.
The page cache works pretty well and allows NGINX to demonstrate great performance in almost all common use cases. Reading from the page cache is quite quick and no one can call such operations “blocking.” On the other hand, offloading to a thread pool has some overhead.
So if you have a reasonable amount of RAM and your working data set isn’t very big, then NGINX already works in the most optimal way without using thread pools.
Offloading read operations to the thread pool is a technique applicable to very specific tasks. It is most useful where the volume of frequently requested content doesn’t fit into the operating system’s VM cache. This might be the case with, for instance, a heavily loaded NGINX‑based streaming media server. This is the situation we’ve simulated in our benchmark.
It would be great if we could improve the offloading of read operations into thread pools. All we need is an efficient way to know if the needed file data is in memory or not, and only in the latter case should the reading operation be offloaded to a separate thread.
Turning back to our sales analogy, currently the salesman cannot know if the requested item is in the store and must either always pass all orders to the delivery service or always handle them himself.
The culprit is that operating systems are missing this feature. The first attempts to add it to Linux as the fincore() syscall were in 2010 but that didn’t happen. Later there were a number of attempts to implement it as a new preadv2() syscall with the RWF_NONBLOCK flag (see Nonblocking buffered file read operations and Asynchronous buffered read operations at LWN.net for details). The fate of all these patches is still unclear. The sad point here is that it seems the main reason why these patches haven’t been accepted yet to the kernel is continuous bikeshedding.
On the other hand, users of FreeBSD don’t need to worry at all. FreeBSD already has a sufficiently good asynchronous interface for reading files, which you should use instead of thread pools.
Configuring Thread Pools
So if you are sure that you can get some benefit out of using thread pools in your use case, then it’s time to dive deep into configuration.
The configuration is quite easy and flexible. The first thing you should have is NGINX version 1.7.11 or later, compiled with the --with-threads argument to the configure command. NGINX Plus users need Release 7 or later. In the simplest case, the configuration looks very plain. All you need is to include the aiothreads directive in the appropriate context:
# in the 'http', 'server', or 'location' context
aio threads;
This is the minimal possible configuration of thread pools. In fact, it’s a short version of the following configuration:
# in the 'main' context
thread_pool default threads=32 max_queue=65536;

# in the 'http', 'server', or 'location' context
aio threads=default;
It defines a thread pool called default with 32 working threads and a maximum length for the task queue of 65536 tasks. If the task queue is overloaded, NGINX rejects the request and logs this error:
thread pool "NAME" queue overflow: N tasks waiting
The error means it’s possible that the threads aren’t able to handle the work as quickly as it is added to the queue. You can try increasing the maximum queue size, but if that doesn’t help, then it indicates that your system is not capable of serving so many requests.
As you already noticed, with the thread_pool directive you can configure the number of threads, the maximum length of the queue, and the name of a specific thread pool. The last implies that you can configure several independent thread pools and use them in different places of your configuration file to serve different purposes:
# in the 'main' context
thread_pool one threads=128 max_queue=0;
thread_pool two threads=32;

http {
    server {
        location /one {
            aio threads=one;
        }

        location /two {
            aio threads=two;
        }

    }
    # ...
}
If the max_queue parameter isn’t specified, the value 65536 is used by default. As shown, it’s possible to set max_queue to zero. In this case the thread pool will only be able to handle as many tasks as there are threads configured; no tasks will wait in the queue.
Now let’s imagine you have a server with three hard drives and you want this server to work as a “caching proxy” that caches all responses from your backends. The expected amount of cached data far exceeds the available RAM. It’s actually a caching node for your personal CDN. Of course in this case the most important thing is to achieve maximum performance from the drives.
One of your options is to configure a RAID array. This approach has its pros and cons. Now with NGINX you can take another one:
# We assume that each of the hard drives is mounted on one of these directories:
# /mnt/disk1, /mnt/disk2, or /mnt/disk3

# in the 'main' context
thread_pool pool_1 threads=16;
thread_pool pool_2 threads=16;
thread_pool pool_3 threads=16;

http {
    proxy_cache_path /mnt/disk1 levels=1:2 keys_zone=cache_1:256m max_size=1024G
                     use_temp_path=off;
    proxy_cache_path /mnt/disk2 levels=1:2 keys_zone=cache_2:256m max_size=1024G
                     use_temp_path=off;
    proxy_cache_path /mnt/disk3 levels=1:2 keys_zone=cache_3:256m max_size=1024G
                     use_temp_path=off;

    split_clients $request_uri $disk {
        33.3%     1;
        33.3%     2;
        *         3;
    }

    server {
        # ...
        location / {
            proxy_pass http://backend;
            proxy_cache_key $request_uri;
            proxy_cache cache_$disk;
            aio threads=pool_$disk;
            sendfile on;
        }
    }
}
In this configuration, the thread_pool directives define a dedicated, independent thread pool for each disk, and the proxy_cache_path directives define an dedicated, independent cache on each disk.
The split_clients module is used for load balancing between the caches (and as a result between the disks), which perfectly fits this task.
The use_temp_path=off parameter to the proxy_cache_path directive instructs NGINX to save temporary files into the same directories where the corresponding cache data is located. It is needed to avoid copying response data between the hard drives when updating our caches.
All this together allows us to get maximum performance out of the current disk subsystem, because NGINX through separate thread pools interacts with the drives in parallel and independently. Each of the drives is served by 16 independent threads with a dedicated task queue for reading and sending files.
I bet your clients like this custom‑tailored approach. Be sure that your hard drives like it too.
This example is a good demonstration of how flexibly NGINX can be tuned specifically for your hardware. It’s like you are giving instructions to NGINX about the best way to interact with the machine and your data set. And by fine‑tuning NGINX in user space, you can ensure that your software, operating system, and hardware work together in the most optimal mode to utilize all the system resources as effectively as possible.
Conclusion
Summing up, thread pools is a great feature that pushes NGINX to new levels of performance by eliminating one of its well‑known and long‑time enemies – blocking – especially when we are speaking about really large volumes of content.
And there is even more to come. As previously mentioned, this brand‑new interface potentially allows offloading of any long and blocking operation without any loss of performance. NGINX opens up new horizons in terms of having a mass of new modules and functionality. Lots of popular libraries still do not provide an asynchronous nonblocking interface, which previously made them incompatible with NGINX. We may spend a lot of time and resources on developing our own nonblocking prototype of some library, but will it always be worth the effort? Now, with thread pools on board, it is possible to use such libraries relatively easily, making such modules without an impact on performance.
NGINX and NGINX Plus can be used to load balance IBM WebSphere application servers. With NGINX and NGINX Plus you can handle a larger volume of users while providing an overall faster and more consistent user experience for your WebSphere application.
To help customers get the most out of their WebSphere deployments, IBM and NGINX, Inc. have published a new deployment guide, Using NGINX to Load Balance WebSphere. This guide details how NGINX and NGINX Plus can be utilized as a load balancer and application delivery controller for WebSphere.
Why NGINX?
IBM WebSphere application servers typically use the IBM HTTP Server (IHS) for application delivery. IHS uses a thread‑per‑connection architecture where a thread is dedicated to each connection until completion. Under low or medium load this performs well; however, under heavy load or during a DoS attack the problems with this architecture begin to surface. For example, if there is a large number of concurrent connections, the thread pool can get exhausted, delaying new connections indefinitely.
NGINX addresses these and other problems with the thread‑per‑connection approach. NGINX uses asynchronous operations to achieve high concurrency without the overhead of threads. This architecture allows NGINX to scale and handle a large number of simultaneous connections using a very small memory footprint. In addition to performance and scale, NGINX provides a number of benefits for WebSphere applications:
Event‑driven architecture – NGINX allows for much greater scalability and resilience to traffic spikes and DoS attacks.
SPDY and HTTP/2 support – NGINX supports the SPDY protocol, and plans to support HTTP/2 before the end of 2015. SPDY and HTTP/2 offer improved performance over HTTP/1.1.
Load balancing – NGINX offers a variety of load balancing algorithms allowing you to scale out your WebSphere applications as well as maintain high availability.
SSL termination – NGINX can terminate SSL connections to offload that work from the WebSphere application servers.
Caching – NGINX provides a highly capable cache for both static and dynamic content, with NGINX Plus adding even more features and capability.
And NGINX Plus, the commercial version of NGINX, provides additional enterprise‑ready features:
Proactive health checks – NGINX Plus proactively monitors WebSphere application servers and removes unhealthy servers from the pool.
Session persistence – NGINX Plus can leverage the JSESSIONID cookie to ensure session persistence.
Advanced load balancing – You can specify a connection limit to prevent WebSphere application servers from being overwhelmed. Connections past the limit are queued.
Live activity monitoring – NGINX Plus has a real‑time activity monitoring interface that provides key load and performance metrics.
How Do I Get Started?
To get started using NGINX Plus with WebSphere, download the new deployment guide developed by IBM and NGINX. It provides step-by-step instructions on how to configure our software to appropriately load balance and scale your WebSphere application. Configuration files for NGINX Open Source and NGINX Plus are also available so you don’t have to cut and paste from the deployment guide.
Experienced with WebSphere but new to NGINX Plus? Take advantage of our <free 30-day trial today or contact us to discuss your use cases, and see for yourself how NGINX Plus can boost the performance and manageability of your WebSphere application.
Today we issued the third release in the 1.9 mainline series of NGINX. This brings with it a few new features as well as bug fixes. The main focus of this release was improving the Stream module, initially added in NGINX 1.9.0 for generic TCP proxying and load balancing. Most notably:
Bug fix for SO_REUSEPORT socket option with TCP – The reuseport parameter to the listen directive now works correctly for TCP connections.
Configurable queue length for pending TCP and mail connections – The backlog parameter to the listen directive is now available in the stream and mail modules.
Access control based on IP address for TCP connections – With the new Stream Access module, you can restrict access to a TCP stream to specified IP addresses or address ranges.
The module goes through the list of IP addresses and ranges until a match is found and acts on it. For example, the following snippet allows TCP connection from any IP address in the 192.168.1.x range except 192.168.1.1, and blocks connections from any other IP address range:
In addition to those changes, the following new features have been added:
PROXY protocol support for TCP – The new proxy_protocol directive enables a header to be sent to the upstream server with details about the client connection.
Specify source IP address for connections to proxied servers – The new proxy_bind directive for TCP works like the existing HTTP directive: it makes connections to a proxied server originate from a specified local IP address.
REQUEST_SCHEME parameter – Support for the REQUEST_SCHEME parameter is added to the (HTTP) fastcgi_param directive and fastcgi.conf.
Configuration dumping – The new -T argument to the nginx command not only tests the configuration but gives much more verbose output including an entire dump of every configuration file parsed.
Bug fix for OCSP Stapling – Expired cached SSL handshake responses are no longer sent when the ssl_staplingon directive is configured. Thanks to Andrew Ayer for contributing a fix for this.
TCP load balancing is also available in NGINX Plus R6 with even more great features.
Updating NGINX
You can check your current NGINX version using nginx -v:
# nginx -v
nginx version: nginx/1.9.1
Updates for NGINX 1.9.x are available from nginx.org (sources and prebuilt binary packages). If you’ve subscribed to NGINX through another channel (such as your operating system distributor), you can expect it to sync with the 1.9.2 update shortly.
[Editor – The features described in this post are also available in NGINX Plus Release 7 and later.

 When Igor Sysoev created NGINX a decade ago, he did not set out to create a software project that would be used worldwide. Back then, the problem of making applications fast and reliable was keeping developers and site owners up late at night, just as it still does for many today. While working at Rambler (a Russian search engine and web portal) in 2002, Igor worked to crack the C10K problem: reaching 10,000 simultaneous connections to a single web server. NGINX was the first web server software to make that possible, and it’s no surprise that rapid adoption followed after NGINX was open sourced in 2004.